Sunday, July 28, 2013

Coffee Cake Inside Out


It's that time of the year when the plan is to have the entire clan for a dinner but that did not happen. My sisters and their kids could not make it. I was quite happy to have my bro H come down with his wife. So S&S, H&R, Dad n me, that's quite a good number for a celebration than just 2 or 4. So a rich buttery Coffee Cake with Coffee Mascarpone frosting was made.

It's been a hectic fortnight for me as my best friend's Dad is in hospital. We felt helpless many a times. All I could manage was just being with her. For a few days I did cook and pack lunch to take along but it got more difficult to make time.

That's when we found www.foodpanda.in very useful. Thru the week Dad was able to pick a local restaurant and order for food online. Instead of shouting into the phone an order that mostly gets goofed as the restaurants take it over the din in there, he was so happy with the ease of doing it on the net. Foodpanda hosts the entire menu from each restaurant and you can pick and choose your favorite dishes and place the order. What's good is you can either pay online or Cash on delivery. Depending on the proximity of the restaurant the delivery time varies from 30 mins to couple of hours. Through the week one can enjoy different tastes without getting bored.

Yesterday too we ordered the food from our neighbourhood outlet but I did make this cake. It's replete with intense flavor of coffee. Coffee on the inside, the sponge of course and Coffee Mascarpone frosting all the way on the outside too. A Nutella layer in the middle gave it some much desired gooeyness.

Here's the recipe...

Ingredients

For the sponge
200 gms all purpose flour / maida
200 gms Demerara sugar
150 gms Amul butter (if using unsalted butter and a large pinch of salt)
3 teaspoons Instant coffee dissolved in 1/2 cup water
3 teaspoons baking powder
1 cup chilled milk

For the frosting
100 gms mascarpone
75 gms sugar
2 teaspoons instant coffee

For sprinkles
1-2 teaspoons Instant coffee granules

In a large bowl cream together butter and sugar. In another bowl mix together flour and baking powder. 

Fold in the flour and baking powder mix into the creamed butter and sugar. Add the milk to loosen the batter. The batter should fall in folds.

Grease a tin and dust with flour. Pour the batter in the tin and bake at 180 deg Celsius for 40 mins. I used a 3 inch deep 8 inch oval tin for this cake. 

Cool completely and unmold onto a dish.
Slice the cake thru the middle and slather a generous layer of Nutella. You should have the Nutella layer sandwiched between the two coffee sponge layers.

Now beat together mascarpone, sugar and instant coffee. The bowl should be kept over ice cubes to keep the mascarpone chilled. Once soft peaks are formed scoop up the frosting and slather onto the cake.

Give the final touches to the cake by sprinkling the coffee granules along the edges. 

This cake has a really intense coffee flavor. My family loved it.


Thursday, June 20, 2013

Gingersnaps


Hi Friends

It's been a while since I posted. I was busy with my home renovation project, it's still not complete but let me post this recipe for good old world gingersnaps which I just made for my family to have with tea. 

The last 2 days were sunny here and now the rain is back. With weather like that you need to eat right, grab a gingersnap and experience what I am recommending here. 

This recipe is adapted from allrecipes.com. I have used jaggery instead of molasses. I skipped the cinnamon, why is the west so obsessed with it? gingersnaps can do without it. Isn't gimger the star spice here! I used Dalda for the fat. Ok don't scold me but certain things like gingersnaps taste goooood with it. Plus I never buy Dalda but right now that's what I found in my SIL's kitchen.

Well I'll let you mark it not so heart healthy. But you bet you can't say no to a still warm cookie that's oven fresh!

Ingredients

2 cups maida / all purpose flour
1 cup regular granulated sugar
1/4 cup jaggery
1/2 teaspoon salt
3/4 cup Dalda/ margarine
3 tablespoons fresh grated ginger
2-3 tablespoons milk
2 teaspoons baking powder
1/4 cup castor sugar for coating

In a large mixing bowl cream together the Dalda and 1 cup regular sugar. Add the jaggery, salt, milk and ginger to it and mix well. Finally add the maida and baking powder. Make a dough.

Divide the dough into 24 equal parts. Roll into balls and coat with castor sugar. Press down the balls and shape into a thickness you prefer. I made few really thin and they are the snappiest!

Bake at 200deg Celsius on convection mode. It took me 20 mins to bake 1/4 inch thick cookies, 6 at a  time in a 9 x 13 cookie tray.

The cookies will get a lovely golden color. If you want a shade darker bake for 5 mins more. This is a  picture clicked on the iPad will post better ones later, after my home is fully functional. Until then enjoy the Gingersnaps on a rainy day with a cup of chai as you wonder about the joys of nature and pitter patter.

Saturday, June 01, 2013

Colocassia Stems Koshimbir


When I was a kid, I would hate it if anyone made use of things like vegetable peels, stems etc. to create a new dish. To the point that I would avoid it and call the person miserly and turn my nose on it.

There was this aunt of mine who did it often. She used peels stems and everything to create yummy stuff. That's what I think now. Back then she was hated for being disciplinarian and making me eat those scraps of waste!

You will appreciate her ingenuity now. Whenever she made Alu vadi she also made this koshimbir. She would say when leaves are loved  why not the stalks. She taught me as a kid to peel the stalks of colocassia  with skill as she would sit me next to her as she slathered the Alu leaves with the sourish besan paste on the leaves. She would to engage me put a little of that paste on my lil palm and ask, does it taste good? Is the salt right? It made one feel so important. You were the one that could make or break the dish with your verdict! I would nod my head with all air of authority and tell her perfect as I make a circle with my thumb and fore finger. Else would say add more tamarind or spice. You know how lil connoisseur's are ;)

Meanwhile my smart aunt would have got done the peeling of the stalks by me. She would instruct. Hold the stalk, section it halfway thru its thickness and peel of the skin with the sections. The skin is waxy and when removed leaves behind a spongy stalk. The stalk when soaked in the curd is delicious.

Ingredients

1/2 peeled colocassia stalks sectioned into small bits
1 cup curd
1/4 teaspoon mustard
1/8 teaspoon asafoetida
1 teaspoon oil

Heat oil in a small vessel. Splutter mustard and asafoetida in the hot oil. Add the sectioned colocassia stalks in it. Cook till done. The stalks look pale once done. Add curd to it.

Let the flavours steep for 10 mins before you serve. 


Sunday, May 26, 2013

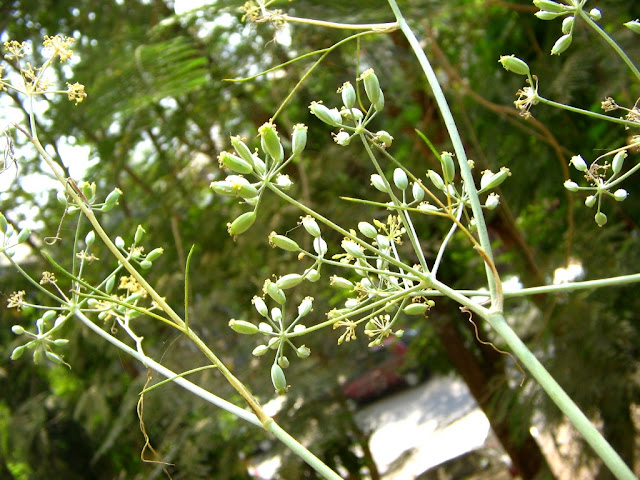
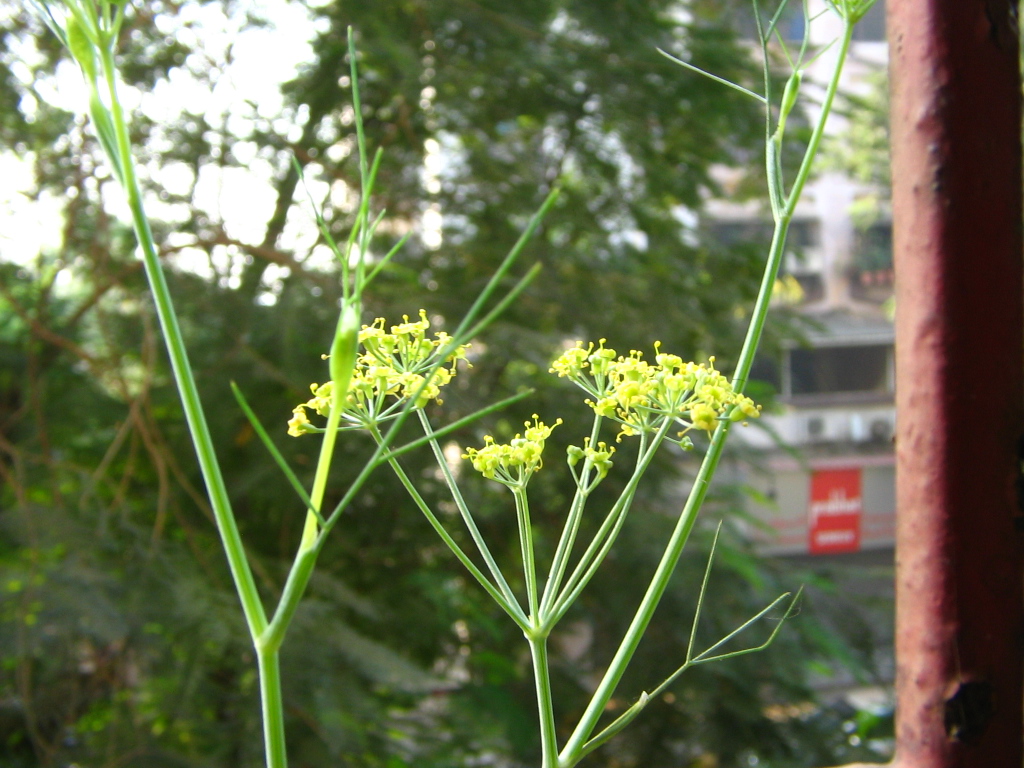
Growing Badishep


Believe it or not India is the largest producer of Fennel in the whole world !

As a young kid growing up in Colaba and Fort, my access to fresh fruits off the trees was limited. Like our parents we did not have trees to climb and pluck fruit to sink our teeth into the juicy flesh neither did we walk through roads lined with field were we could barge in and pick up fresh munchies like a frond of fennel. Our hope was the bhaiya who sold little slices of fruit spiced with a dash of chili powder and salt. My introduction to fennel was there at his little round display propped on a wicker stand.

Fennel was loved by one and all lush green and sweet to taste. Fennel in Marathi is badishep. I decided to grow some in my green Balcony. BTW just wanted to mention the balcony is undergoing some major changes and will come back in a new avatar.

Get ready with you pots to plant Badishep along with me. For the seed reach out in your pantry, go no further.

Planting
    1. I use a big planter plate, 12 inches to grown Badishep. 
    2. Ensure there is a small hole in the bottom of the pot for draining excess water.
    3. Fill up to the brim with planting soil upto 5 inches.
    4. Sprinkle the seed over the planting media.
    5. Sprinkle water to moisten the soil. Do this every day.
    6. Cover thinly with dry leaves/ saw dust /  or a wet muslin cloth to protect from birds picking the sprouts.
    7. Ensure enough sunlight, but not direct.
    8. In about 2 weeks you will get about 10 inch grassy growth. 
    9. At this point you can move the plants into deeper pot of about 5-6 litre capacity.
    10. Keep the soil moist but not wet and choose a really sunny spot for it. In a month and a half you will see it flowering.
    11. The yellow flowers on the radial frond grow into sweet Badishep/ fennel. 
    12. Let them mature a bit to get large seeds.
Harvest : 
Pluck the fronds of Badishep to harvest and enjoy the sweetness. The young leaves can be used to make parathas or as a herb in your pasta. The leaves are very mild in flavor.


Uses:

As mouth fresher
As a spice
As a natural appetite suppressant

Friday, May 24, 2013

Vari Vegetable Hotchpotch


I have a very busy life packing a lot of things into it, in an attempt to live it to the fullest.

Especially my music class, it is one thing I never like to miss. So on those days even if We have had to eat a pasta dinner it is ok.

There are times when I want to be ordering those delicious Pizzas and save with the Dominos Coupons my order is never complete without garlic bread and cheese dip.

In recent times I came across this service called FoodPanda, you can order online from a choice of your favourite restaurants and save with FoodPanda Coupons. I do it especially when I have company to share all the yummy food. Else slog like I did! Really!!

I completely missed that I was out of stock of rice. There was no atta to make rotis and no besan to make chillas. That's when I found the used packet of Vari or foxtail millet. For us Vari is fasting food and the spicing is always kept simple with just cumin seeds and green chilies. On this day I wanted something hearty yet with a touch of  spice moving away from the satvic taste associated with recipes using Vari.

I made this Hotchpotch just a little loose not a khichadi and not a biryani somewhere in between. It was lovely to sit with our little pots cuddling them and eating straight out of them warm and satisfying.


Ingredients

1/2 cup Vari
2 cups shredded cabbage
1/2 cup peas
1/2 cup cooked chickpeas
1/2 cup shredded carrots
1 large onion diced
1 tablespoon Suhana veg biryani masala
1 tablespoon oil
salt to taste
a pinch of sugar

Heat oil. Fry onions. Follow in with the vegetables one by one and stiring to mix. Add the biryani masala. Top up with 3 cups water. Cook until thick and soft but not mushy. Cover and cook. Before removing from heat add salt and sugar and allow the flavours to steep for 5 mins. Put off heat. Serve in individual pots with lids and enjoy steaming hot!

On another note my friend Nimmy, suggested I read Stephen Mitchell's translation of the Bhagawad Gita. I simply love Flipkart's deliveries and when you have these FlipKart Coupons then nothing less than a happy dance. I ordered the book instantly and it was door delivered the next day.

It's a phase I am in when I need this much. I have read several versions before and have aborted reading some due to discomfort with the fonts or sometimes the language. I have done several Parayans of Dynaneshwari but yet find it difficult to understand and even more difficult to accept and implement in my life. One who claims that they understand Gita are surely evolved I must say and if they are able to live the prescribed life eliminating some of the time contextual thoughts in it, are surely of the cadre above the average person. This new translation is beautiful and will appeal to that class who are not comfortable with Sanskrit and vernacular versions. The language used is beautiful the author has painstaking maintained the meter of the original poetry and Nimmy and me agree that the choice of words is perfect! Order your copy and add to your collection a wonderful book that you can read and then pull out anytime for your daily motivational quotes.

Wednesday, May 22, 2013

Kantol

I have gone back to into the drafts yet again, I have not so great pics for this recipe but must post it so you can bookmark it and keep your eyes open for this veggie for it will be in season soon.

It's almost the end of summer here. The skies are cloudy and grey with taletells of the monsoon. The monsoons breathe new life into everything. The seeds that are dormant sprout and surprise you with an abundance of goodies. Kantol in our parts was never grown by farmers, it is considered to be an exotic vegetable that grew wild in the jungles and was hand picked by the katkari and brought to the village to be sold. It came really cheap and by the basketfulls. Only in the city of Mumbai did we pay thru our nose to buy this vegetable.

I remember my mother not touching the veggie at the Bora bazaar market and telling me that we will get ours from the village when someone visits. We did and so this veggie was much awaited and relished. There were many ways my Mom would make it but those would mostly drown the lovely vegetable in coconut masala. I prefer this simple stir fry. So here it is.

Kantol is a spiny gourd you may be reminded of the bitter gourd but this is a sweet one without a trace of bitterness. When you choose the veggies, pick small tender fruits that are bright and green. The mature fruits with slight yellow from the ripening will have seeds that mar the taste. Tender ones have soft underdeveloped seeds that can be consumed along with the veggie.

Ingredients

1/4 kgs Kantol sliced fine
2 large onions chopped fine
1/4 teaspoon red chilli powder
1/4 teaspoon turmeric
1/2 teaspoon coriander powder
Salt and jaggery to taste
1 tablespoon oil

Heat oil. Fry the onions a bit. Add the finely sliced Kantol. Sprinkle the red chili powder, turmeric and coriander powders. Stir. Cover and cook for 15 mins.

Add salt and jaggery to taste. Stir again and cover and cook till soft.

Enjoy with chapatis.

I had made a masur amti to go with rice on this particular day, so you see it in the left compartment and the right one has the Kantol stir fry.


Saturday, May 18, 2013

Pomegranate Poached Pears On Mascarpone


Have you read my post on Homemade Mascarpone raise your hands, I mean comment here if you tried it out. So assuming you did make it in your own kitchen.

This a very old draft that I pulled out to post right away after seeing the picture. It is a simple dessert with a touch of art. I think your guests will love it and you don't need to sweat over it to please them.

Ingredients

1 pear
1/2 cup pomegranate juice
1 cup mascarpone cheese
1/4 cup icing sugar

Prepare mascarpone cheese and chill in the fridge overnight. You can used ready made straight from the box if in a hurry.

Now prepare the pears. In a saucepan heat the Pomegranate juice. Shave off the pear skin. Halve the pear and put it in it. Cook till the pear gets a nice pink colored skin. Let it cool.


Now slice the pear thin. It should have pink outer color and untainted insides.

Before serving blend the sugar into the mascarpone cheese to sweeten it and fluff it up a bit. Pipe it out into pretty bowls. Arrange the sliced pear in the form of a rosette on top of the piped mascarpone in each bowl.

Tip: always start making the rosette from inside by first making the rolled bud then arranging the petals around it.

Serve chilled.


Sunday, May 12, 2013

Growing Owa


I was on an experimenting spree when I sprinkled some Owa or Carom seeds to grow. I wanted to grow the thick velvety leaves which we use to make bhajji. To my surprise these seeds grew to look like cilantro. I knew then that I was not growing these for any yield of great value. It was just to see what happens and what is the life cycle of this seed that is used as a spice in many Indian dishes.

The plants grew to a height of 4-5 ft and blossomed into beautiful tiny flowers. It gave some seeds to munch on but that's about it. They were very mild in taste.

Recording my experience here:

  1. In a tray filled with planting soil sprinkle Owa/ carom seeds and sprinkle water.
  2. Leave it to sprout and grow about 3-4 inches.
  3. Replant the micro plants
  4. Take a container, we used a 5 kg plastic recycled bag one. 
  5. Ensure there is a small hole in the bottom of the pot for draining excess water.
  6. Fill with planting soil upto 1 inch below the brim.
  7. Remove the entire cake of the plants and bury in the prepared pot.
  8. Sprinkle water to moisten the soil. Do this every day.
  9. Ensure enough sunlight, but not direct. You can keep it under a larger plant for some shade.
 Time to replant: Don't they look just like cilantro

The flowering starts after a month

In 2-3 weeks you will seed the seeds on the fronds
Harvest : 
You don't get too much to harvest but pluck the fronds and much on and enjoy!

For me the harvest was of a bunch of pretty flowers that decorated my table for 3 days.

Saturday, May 11, 2013

Cherry Tomato And Cilantro Spaghetti With Cumin Tadka


Cherry Tomato And Cilantro Spaghetti With Cumin Tadka served with clear tomato soup 
and Strawberry and Oreo Cups for dessert. 

While buying Strawberries is a must in Mahabaleshwar, spotting a basket full of cherry tomatoes was the most exciting moment for me. The bunches of them with the wine and leaves on can make any city bred go week in the knees. So I bought 4kgs of them to Mumbai. What followed was cherry tomato salads of every kind and them studding our food of every kind. There were pastas made, pizzas decorated and sometimes a boxful were packed to work for snacking on their own.

One evening when I had to rush for my music class I made this quick dinner which was wonderfully light and satisfying. So let me share here this fluke recipe which got a thumbs up from my family.

Ingredients

Spaghetti bundle enough for 4 about 100 gms
30 or more Cherry tomatoes
3 tablespoon olive oil
1.5 teaspoon cumin seeds
1 cup fine chopped cilantro
1 teaspoon red chili powder

First cook the Spaghetti al dente and keep it aside.

Heat the olive oil and turn to high add the cumin seeds when browned add the whole cherry tomatoes. They will burst on high heat to release wonderful juice and cook well. Now add the red chilli powder. Add the chopped cilantro and let it wilt a bit. Follow in with the cooked pasta and toss well to mix and coat the pasta well with the chunky sauce. These cherry tomatoes were quite sweet and gave a wonderful sauciness to the pasta.

Serve hot along with tomato clear soup and dessert to make it a special meal.

Friday, May 10, 2013

Strawberry and Oreo Cups

While we are still in ice cream season let me share with you this delightful and kiddophilic treat.

I had returned from a short but very refreshing holiday in Mahabaleshwar with an armload of strawberries. We were eating strawberries in every form. This treat was a creation for the family kids who were supposed to visit us. Ok the kids did not turn up but we did become kids once again.

Not much of a recipe but you will love assembling it. Also its technically not an ice cream but cream which is chilled it is!

Ingredients

100 ml fresh cream
1 cup chopped strawberries
2-3 strawberries sliced
1/4 cup Icing sugar to taste 
1 teaspoon lime juice
6 Oreo cookies

In a food processor whip up the fresh cream, lime juice and icing sugar together, adding the icing sugar slowly till all of it is used. Once it is swelled up add the chopped strawberries and whir it once. That's your mousse, the lime juice holds it up well.

In 6 petite cups arrange sliced strawberries against the walls. In the center fill the whipped cream and strawberries mousse.

Top with whole Oreo cookies. You can lay them flat on top or embedded them halfway into to the mousse.

Let the cups set in the fridge atleast 2 hours before serving.

These strawberry cups look like tulips and tasted creamy and nice, I was told! 

Tell me what you think about them but only after you make them yourself, you are off to make them already? Ah I knew!

Monday, May 06, 2013

Jardaloo Ice Cream


A lasting fragrance, smooth and chunky at the same time. The Kernels enhance every mouthful further with their nuttiness.

It's an ice cream that you will want to make immediately and it is so easy!

Make it now:


400 gms of condensed milk (Amul Mithai Mate)
+
200 ml of Low Fat Fresh Cream (Amul Fresh Cream)
+
Whip together both in the food processor until frothy. Freeze in an airtight box for 2 hrs. 
Whip second time. Freeze again for 2hrs in an airtight box.
+
1 cup of Jardaloo pulp
 Once the icecream is set. Mix in the pulp. Give the ice cream a marble effect. Do not mix completely. You will see the pretty chunky fruit bits as the fruit is hand pulped. The ice cream gets a beautiful peach color. Freeze overnight or atleast for 4 more hours. 


Serve the delicious ice cream in scoops.
+
 To further intensify the experience of this beautiful treat stud the ice cream with the Jardaloo kernels, toasted is better.


Enjoy this summer!

Sunday, May 05, 2013

Jardaloo Ice Tea


Well so if you read the previous post and you are back then you are curious about what I did with the water in which the Jardaloo soaked?

In a jar I poured the Jardaloo juice enriched water and topped up with more water to a total of 500ml. I adjusted the sweetness by adding sugar to my taste. Then about 1/2 teaspoon of tea powder and let it steep all night in the fridge.

The next day I had a wonderful Jardaloo iced tea ready for a afternoon sipper. Just strain it before serving. Serves 2 small tumblers or one huge glass. 

Make sure the Ice tea is consumed the next day else the Jardaloo pulp in the tea starts spoiling. While serving you can add slices of lime but don't add lime juice, it does not go well with the steeped Jardaloo juice and tea.

Enjoy!


On a sultry day I chose to sit near the balcony and the natural breeze was much welcome to relieve the heat that the whirring of the fan did not help. The Jardaloo iced tea was perfect!

Saturday, May 04, 2013

Jardaloo Jadoo!

This picture of Nubra Valley is taken by my nephew. The Jardaloo in this post were grown here.

Last year in July, M Vahini and family had gone to Leh-Ladakh and they came back with a big packet of Jardaloo for me. They were very dry and impossible to snack on the the flesh without fracturing your teeth. Not very happy, I stashed away the packet in the fridge. Its been months in there, every time I looked at it I felt sad that they were getting fridge burnt!

To my rescue came ET, she had made an ice cream with apricots. If you remember this post was also inspired by her. I love her desert ideas. So I decided to make some ice cream too. Yes at first that's all I wanted to make, then on second thought I was inspired to make a curry with Jardaloo as the star ingredient so you saw the Jardaloo Chhole post.

It all began with soaking some 40 plus Jardaloo in hot water. Yes I know that's luxury but I wanted to get rid of them so saved a few but literally emptied the pack for soaking. I poured about 600 ml hot boiling water over those 40 and let them soak in the bath for almost 8-9 hours.

Sneaking on a few to taste as they soaked and used about 7 of them in the Chhole. By lunch time they were still not soaked till the seeds. Yet after the entire day under water a slight squeeze and the seeds just popped out clean. 


The water in which I soaked the Jardaloo looked brownish and thick with the juices. Of the 600 ml water what remained in the bowl was about a little more than 200 ml. It resembled my favorite summer cooler. Ah! but I am not telling everything in this post come back again to see what I made. 

With clean washed hands I mashed the flesh. I don't like using the blender as it destroys the natural fiber in the fruit and it does affect the taste. You must be wondering what I did with the pulp? Of course I made ice cream! Promise I'll show you pictures. The color is beautiful and right now in a tub and chilling in the freezer.

The seeds that you popped out are not to be discarded. Crack them up with a pestle carefully and you will be rewarded with kernels that taste like almonds. I checked out a few for bitterness. They tasted good with no trace of bitterness. The rest are saved to sprinkle on the ice cream servings. 

Now you must be thinking I ate the shells too. No no, I did not eat them but you know me. I don't waste anything and I upcycle a lot, so the shells went into the Brahmakamal pot which was showing receding planting soil. Remember next time shells of any nut can be mixed with planting media to give it some aeration and texture.

Now do you agree Jardaloo has Jadoo in it's name itself! It's magic!

See the complete magic of Jardaloo now!

Friday, May 03, 2013

KhuraasNichi Chutney


The Black seeds are the KhuraasNi seeds (Botanical name: Veronina Anthelmintica). 
Slender black and nutritious, antihelmintic.

As kids growing up in Mumbai you would not expect us to know about KhuraasNi. On our visits to Gondavale we would be served this black chutney at the top of the Taat. Wondering as we licked what it was? My Mother as ignorant as me having grown up in the konkan, had never heard of KhuraasNi. She guessed, may be sunflower seeds! But they are not.

Till I grew to be older I was clueless even though we would enjoy it from packets bought from small shops in the ghats. 

One day my friend Sangita's Mom made the chutney and she gave it to me to taste. Hers was with peanuts, yummy nevertheless. I was enlightened then about KhuraasNi.

This recipe is from a random source, I don't remember who gave it to me but this is how I make it.

Ingredients

1 cup KhuraasNi
1/2 cup sesame seeds / Til
1/2 dry coconut
1 teaspoon coriander seeds
1 teaspoon cumin
1 teaspoon salt
1 teaspoon red chili powder

Toast the KhuraasNi and sesame seeds for a minute in the microwave.  Keep aside.

Chip the dry coconut into slices and toast in the MW for 1.5 mins, tossing once for even browing.

Now toast the cumin and coriander seeds for 30 secs.

Cool to room temp all the ingredients. Mix and put in the grinder jar. Dry grind to coarseness with red chili powder and salt.

It can be served with the traditional Taat or even with dosas and idlis for a change. A drizzle of oil will make it a good lick and you won't cough up from the spice going up your nose.

Enjoy it more by storing in an airtight container to last you long at room temp and stretch the shelf life to months by storing in the fridge.
 

Thursday, May 02, 2013

Jardaloo Chhole With Vegetable Pulao And Rose Milk

Jardaloo Chhole With Vegetable Pulao, Nuts from Jardaloo, 
Microwaved Potato Mirgund and Rose Milk

Today, 1st May 2013, was one of the days I did nothing and actually enjoyed doing nothing!

The Nothing is giving me something, Peace of mind!

It is the heat and dust that is causing trouble but harsh summers make the anticipation of the monsoon showers worth the wait! That's life too!

In this unbearable summer time I have been making simple meals and lots of coolers for the afternoons. So far the meals went something like this Chilled Kelyacha Shikaran and Poli, Bean cultlets with salad, Greens stir fry and Phulkas, Tomato Omlette etc. 

Today I felt like making a combo meal complete with dessert. It should get ready in under 30 mins being the criteria. Having started cooking only at 12.30 pm I ensured the hungry Dad got his sharp 12 noon fill of a plate of cut papaya. The papaya was tasteless so gave it a honey bath.  

That done I could focus on preparing the meal. I had cooked and frozen chickpeas that turned out to be of great use today, I pulled them out and set them on the counter to defrost. On the side I was soaking Jardaloo for the things I wanted to do inspired by ET, I also promised her that I will experiment with them in a curry.  

Now the cuisines that I know which use Jardaloo or Apricots in their cooking are the Parsi and Middle Eastern. So I froze on the simple veg pulao which is on the lines of Brown rice that goes with Dhansak. To round off the meal on a sweet note I thought Rose milk fit the theme perfectly.

So presenting to you a Parsi inspired combo-meal.

Jardaloo Chhole


Ingredients
5-7 Jardaloo/ Apricots soaked in hot water for atleast 2 hours.
2 cups cooked Chickpeas/ chhole
 (Incase cooked are not available, soak overnight and pressure cook until completely cooked about 4-5 whistles)
2 medium onions chopped lengthwise
3 tomatoes diced
1 teaspoon Koli masala
1/4 teaspoon red chili powder
1/4 teaspoon turmeric powder
1 teaspoon jeera
1 teaspoon coriander powder
1 teaspoon sugar
2 tablespoons oil
Chopped Cilantro for garnish

Masala paste
2 green chilies
7-8 cloves garlic
1/2 inch piece of ginger
1 teaspoon salt


In a mortar and pestle, grind the green chilies, garlic, ginger and salt to a coarse paste.
In a small pressure cooker heat oil. Fry the masala paste till caramelized slightly. Add the chopped onions and fry till transparent and pale pink. Add the tomatoes and the spices, jeera, coriander powder, turmeric powder, red chili powder, Koli masala and fry on high heat till the tomatoes form a paste. Add the sugar. Now tip in the cooked chhole.

Add the soaked Jardaloo. Remove the stone from the Jardaloo before adding or if you don't mind them while eating you can just remove it at the table. If you have strong teeth crack the stone and eat the nut inside!

Close the lid and allow 3 whistles. Put off heat, allow to cool completely. Open the lid and mash the chickpeas a bit with the back of the spoon against the cooker wall to get a thick gravy.

To serve ladel out the chhole into a bowl, top up with a cooked jardaloo from the gravy and garnish with chopped fresh cilantro.

Vegetable Pulao

(Parsi Brown rice inspired)

This is a very simple pulao and goes well with this curry. I would not recommend it as a pulao for consumption on its own but may be the western palate may still find it good as a stand alone. 

Ingredients

1  cup Basmati rice
6 Fresh beans, I used black eyed beans from the Green Balcony
1/2 cup florets of cauliflower
1/2 green peas
2 onions chopped lengthwise
1 Tej patta
5-6 cloves
10-12 pepercorns
2 cardamoms
3 tablespoons Oil 
1/2 teaspoon of sugar
Salt to taste

Wash and soak basmati rice in water for 30 mins. Drain the water and keep aside.

Heat oil in a wok. Fry the onions with half teaspoon of sugar. They will brown evenly and quicker. Add the vegetables to it  and fry. Add the drained rice and mix to coat the rice well with oil. Cook for 10 mins.

Meanwhile boil 3 cups water with salt.

Pour the boiled water into the rice.

Cook another 15 mins covered. Till all water it absorbed. Fluff the grains of rice.

To serve mould it in a cup and turn it out on the plate. Top with a red cherry.

On the side serve some jardaloo nuts. When you deseed the jardaloo before adding to the curry, keep the seeds aside. Smash these seed open to get the nut, it tastes like almond. No part of Jardaloo is wasted.


Rose Milk

Ingredients
3 tablespoon rose syrup (I used Kalverts) 
400 ml chilled milk
few ice cubes
sugar to taste

Mix everything in a shaker and serve in elegant glasses.

Enjoy this Parsi inspired combo-meal. Put together the plate with a small portion of the vegetable pulao, a bowl of Jardaloo chhole. The curry as well as the pulao has sweet notes from the Jardaloo and the sugar. It makes it a balanced taste. Add the microwaved potato mirgunds for some crunch. Sip on the perfect summer cooler of Rose milk and end your meal on a sweet note.

Life is about living the best way you know inspite of the harsh summers and the heat and dust!

Wednesday, May 01, 2013

Choco-Vanilla Marble Cake


Sometimes you turn the world upside down for a good recipe and then you just experiment with something on hand and you hit upon a perfect recipe. It is so good that you want to use it every time you bake a cake but then you warn yourself this is a rich cake not your usual cake, yes even on its own!

I used this cake as the base for my nephew's BD, The Chocolate Volcano! Cake.

I am not a big fan of richly decorated cakes that are laden with butter cream or fresh cream, exception is the mascarpone. The celebration cake was something that got made for my nephew and later again just the bundt without all that ganache for Dad and me to have along with our tea. It is a perfect cake with tea or coffee. The bad thing about Bundts is that the slices are small. 


Ingredients

100 g butter , softened
1/4 cup oil
225g caster sugar
4 tablespoons curd
225g all purpose flour
1 teaspoon baking powder
1/4 teaspoon soda bicarbonate
3 tbsp milk
1/2 cup Amul fresh cream
1 tsp vanilla extract
2 tbsp cocoa powder

Soften the butter by cutting it up and whisking along with the oil, sugar and curd.

Mix all the dry ingredients, flour, baking powder and soda bicarbonate. Fold into the smooth liquid. 

Add the vanilla extract, fresh cream, milk and adjust the consistency.

Divide the batter into 2 equal parts and add cocoa powder into 1 part and mix well to get the chocolate batter.

Prepare a 10 inch bundt pan by greasing and dusting with flour. Pour the two batters in blotches. Alternate with chocolate and white batter. Then pass a knife randomly to draw swirls in the batter. This will give the marbled effect.

Bake at 180 deg for 25 mins using the convection mode in the oven.

Let it cool completely in the tin before you turn it out on to a plate. This cake is soft and has tender crumb. Slice it for a high tea or decorate it into the The Chocolate Volcano! Cake.

Tuesday, April 30, 2013

Kokum Sarbat


It is summer time and more than the last year I am feeling the heat more this year. Last year when I came back to Mumbai I was fearing being hit by the heat but the summers just passed away. This year I am deliberate in attempting to make lots of cold drinks for us to sip on especially in the afternoon instead of tea.

Here is a post by my dear blogger buddy Saee, on how Kokum juice concentrate is made just the way it is made traditionally in the villages of the Konkan region of Maharashtra.

I haven't gone to Thal in a while and no fresh Kokum for me yet. So I use the Kokum juice that comes in a plastic can to make this thirst quencher.

Ingredients

300 ml Kokum juice concentrate
700 ml chilled water
1/2 a lime
1/4 teaspoon pink salt
few sprigs of fresh mint
Ice cubes

In a glass jar measure out the kokum juice concentrate. It is all natural fruit preserved in sugar. Since this concentrate is made in sugar you won't need extra sugar to make the sarbat. 

Squeeze into it half a lime. The lime should be thin skinned and juicy to lend a nice citrus twist to it. 

Add pink salt, this sets off the sweetness a hint and lends a balance.

Crush the mint between your palm and add to the jar.

Top up with the water to get 1 litre of sarbat.

Add ice cubes into the glasses and fill them to the brim as you hand out the sarbat to a parched soul as the person steps into your home. 

In summers in the Kokan this Kokum sarbat is the welcome juice of choice due to the abundance of this fruit. It is called  Ratambe (plural) in the local dialect. Funny that we love our Hapoos and Payari so much yet this completely different fruit with it cooling properties and antacid effect is called Ratamba (singular) or mango of the night. It must be simply because we love both the mangoes and the night mangoes equally!

Look for Kokum sarbat in any Marathi locality in Mumbai or tell your Mango supplier, I am sure he will get you a drum of Kokum sarbat concentrate.

Make a glass won't you! 

Monday, April 29, 2013

Growing Green Garlic


In my home garlic is not something that we depend on to enhance the flavor in our food but there are certain things unarguably that taste better with garlic. Like the garlic chutney which is a signature Koli style.

Well but garlic cloves taste quite different than Garlic greens. The greens are milder and impart and beautiful mellow taste. 

Growing it is as easy as sticking the garlic cloves from your pantry into some mud, watering it and waiting for it to sprout and waiting to let it grow into 10-15 inches tall grass like greens.

Here is what I did
  1. Take planter plate. 
  2. Fill with planting soil upto 1 inch below the brim.
  3. Create holes in the soil at the top.
  4. Take a whole garlic, separate out the cloves. Stick each clove into the holes created and cover with soil.
  5. Sprinkle water to moisten the soil. Do this every day.
  6. Ensure enough sunlight, but not direct. You can keep it under a larger plant for some shade.
  7. End of a week or two you will see beautiful greens. Let them grow till 10-15 inches tall.
Harvest : 
Pluck the greens when still tender for use as a herb. You can keep them fresh by keeping it standing in water for a few days.
Some uses:

Sunday, April 28, 2013

Lime In Salt and Sugar


Fresh and yet to be aged

This is a preserved lime recipe my Mother would make for me as a kid. She would make small quantities and we had a special glass bowl with a lid for it. Simple yet wonderful especially for a kid that suffered nausea and acidity all through growing up years. If there was this lime my Aai brought out on my plate, I would eat my varan bhaat without complaints.

It's simple to make and not much of a recipe. Just preserving the lime in lots of sugar and salt.

Ingredients

20 Indian lime
1/2 kg sugar
4 teaspoons salt

Wash the lime and drain. Pat dry with a napkin and cut each lime into 8 pieces. 

In a glass jar put all these pieces and cover up with sugar and salt. Shake the jar and keep it in the sun to cook for a week.

After 3 months this pickle will get paler yet juicier as the lime juices thicken with the sugar and salt.

In my home it is called Mooravlela limbu in Marathi or preserved lime.

Aged preserved lime after 3 months, yum!

On Trail