Showing posts with label Gujarat. Show all posts

Sunday, May 03, 2020

Khari Puri


Khari Puri or Farsi puri is a snack from my childhood that features topmost in my favourites. I have Rajput kaki to thank it for. She was an amazing cook and even though we lived in the business district of Mumbai between late 70s to late 80s she cooked some food on the sigdi. That added a beautiful fragrance to her food. Thalis laden with wonderful dhoklas, khari puri, shrikhand puri, raswala bateta etc appeared on festivals from her kitchen. I knew exactly what her menu would be for each festival. It was mostly during Diwali times that we kids helped to make snacks. Together with Preety we were give the task of slashing the puris with a knife. We weren't too good with rolling out puris. That would be done by Induben and Ji aaji. Slashing the puris was fun and a task we enjoyed. Today I was feeling low. So to snap out of it I decided I need to do something therapeutic. Khari Puri project at 9 am is a good thing. I also started recording videos for Talkative Anjali but I made the mistake of pouring in the water all together. Then I had to fix it by added more flour. The consistency of the dough is key to the success. So here is the recipe after a successful project.

Ingredients

2 cups maida 
1/4 cup Rava prefer fine
4 tablespoons ghee
1 teaspoon cumin seeds
2 tablespoons whole peppercorn
Salt to taste
Oil for frying

In a big bowl measure out the maida and rava. Fine rava works better as it will soak up water nicely. Add cumin, salt and ghee. Massage the ghee into the flour to get a crumbly texture. Use both hands to get the ghee into the flour. 

Next take a cup of water. Using little at a time keep kneading the dough. It has to be a flaky tight dough which is required to make the puris crisp and give it shelf life. Cover the bowl with a lid and let it rest for 20 mins. 

Go back and check the dough. The rava would have bloomed with water and the dough should feel supple. Knead it to homogenise the rava and maida. Divide this smooth dough into three parts. Make cylinders of 12 inch length. Cut small pieces of dough roundels. Roll out each roundel into a Puri. The Puri should be nicely thin so when you fry it will turn crisp and stay crisp on storage. You should not need any flour or oil to roll out the puris. That is the sign of perfectly kneaded dough. After rolling out the puris lift it up from the polpat or the counter on which you are rolling it so that it does not stick to the rolling surface. Then place the whole peppercorns on the puri, spacing out properly. Smash the peppercorns with a pestle into the Puri. Now lift the Puri and move it to a weaner or a plate so that you can make a few puris before you start frying. I fried 4 puris in a batch. So that the oil is not crowded. I used s medium-sized cast iron kadhai for frying. You decide how many puris you can accommodate in your kadhai based on this.

Heat oil in the kadhai keep gas on medium. Put 4 puris at a time and reduce heat to sim. Make sure the heat is even and enough for frying. Allow the puris to fry on one side till a beautiful golden and then turn over. The timing for frying is the time required for you to roll out the puris and smash the pepper into it. Do not roll out all puris together else they dry out before frying. After both the sides are golden drain using a slotted spoon and remove into a colander lined with absorbent napkin. I have stopped using paper napkins as an environmental responsibility. I use cloth napkins and wash and reuse them. 

In such a way fry all the puris and use up the dough. It took me 2hrs for this Khari Puri project from start to finish. However all the effort was rewarding in the end when I tasted the Khari Puri. It was so good just like Kaki's. Plus after all the sweet stuf I made and we ate this was just the thing we needed. 

Some of you have requested this recipe so posting it in a rush. I will create the video when I make the next batch. Until then make and fry fearlessly. Enjoy!


Saturday, April 25, 2020

Dudhi na Muthia


How have you been folks? Hope you are enjoying the good side of this lockdown and resting up. I am enjoying it every bit a much needed break first time in my adult life where I need not worry about anything.
It is such an unprecedented time. I was planning to log regularly during the last month but I did not want to be clocking hours. This opportunity is not going to come often. I will make a separate post on how we dealt with the past month and also show you a collage of our meals. However this post is about how we grabbed our least favourite vegetable and tried to create new recipes out of it.

If you haven't been following me on YouTube go check it out. It's still very raw because I am shooting with one hand while I am cooking. Right now even editing videos is not easy for me as I laptop battery needs replacement, it completely dead. The other laptop has driver issues and does not connect to WiFi. No choice but to wait until I can step out to fix it.

Inspite of it thanks to the phone here I am posting on the blog, social media and YouTube. Hope you try out some recipes while staying at home. Stay safe, stay strong!


Ingredients

500gms Dudhi or bottle gourd
2 cups atta
2 tablespoons besan
1/2 teaspoon turmeric
1 teaspoon red chili powder
1 tablespoon green chili paste
1 tablespoon ginger paste
Salt and sugar to taste.
Juice of 1/2 lime
Handful of chopped cilantro
1/4 cup Oil
For tadka
1 tablespoons of black til or whole sesame.
1 teaspoon mustard seeds
Handful of curry leaves if you have.

Peel and grate the Dudhi or bottle gourd. To the grated Dudhi add all the ingredients except oil. Knead well. Add 2 teaspoons oil and knead into the dough. Coat the dough lightly with oil.

Let the dough rest for 10 mins. After the dough becomes smooth pinch of small parts of dough with oiled hands shape into rolls. Place them on an oiled steel sieve or jaali lid. Meanwhile in the pressure cooker or steamer heat water to get steam build up. Once you have enough steam and have finished rolling the dough. Put the sieve inside the steaming set up. If using a pressure cooker put one pan and put the sieve over it. Steam for 20 mins. Cool completely. Once cooled slice into bit sized muthia.

Now prepare for tadka. Heat remaining oil in a kadhai, use more if you like. Splutter mustard seeds and sesame seeds. I like using whole sesame seeds which are black as they are more nutritious than polished white. Add curry leaves if you have. Add the spiced muthia into the kadhai. Stir fry till they get golden crisp edges. Serve warm. They taste delicious as is. If you insist on a dip then make mint cilantro chutney to go along.

I did not use all the muthia for one time as we are a family of two right now. I divided the muthia into three parts.

1. Served as dinner with potato airfries and tomato soup.
2. I made Muthia and Methi pulav.
3. Rasila Muthia a wonderful curry with muthia, potatoes and coconut masala.

Both 2 and 3 are on Talkative Anjali. Go watch.


Thursday, April 24, 2014

Gor Papdi


Flash back to the days in Fort, there is a Jalaram Bappa and Ambe Mata temple in the building opposite my home. The bhajan is in full swing, me standing at the window and sticking out my head as a kid and there is a promise of Gor papdi prasad. Dad warns not go down at night. So I tell Ji, my grand old neighbor that if she goes down to the temple to get prasad for me. I tell Bharat to keep prasad for me. Ensure I get atleast one pudi of prasad (wrapped in newspaper).

Next morning we go to the temple and the potbellied pujari hands me a packet. Thrilled to bits I rush up and nibble the small piece. Then Ji asks if I want the prasad and I happily nod a yes. Bharat too ensures he drops in prasad at my home along with the milk bottle he drops everyday.

At another time Mom is discussing what to make as travel snacks for us to take on our yearly trip to Ganagapur-Akalkot-Gondavale and Kaki, Rajput suggests that we make khari puri and Gor papdi. So the two of them decide it would be made in the afternoon. Kaki would teach my Mom.

I would be pottering around and listening to Kaki's stories of travel. This image of gor papdi tied up in a cloth potli has stayed in my mind. Of the travelers eating it under the tree and drinking water from a kamandalu.


Flash forward to now. For our family trip to Gondavale besides many other things I made Gor papdi. This traditional sweet is made from pantry staples and gets done in less than 30 mins.

Ingredients

1 cup whole wheat flour
1/2 cup ghee
1/2 jaggery
1/8 cup water
5-6 cardamoms 
2-3 tablespoons poppy seeds

(This recipe can be doubled or tripled in all proportions very easily. I used 3 cups of wheat flour for the tray of gor papdi you see in the pics.)

First grease a plate and keep it ready.

In a kadhai heat ghee, once molten add the wheat flour slowly to it. Keep mixing and stirring till the wheat flour is browned and smells nutty. 

Meanwhile separately in a saucepan add the water and jaggery and heat till it dissolves completely. 

Pour the jaggery liquid into the ghee roasted wheat flour. At this point use the seeds of cardamom after crushing them. Stir till it starts leaving the sides of the kadhai and forms a mass at the center. About 5-6 mins.

Now transfer the mass onto the greased plate. Even it out with a katori. Sprinkle poppy seeds. Level it well. Let it set a bit and then cut up into pieces. Let it cool completely.

Once cooled pack it into a box. It stays fresh for 15 days. 

That's a healthy and nutritious snack for you better when you travel excellent for hikking trekking trips.


Sunday, August 21, 2011

Osaman

In the thali clockwise: Osaman, leafy vegetable stir fry, Rice with osaman, tomato basil salsa, coconut coriander chutney and curd

Osaman or Gujarathi Dal or Ramesh Bhai's Dal. Well the third name is by which it was known for many years in my home. You know that I grew up in the Gujarathi heartland of Mumbai, Fort and that my neighbors were a big influence on my eating habits. Kaki my neighbor made this every single day yet when Ramesh bhai her son made it, was always special. The smells of the chauk/ tadka made for the dal made me drool as a child. Recreating memories thru this dal. Soon it will be Ganapati time when the entire Rajput family visited us in Tata Colony after we moved to Chembur. Missing everyone, Preeti, Ramesh bhai, Bhabhi, Indu tai, Ansu tai, Mayuri, Vijay Jijaji, and ones who are no more with us Kaki, Ji Aaji and Japan Baba.

Ingredients

1 cup cooked tuvar dal/ split pigeon peas
2-3 pieces of kokum/ 1 tablespoon tamarind pulp
1 small piece jaggery
1/8 cup peanuts
1 inch piece of cinnamon
2-3 cloves
1 split chopped green chili
 1/4 teaspoon asafoetida
1 teaspoon mustard seeds
1/2 teaspoon cumin seeds
4-5 curry leaves
1 teaspoon ghee
salt to taste
handful of cilantro for garnish

Heat a pateli. Add ghee, heat to smoking point. Splutter mustard and cumin seeds. Followed by cloves and cinnamon. Now add the asafoetida. The green chili and curry leaves go after this. Then add the kokum or tamarind pulp. Quickly add a glass of water. Throw in the peanuts and the jaggery. Bring to a boil. With a ravi/ beater blend the cooked dal to smoothness. Transfer it to the pateli. Salt it and boil vigorously for 10 mins.

Once off the gas serve immediately with a sprinkle of chopped cilantro. Ladle it onto a mound of rice, basmati, kolam or ambe mohor! Love it, you bet it is lip smacking!!

Sunday, October 24, 2010

Mohanthal


I love my Mohanthal crisp with lots of ghee. That is how Rajput Kaki, my neighbor aunty would make it. I am so tired of the dry fruits we eat all the time, cashew is added to everything sweet. Almonds go on almost all cakes and barfis. So this time I went all rustic with Kharbooz (Melon) seeds and Khus Khus (poppy) seeds to add the extra crunch. 

On the Dasara morning I made shevayi kheer but this time I experimented with jaggery and the milk split. So I could not share it with my neighbors. Then in the evening I decided to make this Mohanthal just for my neighbors. It is quick and easy. Give it a try you might want to make it your pantry staple as it used to be in my home when we were a home full of hungry children and as it is in many Gujarati homes.

Here is what you will need.

Ingredients

1 cup besan/ chickpea flour
1/2 cup ghee
1 tablespoon khus khus
1 tablespoon Kharbooz (melon) seeds
1 cup gul/ jaggery
0.5 cup water

First in a vessel add jaggery and water. Boil it to get a syrup. Put off heat and keep aside.

Then in a wok heat the ghee. When its completely molten add the besan and roast till you get a nutty flavor. The golden hues will tell you that it is cooked. Put a drop on a plate let is cool and taste it. It should not have even slightly bitter taste. If it does not taste bitter then it is cooked properly. Lastly add the Khuskhus and Kharbooz seeds. Give it a stir. The hot ghee will crispen it and bring out the flavors too.

In between grease a plate with oil or ghee and keep it ready for moulding the Mohanthal.

Now add the jaggery syrup to besan and keep stirring till it all comes together as a lump. Stop at this point and pour it out into the greased plate. Let is cool for 10 mins. Then cut out squares like seen in the picture. If the Mohanthal cools completely you will not be able to cut out neat pieces so you need to score while the mixture is still warm.

Once cooled completely separate out each piece and pack into gift boxes. A good piece of Mohanthal is slightly crunchy and lot crumbly. The crunch is dual from the jaggery syrup and the seeds.Very rustic.

Monday, July 20, 2009

Manbhavan Muthia


Trupti mane tamari aa recipe bau bhaveli che. Muthia saras thaya, etle enu naam Manbhavan Muthia paaDi didhoo :).

Well after long I actually tried at Gujarati, what I am telling Trupti here is I loved her recipe. The Muthia were so good that I named them Manbhavan Muthia which means Muthia that please the mind.

On Saturday I called Alok and Varsha over for SNACINER, now "What's that ?", you will ask. Well that is Snacky Dinner. If people can come up with Brunch then why not SNACINER! We do it some times, have snacks for dinner. I made 3 things, Paneer tikka (see the pan fried version), Pizza and Muthia.

Alok simply loved the Muthias. This was meant to give him a small after exam treat and Varsha a little breather from the cooking. My dear friends are so busy these days, Alok with his work, studies at IIM and the toddler. Varsha is full time Mom right now, true to the word she literally does everything for the kid herself with so much patience. God bless! I love to spend time with them both and Aditya.

Here is what I did with Trupti's recipe...

Ingredients

1.5 cups Wheat flour, 3 tbsp Besan flour, 1-tbsp: Semolina
1/2 cup leftover cooked rice - mashed (skipped it this time)
2 cups Methi Leaves chopped
Salt, sugar, turmeric, to taste
1 green chili and 1 inch piece ginger- chopped coarsely and roughed a bit
Yogurt to bind the dough
1 tbsp- oil from your favorite pickle - this tastes great in this! (will try next time)
A handful of Cilantro leaves - chopped ( I didn't have on hand)

For the tempering:

2 tbsp: Oil
1 tsp: Mustard Seeds, 1 tsp: Sesame Seeds (I used black as that's what I had), 1 tsp: Asafoetida,
1 tsp sugar and a few drops of lime juice- if you like. (skipped)
Cilantro leaves - for garnish (skipped)

Combined all the ingredients in a large bowl. Kneaded together with yogurt.

Oiled the plates from the dhokla stand.

Pinched off small portion and lined them on two plates. I need only two plates for this measure. Placed one in the top slot and the other on the middle slot. Thus allowing space between 2 plates so there is no sticking business.

Steamed for 20 mins or till the dumplings get a glaze. Once done removed from the steamer. I used pressure cooker without the weight as the steamer. That is regular even for Idlis or any thing that I want to steam.

Or like this fit a mesh lid into a wok filled with water and cover with wok's own lid and let the muthia steam. (added on 13th Jun 2010)


Got the tempering ready by heating a wok. Added 2 tablespoons oil. I was generous coz I wanted a little crunch on the outside of the muthias. Then in went mustard seeds, sesame seeds and asafoetida. Sauteed for about 10 mins.

The Manbhavan Muthia were ready for sharing with friends as I talked to them from the kitchen.

Notes:

I did not have cooked rice on hand so skipped it this time. I guess this must be making the muthia lighter.

Next time I will try with pickle oil. I noticed all the pickles in my pantry are low on oil. Yay! coz I am a pickle lover so lesser guilt. Like Trupti says this must definitely make a whole lot of difference.

When I use ginger I rough it up a little after chopping to tiny bits. I don't like biting into ginger piece nor do it like to use paste. So this is my way.

There was no cilantro in the herb mug so gave it a miss. I would have loved a sprinkle of cilantro at the end though.

I used black sesame seed purely because that is what I had in stock.

The sugar and lime juice dressing I know guarantees citrusy freshness which I will try another time.

This recipe is a keeper. Thank you Trupti!

Sunday, April 26, 2009

Methi Khakara

Khakara are rotis roasted to dry out completely and made cripsy. These are generally made in huge batches at the afternoon time in Gujarati homes by the women of the household. You get beautiful Khakaras of different varieties in shops in Mumbai especially the Gujarati dominated western side, Fort and Ghatkopar areas. Masala, Methi, Jeera, Lasan, Oil fried, Dry roasted and many more.

I remember in Chembur Jain Mandir they would accept flour and this would be given to needy women, who would make Khakaras for a small daily wages and then you could go to collect your big Dabba filled with fresh Khakaras after couple of days.

This is the first time I have tried Khakara on my own though my mother and aunts made it. They always made in small nos. for immediate consumption and we never really stored the homemade ones.

The challenge in Khakara making is the patient rolling out of thin chapatis and then roasting them almost meditatively to a perfect golden crispness. Traditionally the Khakara I knew were always dry roasted. However you now find in the age of fast food these are roasted with oil applied to it. The taste varies needless to say that the dry roasted ones are healthier.

The last important thing is to let the Khakara cool completely before you pile up and stack away in a big~ box. Spread them on a Newspaper for best results.

Today I am sharing here the recipe for Methi Khakara but you could vary the taste by adding different spicing.

Ingredients

1 cup wheat flour
2 cups fenugreek/ methi leaves
1 teaspoon jeera
1/2 teaspoon turmeric
salt
1 tablespoon oil
1/2 cup water

Put all the ingredients into a big bowl and knead the dough. Knead it tight. Do not keep the dough for proofing at all. Always use fresh kneaded dough. If kneaded and kept for long to stand aside the dough gets softer and roasting the khakara takes longer.

After kneading the dough. Take small parts of dough form a ball and roll it out into a thin chapati, as thin as possible. Use enough flour to dust while rolling it out. Roast on a medium hot tava. Press with a either cloth or like I did use a potato masher. Remember if using the potato masher the lower surface has to be smooth if it is rough you will end up punching holes in the Khakara.

This pressing helps to subside the puffing up of the roti and helps dehydrate it faster. Remove it from the tava when you feel it is nice and stiff. The result is a light crispy munchy snack called Khakara.

Cool them on a newspaper sheet or a wire basket making sure each one is well spaced out. Pack them into a box after couple of hours. Serve them with tea as a light snack.

We love Khakara and can't just stop at one!

Saturday, March 14, 2009

Methi na Thepla

a meal for a journey.


In my home Methi na Thepla were introduced by my next door neighbor, Vimli in Colaba. It must have been 1978 or so. She was all of 20 yrs, ready to prove her skills at cooking and in the corridors of marriage. It was the first train journey that we were going to set out on, ofcourse a pilgrimage. Did any middle class people go on any other journey of adventure or leisure at the time? Rarely.

Vimli walked in and the effervescent kid that I was, announced to her that we were to travel. She quickly told my Mom that they could put together the food for the travel. The menu decided, shankarpali, chakli, Chivda the snacks and for the next day's lunch it would be Methi na Thepla.

This is Vimli's recipe and we don't change anything about it. It has been our staple on journeys.

Passing on this recipe to the new bride. She is still honeymooning at their second destination. Dad is on his way to Blr and must have been thrilled to see Somu and Sapna jump on the train at Lonavala to be with him for a while till Pune. Such a sweet thing to do. Love them for the thoughtfulness. Dad is going to remember this journey for a long time even though the family staple thepla is missing.

Ingredients

2 cups chopped fenugreek leaves
1 cup wheat flour
1/4 Chickpea flour/ besan
1 handful millet flour/bajariche pith
1/2 teaspoon turmeric
1/4 teaspoon asafoetida
1 teaspoon red chili powder
1/2 teaspoon cumin powder
1 tablespoon curd
salt and sugar to taste
water to knead

In a big kneading bowl put the finely chopped fenugreek leaves. Add the flours, spices , salt /sugar and curd, knead slowly. Add only as much as water required to make the dough tight. Leave it for 10 mins. Knead again as it would have loosened a bit due to the water from the fenugreek leaves. Pinch off small balls and roll out into small rounds.

Roast on a medium hot girdle applying a little oil or ghee on both sides.

Roast all and cool them by spreading on a paper. Store them in a box. These last for a couple of days without refrigeration. That makes it a great food for journeys.

Serve with your favorite pickle, Chunda or sauce.


Tips:

1. Finely chopped leaves should be used for any type of thepla or paratha because they don't tear the thepla when you roll it out.

2. Curd used in thepla or parathas makes them flaky.

Here are Thepla stories from other blogs:

Thepla for the Soul
Roma’s Methi Thepla even she makes for travel

Wednesday, December 06, 2006

Recycled Dhokla


I was born a Koli but the period between 8 years-16 years of my life I lived in the Gujarathi / Parsee heartland Fort. Sometimes it makes me laugh how places get their names. This southern area in Mumbai was supposed to have been a Fort so the obvious but I do not see even a single trace of the Fort.
Fort is downtown Mumbai. Living in the area meant having a childhood without open places to play after school unless ofcourse if you went to Bombay gymkhana or Harnimon Circle. I regert I never did learn to ride a bicycle like most children do. Spent most after school hours reading books which were in plenty on the streets, school library and tagging along with MJ kaka to Petit library. I will write a separate post on Walking to the Petit Library with Kaka as it was never just that. Hey I'm just straying away.
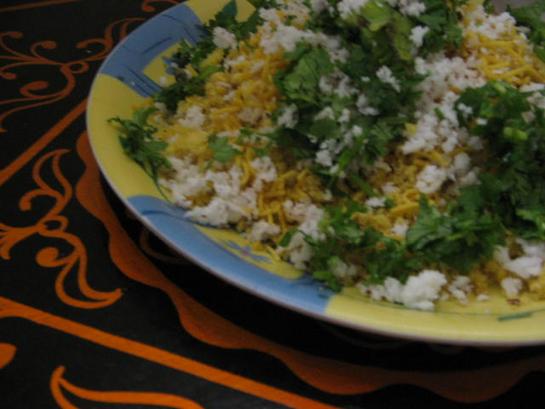
So back to Dhokla. Yeah I was saying how could I not like dhokla living in this mini Gujarath. Many times there would be excess dhokla which Dad recycled into this snack. This dish though made from leftover dhokla in the past. We like it so much at home that now we make Dhokla in the morning control temptation to eat it till evening and then when it is too cold to be enjoyed as dhokla transform it into this dish. However never try to make it using Nylon dhokla or dhokla made from besan it will not lend the same texture. Try it and tell me.
Ingredients

1 cup leftover Dhokla
1 tablespoon thin shev
1 teaspoon lime juice
1 teaspoon sugar
1/2 teaspoon fresh ground pepper
1/2 teaspoon toasted cummin seeds powder
1/2 teaspoon toasted corriander seed powder
grated fresh coconut and
cilantro for garnish
Crumble the Dhokla in a plate and save. In a bowl add lime juice and sugar and dissolve. Mix this juice with the dhokla crumbs using a fork. Sprinkle the three powders and mix again with the fork. To serve top it up with thin shev the ones used in bhels. Garnish with fresh grated coconut and loads of cilantro.

On Trail