Showing posts with label Birthday Party. Show all posts

Saturday, September 26, 2015

Coconut Mawa Cake With Ganache

 
It's a new birthday that I look forward to celebrate every year henceforth on 23rd Sep. Its a special person who has dared to accept me in his life. He who loves me and pampers me much. Meet AC, my beau.

I had ordered a cake with an elaborate theme but the homebaker services are unpredictable since its always a one person show. Well it turned out to be a blessing really. I made this simple cake myself in the flavors my beau would love, coconut and mawa and since its a day for celebrations poured some sinful ganache over it.

I baked the cake at home and made the ganache at his home. This was all before we stepped out for an evening of fun. We were joint by a friend for the cake cutting. It was so funny that I had two men watching me make the ganache like two little school boys. Thanks to the friend we had some moments captured on the cell that we will cherish for life. So we sang the happy birthday song and cut the cake. He liked it he said. Then I packed 2 boxes, one for AD the friend to take home and one for Mami.

Mami is one of our only 3 relatives. She is such a darling. She wished me happy birthday too! I laughed at the moment and only learnt later from a friend that it is an old tradition among the Parsees to wish both partners. Ain't it a cute tradition?!


I am blessed to have AC in my life and wish we have a meaningful, loving life together as long as we live.

Would you like to make this cake? Here is the recipe.

Ingredients

1/2 cups All purpose flour
1/2 cup rice flour
1 cup dry coconut powder 
1/4 teaspoon cardamom powder
2 teaspoons baking powder
1/4 molten Amul butter
1/2 tin sweet condensed milk
100 gms Mawa
1/4 cup of sugar or more as you like
1 cup milk
In a bowl whisk together the dry ingredients first, then add butter and whisk till incorporated. Then add the condensed milk, sugar and mawa whisk again till sugar distributes well in the batter. Now add milk and whisk together to loosen up the batter into foldable consistency.

Prepare a tin by greasing and dusting with dry flour. I chose a heart shaped mould for obvious reasons, you can use any other as the occasion calls for. Pour the batter in it and tap the tin on the counter to even it out. I used a wet baking strip to control the rise of the cake. A blogger buddy had gifted it to me couple of years ago and I finally used it. It worked pretty well.

I preheated the oven at 200 degs, baked for 10 mins at the same temperature and then lowered the temp to 180 deg Celsius and baked further for 25 mins. Checked with a wooden skewer, it came out dry. Removed and cooled for an hour and a half. Then frosted it with ganache

The ganache 
1 bar of dark chocolate (I used 80gms bar of 50% cocoa)
1 Amul Fresh cream 200 ml pack

In a bowl melt together the chocolate and fresh cream in a microwave about 45 secs. Mix to get marbeled effect till all chocolate is liquid. Pour over a cooled cake.

Chill it before cutting and serving.


I picked out this nice plate to serve the cake on and got to know a bit of history about it. It is from AC's grandmother's collection of beautiful things that are lying in dusty cabinets that I am going to dig up some treasures from. This one is aged approx. 100 yrs. It is from Burma, a light weight porcelain. On the back is a logo that reads "Honeysuckle" with the Victorian crown prominent on it.


 Like a friend rightly commented on seeing the pics and it sums up my thoughts too...
"Many Parsis were settled in Burma and had flourishing trade as it was part of the old spice route (not many people know that). This beautiful plate must be an old English one and has probably seen many an elegant evening and much familial bonding. Precious!"


After visiting Mami and taking her blessings, AC took me out to dinner at Delhi Darbar, Colaba. We chose it for all our growing up years nostalgia sake and the food there still tasted so good. Greasy but good followed by a juice at another childhood favorite Canteena adjacent to the restaraunt. Later a walk by the Gateway of India. 

I had come to Gateway with my lover and it was a special feeling as that's where I had walked most late nights as a toddler held by the finger with my favorite uncles T kaka, MJK and Mothe baba everyday after dinner.

That night we returned home very content, my head lightly resting on the shoulder that has promised togetherness for life...

Wednesday, August 05, 2015

Nougatine and Custard Filled Cake


Months before my birthday we were discussing cakes, my foodie partner and I. There was a lot of drool-worthy description of a cake with a crunch that made me zero in on this cake that I wanted to bake for my birthday and as a special treat for the other.

I started looking around on the internet for a recipe but as I always do, my own take on it. Then just as I was confused about nougatine and praline my Larousse Gastronomique came to the rescue! As I was flipping the pages I read the sign off on it that said "India Food Network". I smiled at the timming. This encyclopedia of gastronomy was gifted at the IFBM2014 last year to all the participants. Mine was lying untouched until this reviewing of my collection of culinary books. Like I said it was perfect timming indeed, one never knows how connections are formed and life surprises us. I am now writting for IFN and here is my first post on How to eat like a Koli.
 
Sorry for digressing and lets get back to the recipe. I followed the recipes of Nougatine and Chocolate Genoese sponge from the Larousse Gastronomique yet made an eggless adaptation.  I decided to fill the cake with custard since a Parsi enjoys his custard and this cake if not a success wishing would atleast pass the finicky gourmand's test.

Well it did get a thumbs up from everyone who ate it. Infact it got the silence it deserves when one eats something so good. So here is the recipe. Be warned this is quite an labour intensive recipe and each component can be made as per convenience over days then assembled and chilled a day prior to the celebration you are planning.

Ingredients

For a single sponge
65gms butter
75 gms sugar
75 gms dark chocolate
160 ml whole milk
125 gms all purpose flour
1/2 tablespoon baking powder

For the Custard 
30gms of custard powder
500 ml milk 
50 gms sugar

For the Fresh Cream Frosting
2 packs of 200ml Amul fresh cream
1/2 cup sugar
1 lime, juiced 

For the Nougatine
Recipe to follow

Making the sponge
You need to bake two sponges with the given recipe as we are making a layered cake. Else you could double the quantities and make a single sponge and slice it horizontally. I am not perfect at the slicing so I made two sponges.

Preheat oven at 200 deg celcius. We are preheating at higher temperature to make the sponge rise quickly as soon as it goes into the oven.

Melt the butter. Grease a 9 inch cake tin with a little butter. 

In a heat proof bowl mix the sugar, dark chocolate, molten butter and whole milk. Put this bowl over a pan of hot but not boiling water and whisk till the dark chocolate it completely molten. Remove from heat and cool to room temp. Whisk again to aerate it.

Then in another big dry bowl whisk together the all purpose flour and baking powder. 

Fold the dry ingredients into the wet mix. Pour the batter into the prepared tin. Tap the cake tin on the counter to level the batter.

Bake at 180  deg celcius for 20 mins.

If you are making one single sponge increase the baking time by 5 mins. I also realised that using a 9 inch tin gave me a less thicker layer than I would have liked. It worked for this cake though since it is layered and has 2 layers of sponge.

Making the custard
In a bowl mix the custard powder with 50 ml milk to make a paste. Boil the rest of the 450 ml milk. Once sugar is melted add the custard powder paste to the boiling milk and keep stirring to avoid lumps. Add 50gms sugar at the end and cook for 2-3 mins. Let it cool to room temperature. 

Making Fresh Cream Frosting
The most important thing to do even before you start making the frosting is to chill the cream, freeze the bowl used for whisking and the whisks too. It is also good idea to freeze the sugar. 


Drain the chilled cream. To do this, wet a large handkerchief wring out the excess water. Place it over a sieve. Pour the chilled cream over it. Let is rest in the fridge for 30 mins. You will have nice thick cream.

Now in the freezed bowl add the thick cream and sugar and whisk for 5 mins. Then add the lime juice to the frosting and whip till stiff peaks are formed. The lime juice helps the cream to stay stiff and the citrusy flavour is just a slight trace almost unnoticeable. Keep this bowl of cream chilled till use.

Making the Nougatine 
It is very easy to make nougatine and there is an interesting thing that will surprise you if you are Indian. The process is tricky and therefore it requires a separate post. Watch out for it!

Chop or pound the Nougatine into small pieces. Don't worry if some is powdered, use it all.

Assembly and Decoration
Start by placing one sponge layer on the turn table to form a base. Then pour the prepared custard over the base. Spread it evenly. Sprinkle the nougatine generously over the custard. Place the second layer of sponge over the custard nougatine layer. 

Now add the whipped fresh cream frosting and spread it on the cake top and sides to give it a nice finish. Sprinkle the nougatine and some more very large heartedly on the top as this is the star component of this cake. 


Once assembled move it into a large platter or on to the cake stand for the final presentation. Chill in the fridge till you bring out the cake for the cutting.

I celebrated this birthday with AC and my cousin Akshay amidst some really cheerful singing the night prior. Since we were just three people I had a simple menu. We started off with potato waffers, salted cashews, Kaju katli and gauva nectar and after an hour dinner of Chana dal, Veg pulao, sweet lime juice and this cake.

After which we just talked and talked into the dawn...

Wednesday, May 01, 2013

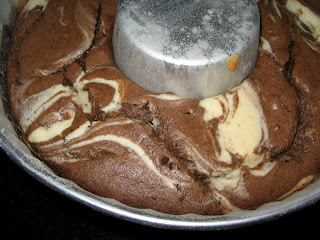
Choco-Vanilla Marble Cake


Sometimes you turn the world upside down for a good recipe and then you just experiment with something on hand and you hit upon a perfect recipe. It is so good that you want to use it every time you bake a cake but then you warn yourself this is a rich cake not your usual cake, yes even on its own!

I used this cake as the base for my nephew's BD, The Chocolate Volcano! Cake.

I am not a big fan of richly decorated cakes that are laden with butter cream or fresh cream, exception is the mascarpone. The celebration cake was something that got made for my nephew and later again just the bundt without all that ganache for Dad and me to have along with our tea. It is a perfect cake with tea or coffee. The bad thing about Bundts is that the slices are small. 


Ingredients

100 g butter , softened
1/4 cup oil
225g caster sugar
4 tablespoons curd
225g all purpose flour
1 teaspoon baking powder
1/4 teaspoon soda bicarbonate
3 tbsp milk
1/2 cup Amul fresh cream
1 tsp vanilla extract
2 tbsp cocoa powder

Soften the butter by cutting it up and whisking along with the oil, sugar and curd.

Mix all the dry ingredients, flour, baking powder and soda bicarbonate. Fold into the smooth liquid. 

Add the vanilla extract, fresh cream, milk and adjust the consistency.

Divide the batter into 2 equal parts and add cocoa powder into 1 part and mix well to get the chocolate batter.

Prepare a 10 inch bundt pan by greasing and dusting with flour. Pour the two batters in blotches. Alternate with chocolate and white batter. Then pass a knife randomly to draw swirls in the batter. This will give the marbled effect.

Bake at 180 deg for 25 mins using the convection mode in the oven.

Let it cool completely in the tin before you turn it out on to a plate. This cake is soft and has tender crumb. Slice it for a high tea or decorate it into the The Chocolate Volcano! Cake.

Saturday, September 29, 2012

A Glamorous Heart Cake


Whenever there is an upcoming marriage in the family, I make sure that I get my special moments with the bride or groom to be. I was brought up in the joint family. I have no sibblings but have 4 cousin sisters and 2 cousin brothers, we grew up as a tight knit family. It does not stay that way though, so then you begin to carve out these moments with more effort to be treasured later. With all my cousin sisters I have tried to make those moments precious, they got married and absorbed into the vortex of life that followed. So before the last of my cousins gets married we spent this refreshing holiday together last September after celebrating his birthday in Blr last year.

Now I am back in Mumbai and so a special cake for everyone in the family. I asked Hrushi what he would like but he trusts my judgement more or the experiment more don't know, he left it to me. I knew I was going to make Mascarpone cheese for his birthday so did a advance test. The test was successful in My Kitchen Lab. Will soon share it here.

The Mascarpone cheese goes really beautifully with fresh fruits, it was a discussion and then Deeba's post that made me feel confident that this will be one Glamorous cake for a birthday. 

This is an elaborate recipe so I preferred making it over 3 days.

Day1: Made the Heart sponge cake
Day2: Made the Mascarpone cheese and left it to drain and firm up in the fridge.
Day3: Did the layering and left it to chill in the fridge. Added the ganache on top.
Day4: At midnight the cake was cut. The flavors were soaked well. The Fruits still crunchy. Happy appreciative smiles and many drools.

Ingredients

For the Heart sponge cake

1.5 cups All Purpose Flour / Maida
2 tsp Baking powder
1 cup Curd
3/4 cup Sugar
1/4 cup oil
1/4 cup condensed milk
1 tsp Raspberry essence
1 tablespoon flax seeds powder + 3tablespoons water; rested for 10 mins.

Measure out the flour and along with the baking powder sieve it. Keep aside.

In a mixing bowl, add curd, condensed milk, oil, raspberry essence and sugar and beat until fluffy.

Add the flax seeds powder sludge which would have become albuminous to the wet ingredients. Mix well.

Now add little by little the flour and baking powder mix. Fold in the flour to get a batter that falls in layers when poured.

Preheat oven for 10 mins at 180 deg celcius.

Prepare heart shaped tin by greasing and dusting with flour.

Pour the batter into the tin. Tap the tin gently on the counter to remove the air bubbles and evenly spread the cake batter.

Bake in preheated oven for 40 mins or till top is golden and knife inserted in it comes out clean.

Let it cool in the tin for 30 mins and then demould onto a plate. I left the cake covered on the counter for an entire day. If you are doing the entire cake in a single day ensure it cools completely before you do the layers.

This cake is slightly dense and works well with the wet layers. It provides the required support and
absorbs the liquids released by the filling.

For the layered filling

1/2 cup Orange Marmalade 
1/2 cup icing sugar
1 teaspoon Raspberry essence
Mixed cut fruits
(I used 2 ripe pears + 1 apple with skin + 2 Nagpur oranges peeled + 1 cup Pomegranate arils, choose a colorful combination of fruits.)

After the cake is cooled completely, start the layering. Slice the cake horizontally.

Put the slice into the cake tin. First spread the Orange marmalade, level it out evenly.

Chill a splash proof bowl in the freezer. Next in the splash proof bowl put the mascarpone cheese, raspberry essence and add little icing sugar at a time and keep beating with a wooden spatula till all icing sugar is incorporated and you get stiff creamed mascarpone.

At this point add the mixed cut fruits to the creamed mascarpone cheese. Mix gently.

Fill  in all the mix into the tin. Place the top slice of the sponge cake over it. Press a bit to make it stick to the filling. Cover the tin with cling film and keep in the fridge to chill.


For the Ganache

1 slab of Bournville Dark chocolate (I used Hazelnut)
50 ml fresh cream

Just before serving, make the ganache. Remove the set layered cake onto a serving dish. You can just turn it upside down on any plate for support and place the Final serving plate face side down on it. Turn it upright again. Remove the support plate. Leave it to stand upright for further decoration.

In a bowl break the bar of  chocolate into pieces. Place the cream in a clean bowl and heat till it starts boiling, keep stirring so it does not spill over. Pour the boiling cream over the chocolate pieces. Beat it to dissolve the chocolate and fluff up a bit.

Pour the ganache from the center and move outward. Spread it with a butter knife. With a clean finger draw the swirl at the center to give it a effect of a rose bud. 

Tuesday, August 07, 2012

Sparkling Strawberry Float


If all the menu for the Birthday Party was fun then this mocktail was super fun, said my family. What you need is...

Ingredients

1.5 litres Sprite or any colorless sweet soda
1 cup Strawberry crush
1/2 litre pack of Vanilla icecream

Take 6 large glasses. Divide equally the strawberry crush into the 6 glasses. Slant the glass and pour in the Sprite slowly, to about less than 3/4 level of the glass. Finally lightly drop a blob of icecream on top. The icecream will float atop. 

Insert a bent straw into the drink. Pass around the drinks. Inform the party that it is a sparkling drink so they must not stir vigorously or else they may be showered by a bubbling fountain.

As you stir and sip the icecream forms a cloud over the liquid. The color is a lovely electric pink with a baby pink couldy float. 

Enjoy the drink and that brings us to the end of the Birthday party menu. Hope you enjoyed following this series as much as I did posting it! Before you go away let me tell you there is another interesting theme that is coming up. So see you again after the 20th.

Monday, August 06, 2012

Blueberry Tall Muffins


The birthday was on Friday and I was at Four Point Sheraton, Vashi for a conference couple of days before that. It was so well timed. After the Conference, I walked straight into the neighboring Inorbit Mall to shop for the celebrations. It had been six months since I bought a new wardrobe. So off I went picked up 4 new sets of clothes, I must have been in a very happy mood for I bought colors like yellow, orange, fuchsia and rust, rare in my wardrobe. The food picks were some Cheddar and Gouda cheeses, of which the Cheddar went into the Cheese Potato balls. The blueberries that have appeared in the market had to be bought. There was only one specific thing on my mind, blueberry muffins!

Now for a birthday if I was making Blueberry muffins they had to be king sized, else what's the fun?

So I made these Tall muffins, the recipe is adapted from Joy of Baking. I have doubled the measure of ingredients mentioned in the original. Omitted baking soda and instead increased the amount of baking powder. I use a half and half combo of oil and butter. The flax seed powder works as egg substitute. Also I have made the muffins sweeter as the blueberries were mildly sweet.

Ingredients

2 tablespoons of Flax seed powder
2 cup curd
1/3 cup vegetable oil
1/3 cup butter 
2 teaspoon vanilla essence
4 cups all-purpose flour
1.5 cup granulated white sugar
3 teaspoons baking powder
1/2 teaspoon salt
1 cups Fresh blueberries

Making these muffins is really easy.

Mix the flax seed powder with 1/4 cup water and leave it for 10 mins.

Mix all the wet ingredients and whisk lightly.

In another bowl mix together all the dry ingredients. Dredge the blueberries in the flour, so they don't sink to the bottom of the muffin.

Then fold all the dry ingredients into the wet ingredients. This batter is not your foldable batter like your usual cake batter. It is thick and needs to be spooned into the muffin moulds. I got 8 Tall Muffins from this batter.

They were delicious, soft crumb, jammy blueberries. Not your one person muffins, we shared because we had so much on the party menu and the Tall muffin as a single item is as big as a lunch serving!

My Dad loved his with a dribble of fresh cream.

Sunday, August 05, 2012

Smörgåstårta, It's A Sandwhich Cake!


We are a family that loves our local sandwich, the club sandwich that you get all over Mumbai. It is while I was in Blr, I had posted about the ubiquitous Mumbai Sandwich. It continues to top my most popular all time posts.

For the Birthday Party I decided to make healthy and pretty open sandwiches. I was looking for ways of decorating open sandwiches when I hit upon this word Smörgåstårta, Scandinavian in origin and following this link it lead me to the world of Sandwich cakes!

Cake? yes Cake in the way it is decorated. You have to just let your creative juices flow to create a beautiful looking sandwich cake. I put together my sandwich cake in just 15 mins with the help of my Dad. He buttered the slices of bread and I arranged the cake. Since we did not have time I did not do an elaborate decoration but even this simple decoration surprised my family so much. No one expects it from a sandwich.

There are ways and endless ways how you can decorate yours but I know you definitely want to know how I did it. You must be cringing at the cream that covers the cake, thinking that much cream! Read on to find out if it really is?

Ingredients for the decoration

2 cups finely chopped cilantro
1-1.5 cups of Homemade Veg Mayo
slice onion, cucumber and beetroot

First choose a serving dish you want to use. It should be large enough to hold 4 regular slices of a loaf.

The bread slices need to be buttered, this will prevent the slices from sogging. If you like spicy ones like us apply green or red chutney. Make tiers of bread slices and vegetables of choice. I used cucumber, beetroot and onion slices between the bread. Keep the edges to let the cake hold shape. If you need a recipe for making the sandwiches use my recipe of the Mumbai Sandwich.

I used five slices to give the cake a height. You will need to make a total of 4 such to get the large square foundation for the cake.

Then slather the veg mayo generously onto the cake foundation, to cover the top and all four sides.

Now take the finely chopped cilantro and shower on the sides. The cilantro will be held by the cream to give it a nice ivy covered wall look.

Last, make 4 rosettes with cucumber slices. On top of the rosettes place a slice of beetroot to make it look like a flower. The veggies used on top for decoration should be the ones that are used inside so people know whats inside before the cake is sliced up. Hey but if you want to surprise people more use decoration that are not used in the layers but go well with the overall taste.

When you cut up the Smörgåstårta, use a sharp knife to be able to cut thru the vegetables all the way into the cake. Make slices and serve the hungry party.

With all the food we had this cake stayed good right upto next day in the fridge, store it above the crisper and it will not get soggy.

Saturday, August 04, 2012

Cheese Potato Balls


This birthday falls in the monsoon and what is a Mumbai monsoon without some fried goodies. In the morning before I left for work I had pressure cooked potatoes and left the cooker as is, knowing that it will stay good till I open the lid.

Once I was back from work the first thing I worked on in the Cheese potato balls. They got rolled and put into the fridge for setting, while I was busy with other things.

These Cheese Potato balls are a crowd pleasure and are gone just as they are out of the wok. It is fun to watch the animated eating, some delicately breaking into two, dipping in the sauces and taking a nip. Another greedily popping it in the mouth not realizing how hot it is and then gasping for air to cool the burnt mouth as he fans it with his hand. Another taking a small bite and looking into it curiously searching for an answer why such simple treats are loved by so many and trying to decode the ingredients. I loved feeding them and you will love making these for yours too. So here you go...


Ingredients

6 Potatoes
50 gms Cheddar cheese shredded
1/2 cup bread crumbs
salt as per taste
2 teaspoon Pav bhaaji masala
1 medium onion chopped fine

For the cover
1/4 cup all purpose flour
salt as per taste
1 cups bread crumbs

Oil for frying.

In a large bowl mash together all the ingredients. Roll them into small balls and place on a tray. Keep the tray in the fridge to set for at least 30 mins.

Prepare the batter of all purpose flour and water. It should be slightly thinner than bhajji batter.

Spread out bread crumbs in a plate.

Remove the balls from the fridge just before frying. Dip them in the batter and then roll them in the bread crumbs. 

Heat oil, keep the flame on high. This will fry the balls quickly and to crispness without absorbing too much oil. Drain them on absorbent paper.

Serve piping hot with sauce of your choice. I served with mustard sauce and ketchup, turns out its best with ketchup.

What are you waiting for? Get boiling the potatoes and grating the cheese...


Friday, August 03, 2012

Pumpkin Shorba


Pumpkin is a vegetable that I don't admire. Earlier it was only for some special use we would get it, like in vadas or that Gavar and pumkin combo. I am a little scared to buy those small pumpkins because they are definitely hybrids. The cuteness does not melt my heart. I would rather get a slice of a fresh cut large pumpkin.

Anyways for the birthday party the choice of soup zeroed on Pumpkin due to the color. I wanted different colored dishes. I never like it when all the food  on the plate is in just one color. So tomato soup was out, they would however be used generously in the pasta.

Also the menu was of different origins so a Shorba sounded better than a western soup. Indian in flavor and that would awaken the taste buds to an exciting menu that followed. A shorba is not thick in consistency and its never loaded with cream. It's light and refreshing and warmly spicy, just right for the cold monsoon that we have right now.

Here is how to make it.

Ingredient

1/2 kg pumpkin
1 medium onion
oil 2 teaspoons
2 Taj patta
3-4 cloves
1 small piece cinnamon
7-8 pepper corns
slat to taste.

In a pressure cooker heat oil, 1.5 teaspoon. Fry onions till translucent. Add pumpkin to it. Close the lid and cook for 1 whistle.

Let it cool. Once cooled open the cooker and transfer the cooked vegetable to a blender. Puree it. 

Now heat just a 0.5 spoon of oil. Make the seasoning with tej patta, clove, cinnamon and pepper. Add the puree to the tadka. Add water to thin it. The total soup should be about 2.5 litres. Boil vigorously. Serve in soup cups or deep dish.

Enjoy the warmth! That's how we kick started our party.


Thursday, August 02, 2012

A Birthday Party


Last weekend we had a birthday party at home.

The Menu

Soup:
Pumpkin Shorba

Starters : 
Cheese Potato balls with mustard sauce and ketchup
Hummus and Potato chips

Mains :
Smörgåstårta, its a sandwich cake
Pasta in creamy tomato sauce

Mocktail :
Sparkling Strawberry float

Dessert:
Blueberry Tall Muffins

I came back from work and decided 2hrs was enough for me to prepare dinner but I was wrong it took me 3 hrs to make this menu and I had no time to set up the table, so you see some pictures were taken the next day in daylight. Each of this recipe will follow this post. We were just 6 people but this amount of food could have served 10, you don't want the food to fall short when it is a party

My family was so happy and my bros especially showed an appetite like never before. I was so thrilled with all the chatter and sedated smiles that I could not sleep till 2 am that night!

My friend Sangita, kept telling me not to make elaborate menus like these, as she is worried for my health but this is what makes me happy truly!

On Trail