Showing posts with label Remakes. Show all posts

Monday, March 21, 2016

Navroze Mubarak!


It's my first Navroze after marriage. There has to be Ravo (sheera with cardamom and nutmeg) for all auspicious days for the Parsis. So I made Ravo, Saee's Mawa cake, Dhan Dar served with gajar-mewa nu achaar. Yes its a simple lunch as we will be eating at the community dinner or Gambhar tonight at the gymkhana.

I have my own mawa cake recipe but I have so far baked only eggless cakes as per my  Maharashtriya family's preferences. Since on the Parsi side eggs are omnipresent in food and customs. I went ahead and baked my first ever cake with egg! 

Well new year's beginnings, I am hoping will change atleast a few things in my life.


Posting this under the label Remake, where I cook and review recipes from other blogs. So what are the things I did in my Parsi Kitchen? 

1. I don't have muffin moulds in this kitchen so I used a square borosil dish.
2. Used 2 cups sugar as in the original recipe as AC likes his sweet dishes actually sweet unlike me. I like mine faintly sweet.
3. I skipped the doodh masala Saee used. Instead I used elchi-jaiphal as the Parsis do.
4. Since this is baked in a square dish I baked this cake at the same temperature of 150 deg C but for a good 1 hr. Until it was a golden.


The verdict:

A beautifully light crumb with a thin crust on the outside. AC loved it and that says a  lot. 


Monday, March 09, 2015

Suikerbrood


A very long time ago I had made this sweet bread. I had loved the recipe the moment I saw it on Finla's blog. It uses sugar pearls which are available in the European market but are not found easily even in the imported goods sections in Indian markets. As I always do I try to use Indian ingredients instead and found sugar batashas suited this recipe perfectly, they just need to be crushed coarsely.

It is a celebration bread therefore the process is elaborate. it is not your callously throw in all the ingredients and let it rise recipe, so make it when you have good amount of time on hand. Finla got this recipe from a Belgian baker and it is really lovely even without egg, that's my experience.

Ingredients

Main dough

250 gm white flour / maida
20 gm fresh yeast
1 tablespoon milk ( to replace egg yolk in original recipe)
110 ml luke milk
25 gm sugar
37 gm soft Amul butter or any salted butter

For the core dough ball
100 gm Pearl Sugar or coarsely crushed sugar batasha
15 gm molten butter


Method

Measure out the flour. Dissolve the yeast in the milk and use it to knead the dough. Add the sugar and mix well. Knead the dough to form a ball about 10 mins. Mix in the butter and leave it to rise. Pinch off a piece of the dough and weigh about 125gms. This is to be used as outer shell of the bread. Keep the dough covered with a wet cloth.

After proofing for 30 mins. Punch down the dough to remove air.

In the bigger sized ball mix the sugar batasha pieces like I used or sugar pearls if you can lay your hands on it. Distribute well in the dough along with the molten butter. Keep aside.

Roll out the 125 gms dough ball into 2 mm thick disc. 

Wrap the core ball into the rolled out disc of dough. Tuck the folds on the underside so you get the smooth top. Cover the bread with a wet towel and let it rise till doubled. This is the second proofing in a round cake tin.

Once the bread is plump and doubled. Score the bread on top and fill some more crushed sugar batashas in it and let it rise a third time for just 15 mins covered with a wet towel.

Get the oven preheated to 180 deg celcius. Bake the bread for 35 mins or until it sounds hollow on tapping. 

Cool completely before slicing.

This bread is very popular in the Friesland region of the Netherlands and it is traditional to gift it to the parents of a new baby. We don't need any such reason. I love it just at anytime and I am soon going to make it again for my cousin sister who is in hospital fighting it out right now suffering the after effects of arterial thrombosis. Seeking prayers for her.

Saturday, February 14, 2015

Strawberry Soft Melting Hearts

Happy Valentine's Day!

It's a mad kind of a day today. I am hosting a couple for lunch. Its a special meal for the lovers, the wife is spoiling her husband silly. I thought I'll make for them, these Strawberry Soft Melting Hearts. Inspired by the Smitten Kitchen.

Sometime ago, a blogger friend and co-IFBMer Anand of Magic Marinade recreated this cake from the Smitten Kitchen and it just set a cascade effect on all other blogger buddies, a movement of sorts, literally! We all made and posted pics for everyone to see on FB and some posted on their blogs too. It was such fun bonding making the same cake in kitchens across the world, take a look here..

Happy Valentine's to all the people reading this blog, those who take all the trouble of interacting with me. Those who encourage me. I love you all!


Happy Valentine's to those who have found their Valentine, for those who are looking and mostly for those who are too harsh on themselves. Love your special someone and love the people around you and love yourself, for God's sake!

Do you see a heart?


Heart Melt !!!!!

I wear my heart on my sleeve always whether it is my family, a special one or even myself. I have a mushy soft heart and these cup cakes are so me.

Enjoy your day today and everyday!

Monday, March 31, 2014

Sev Barfi or Singhar Ji Mithai


गुढी पाडव्याच्या हार्दिक शुभेच्या !

Does it matter if I post a Sindhi sweet recipe on a Marathi New year? Would it taste different if I tell you I made it in Diwali and am posting it now? 


No, naa. Then here is the recipe. You have one more sweet recipe to try at home.

Since I spent the first few years of my life in Colaba where besides the Kolis the Sindhis have their base, I grew up feasting on a lot of sweets from the famed Sindhi Mithaiwalas, whether it was Kailash Parbat or Chandu halwai. Then 20 years later Jhama's had us swearing with the hot samosas, juicy jelabis and a lot lot more. The sev barfi was brought home as an odd time treat, never for the religious rituals or naivedya. For the naivedya it has to be pure milk based sweets and this sev barfi had chana atta in the form of sev so was meant only for human consumption.

I don't know what made me think I cannot make it at home. Then I chanced on Alka Keswani's Sindhi Rasoi it sounded so easy so how could I not give it a try. During Diwali I was visiting friends when I made it as gifts for them and packed it into pretty boxes. It definitely is an uncommon sweet and people love the little surprise of a sweet made from sev. 

The key to making it successfully is laying your hands on Feeka sev! That's salt free Sev. The sev is usually savoury snack or topping that goes on the chaats but for this sweet the regular sev will not work.

Again I got lucky to  get Feeka Sev at Jhama's itself and I bought it on stealth lest my Dad who was with me asked me to dump it and buy the ready made Singhar Ji Mithai instead. That would have been easier but a blogger never takes it easy when it comes to food gifts, what say?

So there I was loaded with a kg of Sev and I mean that's a lot. I was home and in the kitchen boiling sugar syrup to make my own Sev barfi. I doubled the quantities as I need a large batch to be given to 3 families. I used vanilla and dropped the food color. My barfi was richer with more mawa.

Ingredients

500 gms Feeka Sev
750 gms mawa
500gms sugar
3 cups water
1 teaspoon vanilla extract
Cashews and almonds for decoration
5-6 cardamoms peeled, seeds separated

In a saucepan measure out the water and add sugar to it. Boil it till sugar dissolves. Add the vanilla extract.

Keep a greased tray ready.

Add the sev to it and stir to mix. Break the mawa into chunks but don't crumble it. Add it into the sev and sugar mix. Stir to even out. 


Transfer the mix into the tray. Level it out. Score the barfi. 

Chop the almonds and split the cashews, decorate as shown or just the way you like. Sprinkle the separated cardamom seeds over the top.

I do not use Varakh or silver foil. Its a choice I make, here is why?

Thursday, November 21, 2013

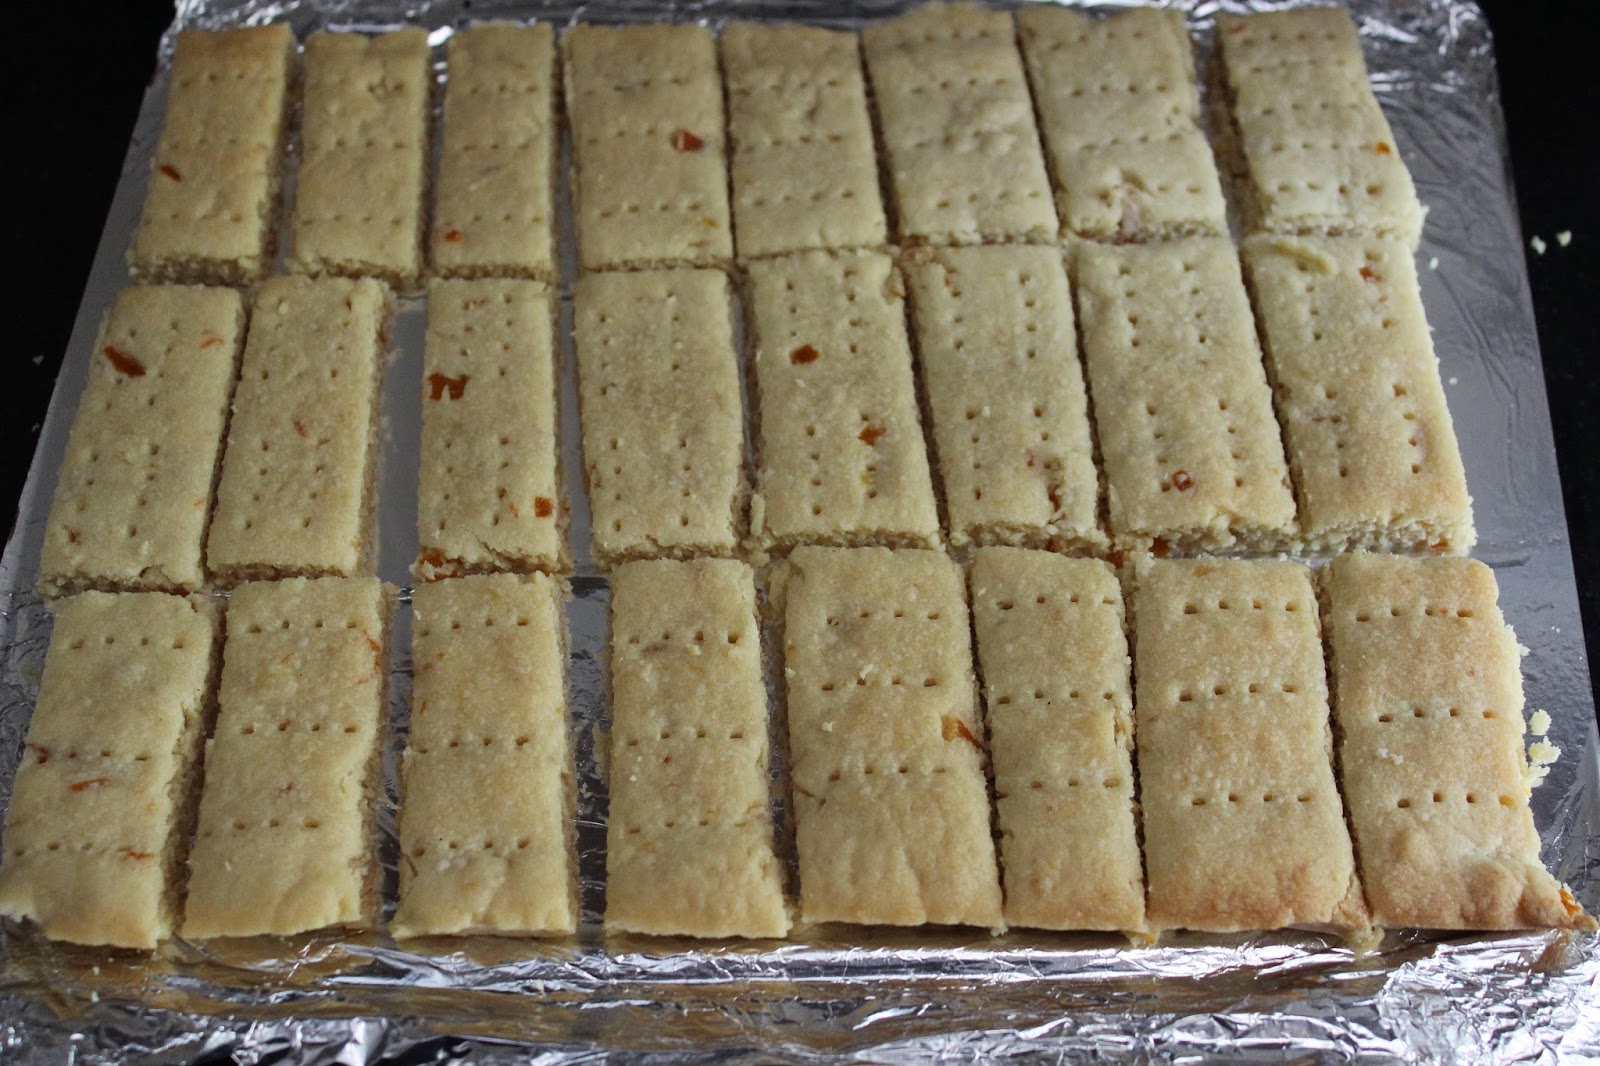
Orange Marmalade Shortbread


Mrs Rekha Karmakar posts on her son Kalyan's blogShe is a storyteller who is full of wonderful memories. Whether it was her going back to Diamond Harbor looking for that home of her childhood vacation along with her two school going sons or her rediscovering Delhi, her memories of Jalpaiguri  or her travels around the world take you back into a different era. I feel like I am listening to my own aunt telling stories.

When I conducted a contest on the Fb page Mrs. K participated in it, I was happy she did as she was just recovering from bad health. She deserved a treat!

So along with the pack of masala I promised to send her for her enthusiasm to participate in the contest; I also made Shortbread with Orange marmalade. Keeping her health in mind I thought this is mildly sweet so she will be able to enjoy it and hoping she will like it.

Thanking Mrs. Rekha Karmakar for sharing her wonderful memories of travels and childhood and wishing her good health!


Basic recipe source: Indian food rocks

Ingredients

2 cups flour
3/4 cup powdered sugar
3/4 cup ghee
2 teaspoon vanilla extract
3 tablespoons Orange Marmalade

Just dump everything in the food processor and whiz. Remove to counter and knead to form a smooth ball. Line a baking sheet with foil. press the dough into the sheet. Roll out evenly. Score into fingers. Chill the baking sheet with the dough for 20 mins. 

Preheat oven to 140deg Celsius for 10 mins. While you do that, remove the baking sheet from the fridge. Use the fork to prick the dough so that it does not puff up. 


Bake the shortbread for 20 mins. Remove on counter. Score the fingers again on the same lines to ensure the fingers can be separated out after baking. Bake again for 5 mins to get the pinkish tinge on the fingers.


Remove the baking sheet. Cool for 5 mins. Then lift out the foil along with the shortbread fingers carefully separate out the fingers. Put them on a rack to cool completely. Store in air tight container.


For chocolate drizzle
2X2 inch piece of chocolate + 1/4 teaspoon of ghee 

Zap in the microwave for 20 secs. Give a stir to thin the molten chocolate evenly.


Since I was to speedpost these for Mrs. K I did not drizzle chocolate on hers. But I thought let me do it for Dad and so there you see. Well I just drizzled with a fork for neater drizzle use a ziploc bag or icing bag.


Friday, December 14, 2012

Fougasse With Homegrown Mustard Greens


Deeba is a passionate baker who does everything from scratch, she is such an inspiration. I drool so often on her blog, this fougasse was made some time ago immediately after her post but I am able to release this post now. She uses a Thermomix, me just the regular food processor. Have made some changes in the ingredients to use what I had on hand and from my Green Balcony.

I used my own steps for the dough making and own sweet time for proofing and baking to suit my needs on that day and the next day. Stay interested you will love it.

It is so thrilling to be able to use the homegrown Mustard Greens, rather micro greens, they grew dense and I had to harvest them before the fungus could get the roots so a bunch of them found way into to the Fougasse.

Ingredients:
  • 450g all purpose flour
  • 300ml warm water
  • 1.5 tbsp active dry yeast
  • 30g olive oil
  • 1.5 tsp salt
  • 100g Amul Gouda
  • 100g walnuts, chopped (Oops missed this)
  • Extra olive oil for brushing
  • Sea salt for sprinkling 
    Roasted veggies
    • 1 red bell pepper, roasted, skinned, chopped
    • 1 head of garlic, roasted
    • 2 medium onions, sliced and roasted 

    Fresh herbs : Homegrown Mustard Greens cleaned and chopped rough


    In a bowl heat up the water to luke warm. Make a paste of handful of flour in a small bowl. Mix it back into the large bowl. Sprinkle yeast on it. Let it bloom for 10 mins.

    In the Food processor bowl measure out the flour. Run the FP and add slowly the yeast and flour slurry. Knead till it comes together.

    Leave to double in the FP bowl itself. Like you see here.

    While the dough doubles, get the oven heated and roast the red bell pepper, garlic and the onion.

    On a tray place the sliced onions, drizzle olive oil and salt and mix to get separate shreds of onions.

    In a bowl, place the halved and deseeded bell pepper and drizzle with oil and salt. Place the garlic along with it.

    Roast all the veggies for 45 mins.

    Cool and peel the bell pepper by removing the waxy skin. Peel the garlic and separate out the cloves.

    Chop the bell pepper into strips and garlic into slivers. Save.

    Now remove the doubled dough on to the floured counter and fold into the dough the roasted veggies, onions, garlic and the gouda cheese and the homegrown fresh mustard greens.

    Divide the dough into two. Roll out and shape the fougasse by slashing with a knife, three slashes in the middle to create a midriff and on the side. Spread the side cuts a bit. Traditionally a fougasse is designed to look like the ear of wheat but mine looks more like a banana leaf I think, Ha ha!

    Leave it to proof for an hour or till double on an oiled baking tray. Brush with olive oil and give the fougasse a nice drizzle of salt.

    Preheat oven for 10 mins at 180 deg Celsius. Bake the fougasse for 40 mins or till golden.

    My family chomped off the bread as soon as it was out of the oven, won't say more. Go try it and you will know what I mean.

    Saturday, June 09, 2012

    Pull Apart Garlic Rolls


    Some pictures are so enticing that you are compelled to try that recipe. Nags, of  Edible Garden
    had got me with those Pull apart rolls. It took me time to actually try it out is all my fault. This recipe is a keeper and I am going to make it repeatedly.

    I am adding this recipe here to the Remake category, that stands for the recipes that I tried from other blogs and that have helped expand my repertoire, and what I did with the recipe. While I referred to Nags recipe, I doubled the measure of ingredients to serve a family of six. Now when I am writing this post I realized Suhaina of My Singapore Kitchen had originally made with the same measures as me. I however used only half the butter as Suhaina. I prefered to slather the garlic butter and sprinkle the cilantro before rolling up, just to give it more air to improve the layered effect with less butter. I get the yeast to bubble up before mixing with the dough as I use active dry yeast, its easier to mix a liquid than dry globules. This enable a homogenous proofing of the dough. To liven up the rolls further I added finely chopped green chilies.

    Thanks to both the cooks they turned out a hit with the family. Even before I could get a picture, 4 pieces were gone. These pictures are not just to tease you, go try them out, listen to me or you will regret.

    Ingredients

    For the bread
    3 cups Maida/ White flour
    1 cup water
    1 tablespoon active dry yeast (Blue bird brand)
    1 teaspoon salt
    2 tablespoons sugar
    2 tablespoons Olive oil

    For the Filling

    Garlic Butter
    15 to 20 cloves garlic chopped fine
    25 gms of Amul butter softened

    Mix together in a bowl to use later

    For the sprinkles inside

    1/2 cup chopped cilantro
    4 green chilies chopped fine

    For topping
    2 tablespoons sesame seeds

    Making the dough

    Warm about 1/2 cup of water just about warmer than body temp. Add a teaspoon of sugar and yeast to it. Leave it alone to froth for 10 mins.

    In a large bowl measure out the flour. Add the bubbly yeast. Add rest of the 1/2 cup water. Add the rest of the sugar and salt. Knead untill smooth and lump free. Include oil and knead again for 5 mins. Grease lightly a clean bowl with little oil, place the dough ball in it and leave it to rest until doubled and airy. Under tropical conditions it take anything from 30-45 mins.  

    Then sprinkle some flour on the counter and knead the proofed dough for 5 mins. Divide into four equal parts. Roll into balls and then roll out flat into 4 sheets in an elongate form like a rectangle. Do this one at a time. All sheets should be of the same size.

    Divide the garlic butter, the cilantro and chopped green chilies equally to be used in the 4 sheets.

    Spread the garlic butter. Sprinkle the green chilies and cilantro.This way we need less butter and still get lovely layers.

    Roll up tight and keep aside.

    In this fashion. Roll up all 4 sheets.


    Then place all the rolls parallel to each other horizontally. In case one of them is short roll further to elongate. All four should be same sized. Then cut into 3 inch parts like shown here. I got 20 rolls this way.


    Now cut side up, line the rolls in a baking tray. I used a 9X11 inch tray for this. Cover the tray with a cling film and let them proof for another 1 hr.

    Once the rolls double up they will fill up all the gaps. 

    Brush the doubled rolls with molten butter.

    Lastly top up with sesame seeds.

    Preheat the oven for 10 mins at 180 deg centigrade.

    Bake for 25 mins or a little more till the top is golden.  Pull out of the oven and lay it to cool. 

    No sooner you do that hands will reach out to grab a warm bite into these buttery pillowy  garlic rolls. Four of mine were gone in a swish and had to keep the rest away for a soup and rolls dinner that night.

    Recommending you must try.


    Thursday, April 26, 2012

    Kairi chi Chutney


    The internet world has a great part in my life just like yours. It is the most generous society, when it comes to sharing experiences, laughs or recipes and even food.

    Here is a some friendly blabber I'm sharing with you that will have you ROFL for sure...
    Aamir Khan:
    My infamously crazy Mango shopping got underway past weekend. Bought 35Kgs of Badami and Alphonso varieties. This man has tasted blood!
    Aakash Kumar: Awesome.. Go for the kill
    Aamir Khan: The 50 Kgs I bought last year still will take some beating :)
    Vaibhav Parekh: ‎'Aam' ka wazan hai ki 'Aam Aadmi' ka!!!!
    Aamir Khan: Aam-Dani athanni, kharcha rupaiya!
    Aakash Kumar: too much Aam craze.. you may wanna use this as your DP during 'Aam' Season: 

    Vaibhav Parekh: an 'Arm' for an 'Aam'!!
    Aamir Khan :Aam-shaking is a way of greeting in Ratnagiri :)
    Vaibhav Parekh: King of Mangoes should be called 'Aamitabh'!!
    Aamir Khan :And comedian amongst Mangoes should be called "Jim Kairi'
    Vaibhav Parekh: Katy Perry is thinking of changing her name to 'Peti Kairi'!!
    Aamir Khan: And the Ravan villain amongst the mangoes will be called ""Dus-Sehri"
    Vaibhav Parekh: Mayapuri's seasonal magazine will be called 'Totapuri'!!
    Aamir Khan :Munaf Patel to be made brand ambassador for "Langda" aam
    Vaibhav Parekh: The one who does not like it will be called 'Langda Tyagi'
    Aamir Khan :Dongri's favorite Aam "Badaam"
    Vaibhav Parekh: Not to forget 'Aam'chi Mumbai'!!
    Aamir Khan :Aam Loving it!
    Vaibhav Parekh: Baba Aamdev!!
    Aakash Kumar: ‎"Aam' going to sleep now.. *yawn* :P
    Vaibhav Parekh :YAWN sambandh!!
    Aamir Khan :‎"Aam"igos, Gd nght
    Raju Dedhia: bhai .. kuch export bhi kardo !!!
    Anjali Koli : Make sure you're chilling the mangoes well before you eat and take an antidote of curd or sabja water in the day...that will avoid skin eruptions and other heat related stuff. Garmi Bahut hoti hai is phal mein...
    Anjali Koli : Lol to all the all the Aam blabber...Aam junta!!!
    Well in this conversation I also realized how rich Indian languages are we don't say just Mango for a fruit that has 2 stages, we don't need 2 words to describe them. Kairi is a single word for raw mango while a ripe one is called Aam/ Amba. 

    Now the recipe I'm remaking here is Saee's. The jar of chutney that you see below is a gift she gave us when we blogger buddies met. At home people demanded that I make a huge batch for the big family. Saee now has my family and my circle of friends for fans.

    Ingredients:
    5 medium-sized raw mango
    4 cup jaggery
    4 halves dried coconut
    3 teaspoons Kashmiri chili powder (she uses whole red chilies)
    4 tsp. fenugreek seeds
    4 tbsp. vegetable oil
    Salt to taste

    Method Peel and grate the mango, she says. Lazy me just chopped roughly and let the grinder do the hard work.

    Lightly fry the fenugreek seeds in the oil.

    Once fragant put off heat and add the chili powder to the hot oil.

    Stir till oil cools a bit and the chili powder is not chared and smokes evenly with the hot oil.

    Crush the jaggery, creates a lesser load on your grinder. Especially when you make a huge batch like this one.

    Place all ingredients in the mixer jar and grind. No water is required. Remove to an airtight container and store it in the fridge.

    This chutney is wonderful with whatever you want to have it with. Chips, breads, rice and though we are eating it like this with every meal these days, I sent it as dip along with Kothimbir vadi for my friend Sangita's birthday celebrations with her team at work and they simply adored it.

    We also mixed up some pohe-kurmure chivda with chopped onions and tomatoes and laced it with this Kairi chi chutney. A sukha bhel for your 4pm hunger and oh so healthy.

    Stay warned you will be addicted!


    Saee has compiled the mango recipes on her blog go over to check them out. They are some of the most authentic and delicious Marathi recipes.

    Sunday, April 24, 2011

    Allam Pachadi


    Recreating the taste of Andhra from fellow blogger's recipe is always such a lovely experience.

    Sailu's Kitchen is one blog that has fascinated me many times. It is such a pleasure to try out her recipe of this Allam pachadi that I loved when I tasted it on my travel in Andhra last month. I think I ate it atleast 4-5 times in the 10 days. I always chose it if it were on the table. Now where else does one go to find an authentic recipe from Andhra but Sailu's!

    This day I made it at home and simply loved it the way it turned out. The freshness of ginger and the tanginess of tamarind balanced by the jaggery when blended in this chutney can provide the much required jump start to a dull morning.

    You however see that my chutney is thinner than Sailu's creamy version because this was our brunch and I got a little worried about scalding my system with the famed heat of Andhra Chutneys, even though I am a huge fan. Plus I forgot that we were going to have Allam pachadi and not our regular coconut sauce with our rice cakes and crepe's. I made our regular ginger chai! We love our tea immediately following our breakfast you see. I think this will be a great chutney to take revenge on the people who are sending me orders and switching me on and off at their will. I promise full revenge. Every civilian has her day. :P

    Go over to Saliu's for a look if you haven't already been there yet.

    Sunday, April 17, 2011

    Besan Paratha


    Manisha recreated Anita's Parathas in her kitchen and looks like it has spinned off some following. Posting the pictures to give Anitha a thumbs up for accepting the gift of a recipe handed down by her MIL and  sharing it with friends very generously. Manisha for her awesome pictures that tempted blogger buddies to give a try.

    I served mine with my Aaji's Tomatochi Bhaaji and curd. This now on goes into my Combo meal section as that's what I go to for quick lunches.
    ___________________________________________________________________________

    and a Thank you note!

    These pretty wall mounting pegs are a gift from Kiran, our families have started enjoying each others company and of course there is always food shared. I was inspired by conversations with Kiran and Suresh to do a Andhra Pradesh tour that you will see coming up soon on Swachchanda.

    Thank you Kiran for this sweet gift and its stashed away for a special place.

    Monday, January 24, 2011

    Steamed Doodhi Ke Kofte


    These steamed Doodhi Ke Kofte are so handy. I swear by them when you have visitors. You can a prepare them before hand and freeze. Just toss them into a onion tomato paste when you want to make the dish. This time I was generous and splashed it with cream. I am adding a new label for Kofta, check out my other posts.

    Psst. I could fry these up and serve as a cousin of Kothimbir vadi with just Varan Bhaat.

    Steamed and cubed

    Tuesday, January 11, 2011

    Paneer Tomato Insalata Indian Ooh!


    ET's Insalata Caprese gets adapted to  Paneer Tomato Insalata Indian Ooh!


    I saw this salad on ET's and it was the first time I succumbed instantly. The comments on that post are proof. I took this long to post as this picture is not good and no where near the visuals of a fresh Paneer and Tomato on a plate sprinkled with dried Rosemary and sea salt. It looked terribly delicious when I made it. 

    Later I was attending a work related Summit at the elegant ITC Royal Gardenia when I got to taste the real Insalata Caprese and I identified this salad with the name, my friends were highly impressed as the card just said tomato salad. 

    Now that I am educated about the real one let me tell you the nuances. 

    1. Paneer though I used Malai is lite where as the Mozarella in the Caprese lingers on the tongue making you feel gooey rich. Love it both ways.
    2. Rosemary in the dry form is intense in flavor so the right amount of sprinkles makes it a success. Fresh Basil marries tomato so really well like they are made for each other.
    3. I used sea salt, must try ET's Himalayan Pink which she recommends.
    4. The drizzle of olive oil makes it really delightfully glazed.

    Thumbs up for this one ET!

    Thursday, May 06, 2010

    The Last Hapoos Icecream


    When Sumeet visited me last month, he brought 4 dozen hapoos mangoes for me. Sweet bro he is. Oh he bought many other things too like dry fruits from APMC and some farsan, some Anjeer burfi from Jhama's. My sis Charu got 5 kgs Basmati rice. I have been enjoying all the goodies all this time.

    The mangoes especially have satisfied my mango fantasies in all forms, pulp, lassi, milkshake, sheera. There was one craving I did not get to satisfy of mango icecream until I realized there was a lone mango left in the freezer.

    Yes the freezer. I learnt a new thing about freezing and defrosting mangoes. Mangoes freeze extremely well with the skin on upto a week. As it always happens the mangoes ripened all together though my bro had made sure to select mangoes at different ages. This was to make sure I get to enjoy the mangoes for a longer period. Still they ripened in 2 batches. I decide to freeze the first batch.

    They stayed good for a good week. Then the second batch ripened and I froze them too.

    Then came the problem of defrosting 0.5 hr before eating. I want my mangoes on a whim but then when you have to wait till it defrosts you curse under the breath. However there is a surprise. The defrosting makes the mangoes a mush and separating the pulp is a breeze. You don't need to cube the flesh or scrape it to make pulp in a blender. I hate the pulp made in the blender. I enjoy the lumpiness of the mango pulp more as that is more natural. So that was a discovery for me. If you are thanking me for the tip? You are welcome.

    Well I use my own trick, pulp The Last Hapoos add it to the blender. Open a can of Amul Mithai Mate pour it in. Snip of the small tetra pack of Amul fresh cream, pour over the other two ingredients. Fit the blender on the motor and give it a whir for exactly 5 mins. Pour out the mix into a clean dry plastic box. Close the lid and make sure it is airtight. Deep freeze for atleast 4-5 hrs or till it sets. I froze for a day.

    Remove it from the freezer. Scoop out the sunny yellow milky treat that mellows the heart. The Last Hapoos Icecream!

    I was not able to be a copycat for Blog Bites #2 even though I had found my inspiration on Jugalbandi so posting now with the one change, I use real cream.

    Monday, January 11, 2010

    Fruity Sasam


    Lipsmacking! Sweet, Sour, Pungent and Salty. Why should it not taste delicious. The fruity fresh sasam is such a traditional salad in Konkani cuisine.

    We enjoyed this with Dalitoy and Steamed rice, plain and simple. Clean fresh flavors.

    I had heard a lot about sasam but got the first tasting only in Mridula's Wedding. We Koli's make Kairichi Amti but then the star there is raw mango as the name suggests. Here in the sasam it is ripe mango. I love ripe mango so much that we always have it straight, no fuss. At the most as aamras and BTW just the pulp, no extra sugar, elaichi, tup for me in my aamras. That was unlike a Maharashtrian.

    Last week I saw a can of mango pulp. Believe it or not this is the first time I am tasting canned mango pulp. That itself is breaking of the ceiling for me. Once before I had tasted canned pineapple and had resolved to eat fruit only in the freshest form. Cans were out. Then life changes and I eat my words.

    Well with a canned mango pulp now in the fridge I had to make something special. The can does not mention Alphonso mango, so I feel guilty of using it for something other than eating it plain but plain canned pulp does not taste the same as fresh.

    So I set out to try sasam. I followed the recipe from one of my favorite blog Food for thought. I also want to pull out Ashwini from blog slumber. I loved the recipe. but I did not give it a tempering like she does. Also I noted that the sasam in Mridula's wedding was more pungent with mustard paste. The mustard fights for stardom with the tropical fruits like mango and pineapple. Also since I used pulp this kinda gave it a slightly gooey consistency.

    Ingredients

    1 cup ripe mango pulp
    1 cup pineapple cubes
    1/2 cup purple grapes

    For the paste

    1 green chilli chopped fine
    1 teaspoon jaggery
    salt to taste
    3-4 tbsp coconut, grated
    1-2 dry red chillies
    1 tsp mustard seeds (I need more so have adjusted this to a point of reference)

    The lazy me. I take a short cut. I grind all those ingredients into a coarse paste.

    In a big bowl mix all the fruits and mango pulp along with the above ground paste. Adjust the salt. Keep it low on salt to get the jaggery taste to stand out.

    Its ready for a slurp. Sunny flavors in the midst of winter months is good for the moods.

    Monday, July 20, 2009

    Manbhavan Muthia


    Trupti mane tamari aa recipe bau bhaveli che. Muthia saras thaya, etle enu naam Manbhavan Muthia paaDi didhoo :).

    Well after long I actually tried at Gujarati, what I am telling Trupti here is I loved her recipe. The Muthia were so good that I named them Manbhavan Muthia which means Muthia that please the mind.

    On Saturday I called Alok and Varsha over for SNACINER, now "What's that ?", you will ask. Well that is Snacky Dinner. If people can come up with Brunch then why not SNACINER! We do it some times, have snacks for dinner. I made 3 things, Paneer tikka (see the pan fried version), Pizza and Muthia.

    Alok simply loved the Muthias. This was meant to give him a small after exam treat and Varsha a little breather from the cooking. My dear friends are so busy these days, Alok with his work, studies at IIM and the toddler. Varsha is full time Mom right now, true to the word she literally does everything for the kid herself with so much patience. God bless! I love to spend time with them both and Aditya.

    Here is what I did with Trupti's recipe...

    Ingredients

    1.5 cups Wheat flour, 3 tbsp Besan flour, 1-tbsp: Semolina
    1/2 cup leftover cooked rice - mashed (skipped it this time)
    2 cups Methi Leaves chopped
    Salt, sugar, turmeric, to taste
    1 green chili and 1 inch piece ginger- chopped coarsely and roughed a bit
    Yogurt to bind the dough
    1 tbsp- oil from your favorite pickle - this tastes great in this! (will try next time)
    A handful of Cilantro leaves - chopped ( I didn't have on hand)

    For the tempering:

    2 tbsp: Oil
    1 tsp: Mustard Seeds, 1 tsp: Sesame Seeds (I used black as that's what I had), 1 tsp: Asafoetida,
    1 tsp sugar and a few drops of lime juice- if you like. (skipped)
    Cilantro leaves - for garnish (skipped)

    Combined all the ingredients in a large bowl. Kneaded together with yogurt.

    Oiled the plates from the dhokla stand.

    Pinched off small portion and lined them on two plates. I need only two plates for this measure. Placed one in the top slot and the other on the middle slot. Thus allowing space between 2 plates so there is no sticking business.

    Steamed for 20 mins or till the dumplings get a glaze. Once done removed from the steamer. I used pressure cooker without the weight as the steamer. That is regular even for Idlis or any thing that I want to steam.

    Or like this fit a mesh lid into a wok filled with water and cover with wok's own lid and let the muthia steam. (added on 13th Jun 2010)


    Got the tempering ready by heating a wok. Added 2 tablespoons oil. I was generous coz I wanted a little crunch on the outside of the muthias. Then in went mustard seeds, sesame seeds and asafoetida. Sauteed for about 10 mins.

    The Manbhavan Muthia were ready for sharing with friends as I talked to them from the kitchen.

    Notes:

    I did not have cooked rice on hand so skipped it this time. I guess this must be making the muthia lighter.

    Next time I will try with pickle oil. I noticed all the pickles in my pantry are low on oil. Yay! coz I am a pickle lover so lesser guilt. Like Trupti says this must definitely make a whole lot of difference.

    When I use ginger I rough it up a little after chopping to tiny bits. I don't like biting into ginger piece nor do it like to use paste. So this is my way.

    There was no cilantro in the herb mug so gave it a miss. I would have loved a sprinkle of cilantro at the end though.

    I used black sesame seed purely because that is what I had in stock.

    The sugar and lime juice dressing I know guarantees citrusy freshness which I will try another time.

    This recipe is a keeper. Thank you Trupti!

    Sunday, April 19, 2009

    Vendakka Kichadi

    Sunday Meal:
    Vendakka Kichadi, Chavli-Tondlichi Bhaaji, Phulka, Rice and a new dessert.


    Vishu is just over, I wished everyone at Aadiriyedath a happy new year. I've had Konnapoovu as my wallpaper the last whole week, my friend Seema was excited to see it on my laptop. The mood stayed and the weekend saw Kerala influenced meals.

    This time I bought 1/2 kg of lady's fingers from the neighborhood Reliance Fresh. I wanted to stir fry them as we both love it. Then I remembered reading on Indian Food Rocks about Okra Kichadi from Ammini Ramachandran's book Grain's, Greens and Grated Coconuts.

    Khichadi...na ..na...Kichadi everyone blundered. Taste it once and it will remain registered in your mind permanently as Kichadi. Seema loves to teach me Malayalam, so am sure she would have stressed Vendakka kichadi, Anjali.

    I loved the Vendakka Kichadi. The flavor of pungent mustard sweeps your senses. As you get used to it and find the pieces of red chili smoked in the seasonings and you naturally tease it to bring out the red juices the kichadi takes a deeper dimension of a complex flavors as you mix it in with the hot steamed rice. I have seen very few recipes with character as the Okra kichadi with just the mustard, curry leaves, red and green chilies that make it so wonderful that you enjoy every morsel of rice blended with it.

    I think the Bengalis will find the taste like home as they too use mustard as a dominating ingredient in their food. Whereas for a Maharashtrian it might take a bit of getting used too and will enjoy only if the mind is open. As a food blog writer I am not going to say no to anything as long as it is vegetarian. That's why I tried this one. Now you have two Marathis recommending it.

    Some Malayalis outside Kerala are stuck on curd rice. Shame on them! ;)


    Making here a log of the recipe and the things I did differently.

    Ingredients

    I halved the original recipe so here are proportions I used.

    2 cups okra/ Vendakka - sliced to get the star shaped Okra, I used 15 nos.
    2 cups freshly grated coconut - I used 1 cup
    1 tbsp mustard seeds- I used 2 teaspoons but next time I think 1 would be enough for the halved recipe.
    3 or 4 Thai green chillies or serrano peppers- Used 2 Indian green chilies
    1 cup plain yogurt- retained 1 cup of curd to get more gravy.
    Ammini's recipe suggests 1/2 tbsp oil - I skipped this.
    salt to taste

    For seasoning

    1 tbsp oil - I used 2 tablespoons
    1 tsp mustard seeds - retained this
    1 dried red chili, broken into two pieces - used 2 nos.
    12-15 fresh curry leaves

    I cut up the Vendakka into stars measured in the cup it gave me a really heaped cup. Kept aside.

    Meanwhile heated 2 tablespoons oil in a wok. Spluttered the 1 teaspoon mustard. Added the red chilies and curry leaves into the oil. Then in went the sliced starry starry Vendakka. Fried them nicely on high heat. They behaved themselves, no oozing just a bit browning and retaining their self respect. If fried more could have passed of a Bhendi stir fry with chapati. But then I had other plans.
    So went ahead and blended the mustard seeds, curd, green chilies, grated coconut. Got a nice paste that was white with freckles of the mustard seed skin and a yellowish ting. Then added this paste to the fried Okra. Washed the blender jar clean of the paste and added the washings to the wok. Let is simmer for a while about 10 mins.

    Adjusted the salt and tasted. I was unsure how it would taste. I loved the taste. No changes required, my taste buds were won over instantly. Thanks Ammini for the recipe and Manisha for featuring it.
    In anticipation of the meal, I went around doing other things like making Phulkas, Pressure cooking rice and Chavli-Tondlichi Bhaaji. With so much done we wanted a desert too so experimented on that. Today's meal was something we enjoyed a lot for its diverse and distinct flavors.

    Watch out for some posts that just might interest you as much as it interested me in the experiments in My Kitchen Lab.

    On Trail