Showing posts with label Green Balcony. Show all posts

Sunday, May 26, 2013

Growing Badishep


Believe it or not India is the largest producer of Fennel in the whole world !

As a young kid growing up in Colaba and Fort, my access to fresh fruits off the trees was limited. Like our parents we did not have trees to climb and pluck fruit to sink our teeth into the juicy flesh neither did we walk through roads lined with field were we could barge in and pick up fresh munchies like a frond of fennel. Our hope was the bhaiya who sold little slices of fruit spiced with a dash of chili powder and salt. My introduction to fennel was there at his little round display propped on a wicker stand.

Fennel was loved by one and all lush green and sweet to taste. Fennel in Marathi is badishep. I decided to grow some in my green Balcony. BTW just wanted to mention the balcony is undergoing some major changes and will come back in a new avatar.

Get ready with you pots to plant Badishep along with me. For the seed reach out in your pantry, go no further.

Planting
    1. I use a big planter plate, 12 inches to grown Badishep. 
    2. Ensure there is a small hole in the bottom of the pot for draining excess water.
    3. Fill up to the brim with planting soil upto 5 inches.
    4. Sprinkle the seed over the planting media.
    5. Sprinkle water to moisten the soil. Do this every day.
    6. Cover thinly with dry leaves/ saw dust /  or a wet muslin cloth to protect from birds picking the sprouts.
    7. Ensure enough sunlight, but not direct.
    8. In about 2 weeks you will get about 10 inch grassy growth. 
    9. At this point you can move the plants into deeper pot of about 5-6 litre capacity.
    10. Keep the soil moist but not wet and choose a really sunny spot for it. In a month and a half you will see it flowering.
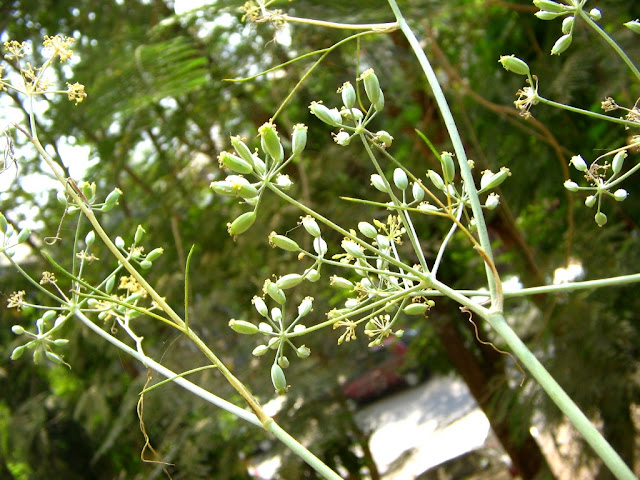
    11. The yellow flowers on the radial frond grow into sweet Badishep/ fennel. 
    12. Let them mature a bit to get large seeds.
Harvest : 
Pluck the fronds of Badishep to harvest and enjoy the sweetness. The young leaves can be used to make parathas or as a herb in your pasta. The leaves are very mild in flavor.


Uses:

As mouth fresher
As a spice
As a natural appetite suppressant

Sunday, May 12, 2013

Growing Owa


I was on an experimenting spree when I sprinkled some Owa or Carom seeds to grow. I wanted to grow the thick velvety leaves which we use to make bhajji. To my surprise these seeds grew to look like cilantro. I knew then that I was not growing these for any yield of great value. It was just to see what happens and what is the life cycle of this seed that is used as a spice in many Indian dishes.

The plants grew to a height of 4-5 ft and blossomed into beautiful tiny flowers. It gave some seeds to munch on but that's about it. They were very mild in taste.

Recording my experience here:

  1. In a tray filled with planting soil sprinkle Owa/ carom seeds and sprinkle water.
  2. Leave it to sprout and grow about 3-4 inches.
  3. Replant the micro plants
  4. Take a container, we used a 5 kg plastic recycled bag one. 
  5. Ensure there is a small hole in the bottom of the pot for draining excess water.
  6. Fill with planting soil upto 1 inch below the brim.
  7. Remove the entire cake of the plants and bury in the prepared pot.
  8. Sprinkle water to moisten the soil. Do this every day.
  9. Ensure enough sunlight, but not direct. You can keep it under a larger plant for some shade.
 Time to replant: Don't they look just like cilantro

The flowering starts after a month

In 2-3 weeks you will seed the seeds on the fronds
Harvest : 
You don't get too much to harvest but pluck the fronds and much on and enjoy!

For me the harvest was of a bunch of pretty flowers that decorated my table for 3 days.

Monday, April 29, 2013

Growing Green Garlic


In my home garlic is not something that we depend on to enhance the flavor in our food but there are certain things unarguably that taste better with garlic. Like the garlic chutney which is a signature Koli style.

Well but garlic cloves taste quite different than Garlic greens. The greens are milder and impart and beautiful mellow taste. 

Growing it is as easy as sticking the garlic cloves from your pantry into some mud, watering it and waiting for it to sprout and waiting to let it grow into 10-15 inches tall grass like greens.

Here is what I did
  1. Take planter plate. 
  2. Fill with planting soil upto 1 inch below the brim.
  3. Create holes in the soil at the top.
  4. Take a whole garlic, separate out the cloves. Stick each clove into the holes created and cover with soil.
  5. Sprinkle water to moisten the soil. Do this every day.
  6. Ensure enough sunlight, but not direct. You can keep it under a larger plant for some shade.
  7. End of a week or two you will see beautiful greens. Let them grow till 10-15 inches tall.
Harvest : 
Pluck the greens when still tender for use as a herb. You can keep them fresh by keeping it standing in water for a few days.
Some uses:

Sunday, April 07, 2013

Growing Chavali


Chavali or Black eyed beans, is one of my favorite beans. I love tender beans as a stir fry and the mature seeds soaked overnight and cooked into a spicy curry with a gravy. On one such day I soaked the Chavali for the curry and decided to plant one and see how it grows. I had read somewhere it grows easily. It did and I am happy with it.

I grew Chavali in three stages

Soaking:  
12 Jan 2013
Add the seeds in a jar and cover with 4-5 inches of water above the seeds. Soak them in water overnight.

Sprouting: 
Drain the soaked seeds and let them sprout in the soil       

Planting: 
  • I used a plastic tray with growing media.
  • Fill up to the brim.
  • Ensure there is a small hole in the bottom of the planter for draining excess water.
  • Sprinkle water to moisten the soil. Do this every day.
  • Cover thinly with dry leaves/ saw dust or a wet muslin cloth to protect from birds picking the sprouts.
  • Ensure enough sunlight, but not direct till the bean stalk proliferates quite a bit.
  • In a week I got 5 inch tall bean stalk.
  • Replant into a bigger pot with growing media, a mix of soil and twigs. Fill up with planting soil up to 10 inches.
  • Start supporting the bean stalk on the grill or a cage.
  • It flowers into white blossoms and bears fruit in the form or green beans.

Harvest:
Pluck the beans once they are about 15 inches to use when tender or leave them on stalk to mature if you want to wait for the seeds.

24 Mar 2013

Cleaning for Use:
Remove the crown and destring, if you must, break into small pieces or chop up fine.

Some uses:
Till now I have harvested only 4-5 beans at a time so they went as sprinkles on uttapams or into a sambar.

While we are talking about growing Chavali here, there is something else happening on the other side of the world with red chavali and my Koli masala which traveled across with ET. Mints, thank you for posting, you made my day!
 Fresh beans harvested for the mature seeds. 11th April 2013

Saturday, April 06, 2013

Finding peace...


My Green balcony


And 

My father's soulful singing


  Maze Maharaj


Sadguru Maza

Sunday, December 09, 2012

Growing Mustard Greens

Growing Mustard Greens was something I wanted to attempt what with Bollywood glamorizing the lush green mustard fields of Punjab. Frankly I had eaten saag so many times at the best of Punjabi restaurants in Mumbai (were there any other kind in the late 70-80s) but had never seen the leaves used for the saag.

In my mode of sprouting any and all seeds from the pantry I sowed the mustard seeds. In 8 days I had Punjab in my lil balcony I thought until I googled for mustard greens. The pics looked nothing like I had in my tray. The leaves when mature are large and the plant grows the height of a person in the fields of Punjab. My tray got a little crowded even with the micro greens and I had to harvest them by the end of 8 days. 

These were not good enough for saag making and the quantity was too large for a salad of mustard greens. These are pungent to taste and have to be used as sprinkles if at all to be used in salads. So I found a super way of using them.

For now since this is a post on the stuff I grow in my Growing Methi, start from the planting step. Then sprinkle the seeds and moisten the planting media and keep doing it till you see sprouts.

Come back again to read about my experiment with mustard greens in a French recipe!

Saturday, November 17, 2012

Growing Cucurbits


They grew from the compost, I did not sow them so I don't know what they are, could be cucumbers and pumpkins I guess.

 Flowering started within a week.

 The first cucurbit! YaY! I thought it was ivy gourd, Dad says its a pumpkin.

 It is getting fatter. I still don't know what it is. May be a cooking cucumber.


Yes it is a cucumber, gifted it to my Uncle MJ, Aruna Kaki made sambar with it.

Diwali is over. Stop over eating right away. Get hold of some fresh veggies, have a nice crunchy salad. Detox for a week, join me.

 Posted on FB, 31st March 2013 : It smells beautiful, the freshness of the just harvested! Aha!

Sunday, October 28, 2012

Growing Tomato

This post is a log I will maintain as the days, weeks and months pass... Will publish it afresh every time I update it. Go to the latest update at the end of the post.

Day 1: (Planted in the week of 10th June 2012)  Found a rotten tomato in the fridge. Did not want to throw it in the Daily Dump so squeezed out the seeds in a container that I had kept ready for sowing seeds. The container is a 1 litre milk carton filled with hay 3/4th and 1/4th with planting soil. I forgot about the seeds until after 4-5 days.

Day 4-5: (16th June 2012) Seeds sprouted, couple of inches of sprouts with leaves. I noticed the sprouts today and am thrilled!

Week 3:
The real leaves forming shape now.

8th Sep 2012: @ 3 months

There were four tomato plants that grew strong in a cluster, I accidentally broke one while replanting them. Now there are 3 growing in 3 corners of a wooden crate lined with a plastic bag. The media in the crate is 10 inches hay, topped with 10 inches planting soil and 1 inch compost from my Daily dump. This transplanting was done a month ago and soil went down to sit with the hay quite a bit. The 1 inch compost also acted as mulch for the plant. One FB friend suggested nipping the apex to get more branches and it worked. In a month I think they will need support.

Month 5: 28th Oct 2012

The  tomato plant is about 4ft now. It is flowering since couple of weeks. These are the captures in the last 2-3 weeks. I have added a 3inch layer of compost with the dual aim of feeding nutrients and mulching for a good yield.

I have been nipping the suckers (the branches that spring up in the notches) since a few weeks, so the plants have fewer branches but every week I see fresh flowers.

 Tomato blooms and the hairy stalks

 Wilted flowers and swollen ovaries. I felt such joy seeing the baby bumps :)

 There they are baby Beefstakes!

Will post the pictures of the vine ripened tomatoes once they are ready. Am sure you will be checking here.

The beefstakes ripened on the plant but gave miniature fruit the size of small grapes. When the other plant started flowering I removed the Beefstakes from the crate. Topped 5 kgs soil. It turned out that the other tomato plant was a Roma.

 16th Dec 2012: The Roma are rewarding.

 12 Jan 2013: At peak season 12 tomatoes!

Saturday, June 16, 2012

Growing Cha Paati

In Koli lemongrass is called Cha Paati or Tea blade getting its name from the one big use as a flavoring in the morning nectar. In Marathi it gets the name Gavati Chaha again from the fact that it is a grass and its use in tea. To visiting friends, an offer to share a cup of lemongrass tea always ends up into extended conversations. Many simply love the citrus laced flavor that it imparts. In a cup of tea, it can brighten your day like nothing. The aromatics in it lift the mood. It's antifungal, disinfectant properties does wonders for those treacherous sore throats and coughing bouts. Though in India we use only the blades, the bulb has found a place of pride in oriental cooking especially the soups and the strongest flavor does lie in the lower end of the grass.

This grass was potted by my bro Sumeet. The day he wants to bribe me he promises me a cup of his specially brewed lemongrass tea. Men who were trying to woo me some how found this as a ply after reading this post is my guess. They sweared to make me a cup of lemongrass cha every single morning. If that was the only thing that I looked for in a man I would have been married long time ago. Such is the effect of lemongrass.
Planting and Growing lemongrass is very easy. Like any grass it just proliferates without any effort in the tropics. Lemongrass is native to India and found in many South Asian countries. The best thing is, its a perennial.
    1. S used a large 10 litre pot for planting lemongrass.
    2. Ensure there is a small hole in the bottom of the pot for draining excess water.
    3. Layer the bottom with an inch or two of gravel.
    4. The growing media is planting soil with just a few handfuls of compost.
    5. He had got a bulb of lemon grass that he just stuck into the soil.
    6. Sprinkle water to moisten the soil. Do this every day, about 1/2 litre of water a day is good to keep it lush.
    7. Ensure enough sunlight, more the better.
    8. When the lemongrass grows more that 2 feet tie it up so that the blades don't spread around making the plant look like a weed.
Tip: 
Saee suggested trimming the tips of the blades to get a denser aromatic content.

Harvest :
Clip the ends to use fresh. Once in six months trim about 1 foot length of the tips of the grass.

The grass can be cut into bits and spread on a plastic sheet. Dry in the shade to use later. The good thing is, it retains the aromatic oils on drying and can be used in the same way as fresh lemongrass.

Some uses:
  • Infuse your drinks with lemongrass like I did in MaTha.
  • Make a Kora Cha to jump start your day.
  • Make an ayurvedic disinfectant by crushing lemongrass and sprinkling on your compost.
  • Use it in Oriental cooking to add the special touch of home grown.

The bundled magic

 
It's the season, I am enjoying my weekend...a mid morning sipper of Kora Cha... a book in hand in my nook in the Green Balcony

    Sunday, June 03, 2012

    Growing Methi


    In Thal my Koli people are very fond of Methi or Fenugreek. They love it as a herb and even in their sweet, can't believe it read about it on Methiche Ladu! This influenced my likings a lot too. For me Barik Methi or Young methi is always associated with Thal, we would get those tiny herb bundles from only the village if someone was visiting us. It made a rare appearance in the Fort Market if the farmers from Vasai brought it to sell. It is considered quite exotic as it is not easily available. This herb is very delicate and has almost no shelf life. It is best used in half a day of harvesting. My father like a true Thal born Koli loves barik methi and I started growing it just for him. Growing methi is very easy. The real challenge is harvesting it and cleaning it before cooking.

    In my post on the beloved Barik Methi Moog Dal of Kolis from Thal I had talked about how my grand aunt grew methi. Though I follow almost the same steps I grow it on a semi soil medium. This may be useful for urban gardeners like me who have a limited space and resources.

    I grow methi is three stages 
    • Soaking
      1. Measure 1/4 to 1/2 cup methi/ fenugreek seeds.
      2. Add the seeds in a jar and cover with 4-5 inches of water above the seeds.
      3. Soak them in water overnight.
    • Sprouting
      1. Drain the soaked seeds into a basket or mesh.
      2. Let the sprouts come out a few cms.

    • Planting
      1. I use a big planter plate, 12 inches to grown Methi. It is just right in depth for Barik methi, as it will grow only 4-5 inches. When I need to grow big Methi I can use a deep pot or a crate with more growing media.
      2. Ensure there is a small hole in the bottom of the pot for draining excess water.
      3. Layer the bottom with an inch or two of coconut coir or hay. I had collected coconut coir from the coconuts used in my kitchen for the first time. The second time I used  the hay from the crate in which the mangoes were delivered.
      4. Fill up to the brim with planting soil upto 2-3 inch. The total growing media should be approx. 5 inches.
      5. Sprinkle the sprouts over the planting media.
      6. Sprinkle water to moisten the soil. Do this every day.
      7. Cover thinly with dry leaves/ saw dust /  or a wet muslin cloth to protect from birds picking the sprouts.
      8. Ensure enough sunlight, but not direct.
      9. In a week I got 5 inch tall Barik Methi.
    Tip: 
    Make sure you are not over watering the plant. This herb requires less water and a growing media with low water retention.

    Harvest : 
    Pluck the methi young and harvest the entire lot for single use if you are making a curry.


    Cleaning for Use:

    Pluck clumps of the methi and tie lightly with a thread. Wash off the soil thoroughly shaking off the grits. Do this 4-5 times to get rid of all the dirt. This cleaning is a very important step if you want to enjoy the pain of labour that you put in growing the methi.

    With 1/4 cup seeds you will get enough harvest for just spiking a curry with methi leaves. I made a Tomatochi Bhaaji and spiked it with Barik methi.

    With 1/2 cup seeds I got enough to make Barik Methi Moog Dal, it serves 4 generously. Felt so happy with the harvest and my recreation of my Aaji's recipe. This was a gift for my fave MJ Kaka last Sunday.
    Some uses:
    • Use for garnishing in salads, it gives nice crunch and a flavor of the robust herb.
    • Use my recipe of Barik Methi Moog Dal or create a recipe of your own and share it here.
    Note: Depending on your weather conditions, the time for soaking, sprouting and growing will vary hence I do not use Day 1, 2, 3 ...as a parameter to monitor my gardening. 

    This is 15 days old Methi (28th Oct 2012)

     1 month old methi

    I can't go to a farm to pick my food as I live in Mumbai so why not bring the farm into the kitchen!

    On Trail