Friday, December 08, 2006
Garlic Pickle
It was that time of the year when Chaturmaas the four month sacred period was going to start. I had some garlic bulbs that were unused and I was not ready to use garlic in anything and everything I cooked. So decided to make a pickle. This year I had already made 4 other preserves hence didn't want to go about making the masala myself. Also there was a packet of Bedekar's Pickle masala lying around that I wanted to use. Here is what I did.
Ingredients
3 bulbs garlic
1 table spoon Bedekar's pickle masala
1/2 lime juice
1/2 cup oil
Peeled the pods and cleaned to get the garlic pods. Fried them in oil for 2 mins. Let it cool for 5 mins added masala, lime juice and mixed. Cooled completely through the day. Before going to bed transfered the pickle into a dry jar. It gave me about 300 ml jar pickle. Generally we start using pickles as soon as they are made even if they haven't aged yet. This pickle was fortunate it aged for 4 months.
The first trial was with curd rice served to my friends and they gave a thumbs up!
P.S: I realize now my pickles have a story each attached to it especially the Kairiche Pickle. Will share my labours love with you soon and the Upadvyap we did for it all for the love of home made pickle with the specific type of mangoes that we like so much. Friends I will be away till next year so Happy New Year! in advance.
Thursday, December 07, 2006
Limbachya Salache Lonche
Last Summer holidays my family and friends visited me. There were 5 kids who had lime juice thrice a day all made by themselves. I didn't want to stop them from enjoying their juice making session either so I would give them all things needed apparatus and all and send them out onto the sit out. All parents gleemed amusedly by the noise they made and believe me the juice was superb. Can you believe how many lime peels I might have collected. They were not squeezing out the juice fully so I didn't want to throw away the peels. So I gave them a big empty jar and told them to put the used lime peels in it and top it up with salt layer. In 15 days I had a full jar. After the kids left and I felt lonely I started a new activity of putting the jar in the sun on the terrace every morning before leaving for office and getting it back into the kitchen in the evening before dinner. In a month I got lovely darkened lime in brine. I tasted it and since this was used lime it did not taste as good as lime with the juice that we make usually. So what did I do.
Ingredients
About 1 kg of lime peels in brine
1/4 cup red chilli powder
1 tablespoon mustard seeds
1/4 cup sambar powder
1/2 cup Oil
Heated oil in sauce pan. Spluttered mustard in the oil. Removed from heat allowed to cool for 5 mins. Added chilli powder, sambar powder and lime in brine. Mixed well and stored. It was ready to eat immediately. Threw away the brine.
I carried it to office in my lunch box the next day and my colleague who does not like any taste other than the typical south indian actually liked it. But I didn't tell her this secret recipe and the story for the fear of being tagged thrifty.
Wednesday, December 06, 2006
Recycled Dhokla
I was born a Koli but the period between 8 years-16 years of my life I lived in the Gujarathi / Parsee heartland Fort. Sometimes it makes me laugh how places get their names. This southern area in Mumbai was supposed to have been a Fort so the obvious but I do not see even a single trace of the Fort.
Fort is downtown Mumbai. Living in the area meant having a childhood without open places to play after school unless ofcourse if you went to Bombay gymkhana or Harnimon Circle. I regert I never did learn to ride a bicycle like most children do. Spent most after school hours reading books which were in plenty on the streets, school library and tagging along with MJ kaka to Petit library. I will write a separate post on Walking to the Petit Library with Kaka as it was never just that. Hey I'm just straying away.
So back to Dhokla. Yeah I was saying how could I not like dhokla living in this mini Gujarath. Many times there would be excess dhokla which Dad recycled into this snack. This dish though made from leftover dhokla in the past. We like it so much at home that now we make Dhokla in the morning control temptation to eat it till evening and then when it is too cold to be enjoyed as dhokla transform it into this dish. However never try to make it using Nylon dhokla or dhokla made from besan it will not lend the same texture. Try it and tell me.
Ingredients
1 cup leftover Dhokla
1 tablespoon thin shev
1 teaspoon lime juice
1 teaspoon sugar
1/2 teaspoon fresh ground pepper
1/2 teaspoon toasted cummin seeds powder
1/2 teaspoon toasted corriander seed powder
1 cup leftover Dhokla
1 tablespoon thin shev
1 teaspoon lime juice
1 teaspoon sugar
1/2 teaspoon fresh ground pepper
1/2 teaspoon toasted cummin seeds powder
1/2 teaspoon toasted corriander seed powder
grated fresh coconut and
cilantro for garnish
Crumble the Dhokla in a plate and save. In a bowl add lime juice and sugar and dissolve. Mix this juice with the dhokla crumbs using a fork. Sprinkle the three powders and mix again with the fork. To serve top it up with thin shev the ones used in bhels. Garnish with fresh grated coconut and loads of cilantro.
Tuesday, December 05, 2006
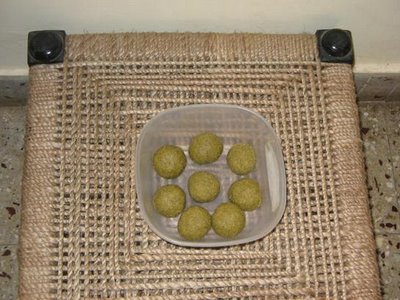
Moogache Ladoo
This recipe I learnt from my favorite Marathi cookbook, "Annapoorna" which I recieved as a gift at the age of 12 years. It is absolutely tattered now. What I realize is the great influence it had on my cooking. Some of the recipes I make may not be exactly from that book just like this one as now I don't even need to refer the book. I make the laddoos for my little nephew, Pranav who simply loves them.
Ingredients
1/2 kg Green lentils split
1/2 kg powder sugar
5-6 cardamons powdered
1 cup ghee
Dry Roast the Green lentils in a kadhai. Leave it to cool completely. Once cooled powder it to fineness in a dry grinder. Next heat ghee in the kadhai add the powdered green lentils and roast on simmmer till the rawness vanishes. Be careful not to burn the mix. Don't leave the roasting till you are done. It takes about 20 mins for the measures mentioned here. Then add the powder sugar while still on the heat and mix well. Remove from heat immediately else the sugar will char. Let it cool a bit so that it is easy to shape the laddoo. Just before you make the laddoo add the cardamom powder and mix well. Shape the balls real smooth. Relish the goodness of the green laddoo.
Ashwini made laddoos with the dehusked moog dal check out her version.
Monday, December 04, 2006
Shravani Cake
Shravani Cake gets its name from the fact that it is a cake to be feasted on in the sacred month of Shravan. We being a vegetarian family and with 2 kids whose birthday falls in the month of Shravan makes even an ordinary cook a creative one. Aai made this cake to prove that all children in our joint family were equal. This was a BD present to all 8 kids at home on their individual BDs. We loved it then and we love it now. My elder bro tells me that mine does not taste as good as Mom's. The secret it she made it in a cooker just like steaming idlis. Whereas I make in the Oven.
Ingredients
1 cup Semolina roasted
1/2 cup milk
2 tablespoon sour curds
1 tablespoon ghee
1/4 cup Pistachio, almonds, cashews slivered
1 generous pinch saffron to be soaked in milk
1/2 cup sugar
1 teaspoon baking powder
In a large bowl first lets beat the ghee to a froth. Add the sugar and beat till dissolved. Now lets add milk and curd then add the semolina and fold into the mix. Mix in the nuts and saffron and baking powder till mixed properly but with a light hand. Let in stand for 10 mins. Meanwhile preheat oven to 200 deg Cel. Grease 6 inch round mould with ghee. After 10 mins lets pour the batter in the mould. and bake for 20 mins. This cake should not be allowed to be browned as it is made from semolina it will give a very hard crust. It should be removed from the oven as soon as it is baked from inside. to check if done insert a dry knife if it pulls out dry then the cake is baked and done. Remove from the oven and let it cool for 10 mins. Then demould it on a tray or cake stand. As you see in the picture above, the cake I baked was for almost double the quantity given here and so I took a mould which could hold all the batter at one time. Enjoy!
Updated: 5th Feb 2007
Pressure Cooker Version
This varies only in the last step. Instead of baking we steam the batter. For steaming you can use a greased Dhokla stand and cut into diamonds after steaming Or in idli stand for small cakes. This versions is fluffier and tastier after all this is how Aai made it. It should be steamed for 20 mins and make sure it is cooked as explained in the oven version before removing from heat and leaving it to cool. I'm sure you will like this version more than my oven version.
Friday, December 01, 2006
Pasta Salad
This salad is much loved in my family due to the color, crispiness and yet warm bite it provides. I just loved taking the pictures and knew my blog would look festive with them so forgive me for the similar looking shots. I devepoed a real taste for the salad when I was working in nightshifts for a while. I din't want to eat heavy food yet wanted to keep full through the night without the side effects of doing night shifts. This recipe is just great for students who stay up all night to study during exam times.
Ingredients
1/2 cup Conchiglie(shell) Pasta
some cabbage, tomatoes, carrots, zucchini chopped large
2 onions chopped big
1/ cup green sprouts
1 1/2 cup milk
salt to taste
fresh ground black pepper as much as you like
Step I
Lets start by putting the saucepan on the heat. Pour in the milk and add pasta, sprouts, chopped zucchini. Cook till done with salt. The rawness of the sprouts and zucchini should have vanished. I just added torn cabbage on the top before taking the picture below.
Step II
Then prepare the veggies. In a shallow pan roast the veggies with minimum oil and salt as per taste. They should look like this. If you notice I had roasted zucchini too but it did not cook well and had to weed it out while eating. Therefore in this recipe I have suggested it be cooked along with the pasta.
Step III
Now in a salad bowl mix together the cooked stuff from step I and step II. Add the fresh ground pepper. I like a lot of pepper in this salad.
Serve while still warm with toasted bread. At home we like to dip the bread in the sauce. It tastes too good.
Subscribe to:
Posts (Atom)