Wednesday, June 20, 2012

Talod Handwa


Talod is a brand I loved for their Nylon Khaman Dhoklas. Now found this Handwa packet and I was thrilled. It made a instant lunch for 2. 


There is a recipe on the back of the pack. What kind of a food blogger am I, if I had to follow exactly what they say and then put it up over here. So here is what I did.

  1. I used only half of the amount of oil mentioned in the recipe. Both for mixing and for the seasoning.
  2. The mass for the Hadwa was provided with 1 cup of coarse grated bottle gourd.
  3. Instead of pan roasting/ shallow frying with the seasoning. I preferred to use the microwave+grill mode. Microwaved for 5 mins. Then unmoulded on the stand and grilled for 20 mins.


It turned out delicious and filling. Handwa or as I have always known it "Handwo" will soon be tried in my kitchen from scratch yet I know I can depend on Talod on a lazy day.

Saturday, June 16, 2012

Growing Cha Paati

In Koli lemongrass is called Cha Paati or Tea blade getting its name from the one big use as a flavoring in the morning nectar. In Marathi it gets the name Gavati Chaha again from the fact that it is a grass and its use in tea. To visiting friends, an offer to share a cup of lemongrass tea always ends up into extended conversations. Many simply love the citrus laced flavor that it imparts. In a cup of tea, it can brighten your day like nothing. The aromatics in it lift the mood. It's antifungal, disinfectant properties does wonders for those treacherous sore throats and coughing bouts. Though in India we use only the blades, the bulb has found a place of pride in oriental cooking especially the soups and the strongest flavor does lie in the lower end of the grass.

This grass was potted by my bro Sumeet. The day he wants to bribe me he promises me a cup of his specially brewed lemongrass tea. Men who were trying to woo me some how found this as a ply after reading this post is my guess. They sweared to make me a cup of lemongrass cha every single morning. If that was the only thing that I looked for in a man I would have been married long time ago. Such is the effect of lemongrass.
Planting and Growing lemongrass is very easy. Like any grass it just proliferates without any effort in the tropics. Lemongrass is native to India and found in many South Asian countries. The best thing is, its a perennial.
    1. S used a large 10 litre pot for planting lemongrass.
    2. Ensure there is a small hole in the bottom of the pot for draining excess water.
    3. Layer the bottom with an inch or two of gravel.
    4. The growing media is planting soil with just a few handfuls of compost.
    5. He had got a bulb of lemon grass that he just stuck into the soil.
    6. Sprinkle water to moisten the soil. Do this every day, about 1/2 litre of water a day is good to keep it lush.
    7. Ensure enough sunlight, more the better.
    8. When the lemongrass grows more that 2 feet tie it up so that the blades don't spread around making the plant look like a weed.
Tip: 
Saee suggested trimming the tips of the blades to get a denser aromatic content.

Harvest :
Clip the ends to use fresh. Once in six months trim about 1 foot length of the tips of the grass.

The grass can be cut into bits and spread on a plastic sheet. Dry in the shade to use later. The good thing is, it retains the aromatic oils on drying and can be used in the same way as fresh lemongrass.

Some uses:
  • Infuse your drinks with lemongrass like I did in MaTha.
  • Make a Kora Cha to jump start your day.
  • Make an ayurvedic disinfectant by crushing lemongrass and sprinkling on your compost.
  • Use it in Oriental cooking to add the special touch of home grown.

The bundled magic

 
It's the season, I am enjoying my weekend...a mid morning sipper of Kora Cha... a book in hand in my nook in the Green Balcony

    Wednesday, June 13, 2012

    Featherlight Okra


    Remember the Mango boy, the witty Aamir Khan, my friend and colleague, he took us, few friends to dine at the Sarovar Portico in Mahape. There were few things on that buffet menu that were striking yet the crisp fried Bhindi was a class apart. It got a thumbs up from all of us sitting around the best table in the restaurant, the round one ofcourse. 

    The Bhindi made our chatter as crisp as ever, it was after 7 long years I was meeting my buddies. The men all ears for who was upto what and especially the hot babe on the floor. We were part of a huge team and for many it was their first job. I was one of the older people in that team, I'd hated their brashness then. Most times I was low key at work but after moving on to a larger part of the org, I missed all the fun and the people until I caught up with them couple of years ago on Facebook. At the diner, We shamelessly bitched about every one from work and went down memory lane of ragging people, our kiddish fights and name calling; intruding chat logs, ok that one I did not do, it was the guys!

    ;
    The original deep fried Okra that we loved

     Photo credit : Nitin Sharma

    We did not realise how quickly it was midnight, the gentleman that Aamir is, he dropped all of us home reminding us that the next day was a Monday.

    Now when I look at my team mates, its a good feeling to know they are doing well in life. Many chose partners from the team itself, they have morphed into such loving caring family people. I got to know they had organized a prayer for Mahesh Shetty, an ever smiling face we lost in the Mangalore plane crash in May 2010. People who value friendships, people who have the ability to give to another when the world restrains from sharing.

    Aamir has to explore a career in stand up comedy besides he is our go to foodie guide. Nitin & Dipti  amaze me with their ability to bind people together which is a rare quality today. Shrijit, is managing his Rock star bro's career so well. Hoping to see you whenever possible, Aamir, Nitin & Dipti, Shrijit, Amol & Sujata. Aakash for speaking to us long distance. It was a lovely evening I spent with you guys. Thank you Aamir!

    Back in my kitchen, I had to recreate a healthier version of that Bhindi. The secret to a featherlight Okra is to slice it thin on the Mandolin and grilling it to perfection in the microwave.

    Follow the steps and I promise you the best crisp Bhindi you have tasted ever, I swear it.

    Ingredients

    1/4 kg Okra
    2 teaspoons oil
    Salt
    Red chili powder

    Wash and pat dry the okra. Cut off the tops and tails. Hold the thick side and slice wafer thin on the mandolin into a largish bowl. Add the oil onto the okra. Mix lightly with your figers to coat the okra with oil. In a single layer spread the sliced okra on the turn table glass itself. Set the oven on microwave + grill mode at 600 power mark. In burst of 3 mins grill the okra for a total of 12 mins. Then remove the turn table onto the counter. Make sure you are placing it on the pot holder, else the hot glass might crack if the counter is cold or it touches water spilt on it. Now sprinkle some red chili powder and salt as per your liking. I needed 2 large pinches of salt and 4 pinches of red chili powder. Mix with a tong and place back the turntable into the oven and grill for another 3 mins.

    Remove into a serving bowl and let it cool a bit before you eat. Serve with dal-rice or chapati and tomato onion koshimbir gives it best company. This makes an awesome starter to go with drinks if you prefer it that way.

    Saturday, June 09, 2012

    Pull Apart Garlic Rolls


    Some pictures are so enticing that you are compelled to try that recipe. Nags, of  Edible Garden
    had got me with those Pull apart rolls. It took me time to actually try it out is all my fault. This recipe is a keeper and I am going to make it repeatedly.

    I am adding this recipe here to the Remake category, that stands for the recipes that I tried from other blogs and that have helped expand my repertoire, and what I did with the recipe. While I referred to Nags recipe, I doubled the measure of ingredients to serve a family of six. Now when I am writing this post I realized Suhaina of My Singapore Kitchen had originally made with the same measures as me. I however used only half the butter as Suhaina. I prefered to slather the garlic butter and sprinkle the cilantro before rolling up, just to give it more air to improve the layered effect with less butter. I get the yeast to bubble up before mixing with the dough as I use active dry yeast, its easier to mix a liquid than dry globules. This enable a homogenous proofing of the dough. To liven up the rolls further I added finely chopped green chilies.

    Thanks to both the cooks they turned out a hit with the family. Even before I could get a picture, 4 pieces were gone. These pictures are not just to tease you, go try them out, listen to me or you will regret.

    Ingredients

    For the bread
    3 cups Maida/ White flour
    1 cup water
    1 tablespoon active dry yeast (Blue bird brand)
    1 teaspoon salt
    2 tablespoons sugar
    2 tablespoons Olive oil

    For the Filling

    Garlic Butter
    15 to 20 cloves garlic chopped fine
    25 gms of Amul butter softened

    Mix together in a bowl to use later

    For the sprinkles inside

    1/2 cup chopped cilantro
    4 green chilies chopped fine

    For topping
    2 tablespoons sesame seeds

    Making the dough

    Warm about 1/2 cup of water just about warmer than body temp. Add a teaspoon of sugar and yeast to it. Leave it alone to froth for 10 mins.

    In a large bowl measure out the flour. Add the bubbly yeast. Add rest of the 1/2 cup water. Add the rest of the sugar and salt. Knead untill smooth and lump free. Include oil and knead again for 5 mins. Grease lightly a clean bowl with little oil, place the dough ball in it and leave it to rest until doubled and airy. Under tropical conditions it take anything from 30-45 mins.  

    Then sprinkle some flour on the counter and knead the proofed dough for 5 mins. Divide into four equal parts. Roll into balls and then roll out flat into 4 sheets in an elongate form like a rectangle. Do this one at a time. All sheets should be of the same size.

    Divide the garlic butter, the cilantro and chopped green chilies equally to be used in the 4 sheets.

    Spread the garlic butter. Sprinkle the green chilies and cilantro.This way we need less butter and still get lovely layers.

    Roll up tight and keep aside.

    In this fashion. Roll up all 4 sheets.


    Then place all the rolls parallel to each other horizontally. In case one of them is short roll further to elongate. All four should be same sized. Then cut into 3 inch parts like shown here. I got 20 rolls this way.


    Now cut side up, line the rolls in a baking tray. I used a 9X11 inch tray for this. Cover the tray with a cling film and let them proof for another 1 hr.

    Once the rolls double up they will fill up all the gaps. 

    Brush the doubled rolls with molten butter.

    Lastly top up with sesame seeds.

    Preheat the oven for 10 mins at 180 deg centigrade.

    Bake for 25 mins or a little more till the top is golden.  Pull out of the oven and lay it to cool. 

    No sooner you do that hands will reach out to grab a warm bite into these buttery pillowy  garlic rolls. Four of mine were gone in a swish and had to keep the rest away for a soup and rolls dinner that night.

    Recommending you must try.


    Wednesday, June 06, 2012

    Stuffed Apple Gourd

    Bharwan Tinday or Stuffed Apple Gourd

    Sumeet brought home Tinday or Apple gourd and I was like "What do I do with these?" 

    I have cooked Tinday just once while we were still in Blr. He then suggested the recipe of stuffed Tinday. He had tasted it at his friend Sardar Raj's home. It was made by Raj's Mom. I was daunted by that reference, obviously. How could I match a senior Sardarni's cooking skills, these women are awesome cooks. Plus stuffed Tinday is home turf for them as this vegetable is used abundantly by the people of Punjab.

    Now I was challenged by my bro. Based on what I knew, what goes into stuffing Karelas in Punjabi households I decided to use the same stuffing with some additional aromatic spices. Tinday or Apple gourd look like green tomatoes but are as bland as gourds can be. Yet these absorb a lot more flavour from the spices turning this recipe with a gourd into just something you may want to call a favorite.

    Take a look at what I did with the Tinday and tell me if it is Punjabi enough. Sumeet did like it a lot but avoided comparing my attempt with the Sardarni. Yeah many studies say younger siblings are diplomats ;)

    Well I liked it too and this is going to be made quite often now on.

    Ingredients

    1 kg Apple gourd/ Tinday / Dhemshe
    1/4 teaspoon asafoetida
    2 tablespoon oil to fry

    For the stuffing

    2 onions sliced thin
    2 teaspoon coriander powder
    1 teaspoon cumin powder
    1/2 teaspoon turmeric powder
    1 teaspoon red chili powder
    1 teaspoon dried mango powder
    1/2 teaspoon sauf / fennel powder
    1/2 teaspoon dried ginger powder / sonth
    1 cup chopped fresh cilantro
    salt to taste

    First the prep, Wash the Tinday and pat dry.

    Slice off the tops with the stem intact. Keep aside, we will use these to decorate the final dish.

    Peel the skins and with a spoon scoop out the centers. Save the centre flesh.

    Now lets prepare the masala. In a bowl add the thinly sliced onions, the chopped cilantro and all the lovely spice powders and salt. Mix gently.

    Chop up the scooped out center flesh that we saved above and mix into the masala. Fill the wells in the gourd with the masala. Pack more masala in by pressing down with your thumb.

    Now in a shallow frying pan arrange the Tinday. Drizzle the oil between the gourds. Cover and cook for 10 mins. Then if you have extra stuffing left sprinkle it over the gourds and add a cup of water around the gourds. Cover and cook till tender, about 15 mins.


    Once cooked remove the Tinday onto a platter and decorate them with the caps that we saved in the beginning. The family would want to grab the Stuffed Apple gourd as soon as it is served at the table.


    Sunday, June 03, 2012

    Growing Methi


    In Thal my Koli people are very fond of Methi or Fenugreek. They love it as a herb and even in their sweet, can't believe it read about it on Methiche Ladu! This influenced my likings a lot too. For me Barik Methi or Young methi is always associated with Thal, we would get those tiny herb bundles from only the village if someone was visiting us. It made a rare appearance in the Fort Market if the farmers from Vasai brought it to sell. It is considered quite exotic as it is not easily available. This herb is very delicate and has almost no shelf life. It is best used in half a day of harvesting. My father like a true Thal born Koli loves barik methi and I started growing it just for him. Growing methi is very easy. The real challenge is harvesting it and cleaning it before cooking.

    In my post on the beloved Barik Methi Moog Dal of Kolis from Thal I had talked about how my grand aunt grew methi. Though I follow almost the same steps I grow it on a semi soil medium. This may be useful for urban gardeners like me who have a limited space and resources.

    I grow methi is three stages 
    • Soaking
      1. Measure 1/4 to 1/2 cup methi/ fenugreek seeds.
      2. Add the seeds in a jar and cover with 4-5 inches of water above the seeds.
      3. Soak them in water overnight.
    • Sprouting
      1. Drain the soaked seeds into a basket or mesh.
      2. Let the sprouts come out a few cms.

    • Planting
      1. I use a big planter plate, 12 inches to grown Methi. It is just right in depth for Barik methi, as it will grow only 4-5 inches. When I need to grow big Methi I can use a deep pot or a crate with more growing media.
      2. Ensure there is a small hole in the bottom of the pot for draining excess water.
      3. Layer the bottom with an inch or two of coconut coir or hay. I had collected coconut coir from the coconuts used in my kitchen for the first time. The second time I used  the hay from the crate in which the mangoes were delivered.
      4. Fill up to the brim with planting soil upto 2-3 inch. The total growing media should be approx. 5 inches.
      5. Sprinkle the sprouts over the planting media.
      6. Sprinkle water to moisten the soil. Do this every day.
      7. Cover thinly with dry leaves/ saw dust /  or a wet muslin cloth to protect from birds picking the sprouts.
      8. Ensure enough sunlight, but not direct.
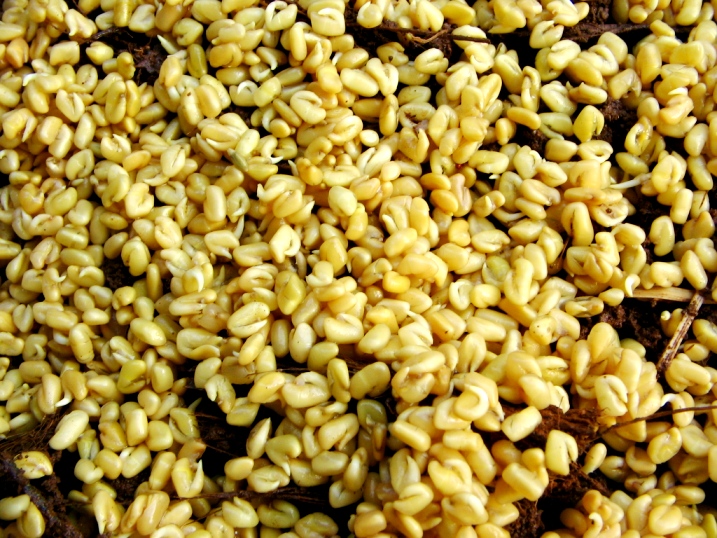
      9. In a week I got 5 inch tall Barik Methi.
    Tip: 
    Make sure you are not over watering the plant. This herb requires less water and a growing media with low water retention.

    Harvest : 
    Pluck the methi young and harvest the entire lot for single use if you are making a curry.


    Cleaning for Use:

    Pluck clumps of the methi and tie lightly with a thread. Wash off the soil thoroughly shaking off the grits. Do this 4-5 times to get rid of all the dirt. This cleaning is a very important step if you want to enjoy the pain of labour that you put in growing the methi.

    With 1/4 cup seeds you will get enough harvest for just spiking a curry with methi leaves. I made a Tomatochi Bhaaji and spiked it with Barik methi.

    With 1/2 cup seeds I got enough to make Barik Methi Moog Dal, it serves 4 generously. Felt so happy with the harvest and my recreation of my Aaji's recipe. This was a gift for my fave MJ Kaka last Sunday.
    Some uses:
    • Use for garnishing in salads, it gives nice crunch and a flavor of the robust herb.
    • Use my recipe of Barik Methi Moog Dal or create a recipe of your own and share it here.
    Note: Depending on your weather conditions, the time for soaking, sprouting and growing will vary hence I do not use Day 1, 2, 3 ...as a parameter to monitor my gardening. 

    This is 15 days old Methi (28th Oct 2012)

     1 month old methi

    I can't go to a farm to pick my food as I live in Mumbai so why not bring the farm into the kitchen!

    Saturday, June 02, 2012

    MaTha: It's Summer Time And When The Weather Is Not Fine


    The summers call for many drinks to cool the hot bodies. MaTha or herbed n spiced buttermilk is a sure way of quenching the parched throats.

    It's a much better drink than your sugar laden ones, I need not stress on that. MaTha tastes best when cooled in terracotta pots with the flavor of clay lending a nice aroma but unglazed terracotta is difficult to clean as it is porous so the next best thing are there ceramic tumblers. They don't lend the earthy taste but definitely take you straight into the lush green villages where the cool breeze blows and summer calls for sitting out on hand woven cots to beat the heat while everyone discusses life as it goes by at a snail's pace.

    MaTha is a lovely drink that refreshes you without giving you a sugar high yet the spices and herbs get your blood circulation going. I remember consuming bottles of MaTha when I used to visit Gujarat for work after sweating it out in the summer sun that blinded any one walking the Industrial areas.

    Ingredients

    1 cup thick curd
    water

    Masala

    few leaves of Pudina
    handful of cilantro
    1/4 green chili
    1 small knob of ginger, skin peeled
    couple of blades of Lemon grass (not traditional)
    salt to taste

    Crush to paste using mortar and pestle, all the masala ingredients except lemon grass. Use salt  to get the aromatic oils release faster.

    In a bowl beat the curd well, transfer to a bottle and make it to 1 litre by topping up with filtered water. Slip in the gently bruised lemon grass blades into the bottle. Don't crush lemon grass, the splitters will cause you to choke if you don't filter the liquid. Leave them whole and long so you can just pull out the lemon grass blades just before serving. Chill it for couple of hours.

    Before serving shake the bottle to mix well, remove the lemon grass blade then pour out the MaTha into the tumblers.

    Hand out to thirsty visitors and family members a chilled glass of MaTha and they will bless you for the welcome drink.

    The cool cover that makes our summers bearable, a look outside the window and I feel relief when I am at home and the sun is burning outside in the high skies, while the Gulmohar blazes on the earth...I am drifting into a slumber.

    Thursday, May 31, 2012

    Banana Walnut bread

    I made this Banana Walnut bread one day for an evening snack. Sapna was home early and she saw the banana bread cooling on the table. She yelped with joy. After brewing the tea and filling up the cups for everyone she perched herself on the swing, a teacup in one hand and a stick of the still warm banana walnut bread, nibbling slowly and lost in her own world. She made such a pretty picture. Touch wood.

    Back from her reverie she thanked me for this bake. In my mind I thanked God for family and allowing me to make them happy. Then followed her usual remark, "Pranav pahije hota" she obviously misses my foodie nephew whenever I bake.

    Ingredients

    • 2 large bananas 
    • 3/4 cup demerara sugar
    • 1/3 cup oil
    • 1 1/2 cups white flour/ maida
    • 2 teaspoon baking powder
    • 1/2 teaspoon salt
    • 1/2 cup walnuts
    Peel the bananas. Mash them in a bowl. Mix oil and sugar along with banana and beat till creamy and the sugar is dissolved. Add flour, baking powder and salt. Fold the batter with a spatula.

    Prepare the baking tin. Grease and dust with flour. Tap off the excess flour over the basin. Now crush the walnuts with the hand and sprinkle at the bottom of the baking tin. Pour the batter over it. Level it out evenly.

    Bake in a preheated oven at 180 deg centigrade for 15-20 mins till the knife inserted comes out clean or its golden on the top and leaves the sides of the tin.

    Remove from the oven, let it cool completely, then turn it out on a serving plate. I used a laminated paper banana leaf to serve it on.

    This Banana walnut bread is spongy and the oval shape lent itself well to cut out sticks, best for a delicate nibble.

    A cashew version of the Banana bread.

    Tuesday, May 29, 2012

    Corn N Peas Majjige Huli

    The buttermilk had gone sour and I had more than a litre of it. The family was complaining that we were eating too many dal-rice meals. Sumeet found wonderful corn and got them home. I thought of this non traditional majjige huli idea, here in Mumbai not everyone loves their gourds so this corn made succulent in the curry was a safe bet. To add more color I included peas too but those sat at the bottom and didn't really help to make it colorful unless they were scooped up with a spoon. Yeah but it did surprise the diners, when they did.

    Follow exactly the traditional recipe of Majjige HuLi With Mangalore Southekayi but instead of the cooking cucumber use corn on the cob, chopped into large chunks and add a cup of peas to the recipe.

    It's so much fun to suck on to the corn and if it is as sweet as we had it was a perfect match for the sour curd curry.

    Tip: In this curry I added the cilantro to the seasonings and it made a big difference to the flavors.

    Saturday, May 26, 2012

    Orange Marmalade


    I made this Orange marmalade in Jan while we were still in Blr. when oranges were in Season. I love the thick skinned oranges. In this recipe I have used Seville oranges which lend themselves wonderfully for a marmalade. I make marmalade without any gelatin so this is slightly runnier than store bought. It helps me achieve the home made feel that instantly family and friends spot. It is therefore more spreadable unlike the marmalade you get in the factory manufactured ones.

    Also my proportions of sugar are 3/4 cup of sugar for 1 orange plus juice of 1 orange. You get the most wonderful looking marmalade and the smell is divine on a hot toast or even a warm paratha like you see in the pictures. No spices for me in my orange marmalade please.

    Ingredients

    2 Seville Oranges
    Juice of 2 Oranges
    2 cups water
    1.5 cup sugar

    To begin cut into half horizontally, slice the oranges with skins on a V-slicer.

    In a deep pot put the orange slices and add water. It should cover the slices completely. Boil till the oranges are cooked and soft. 

    Add sugar when you can press the orange skins and they easily crumble. Once you add sugar the cooking will stop. This is very important, if you have uncooked skins in a marmalade, it is a failure. No one likes chewy skins. So doubly make sure the orange slices are cooked only then add the sugar. 

    Boil till the sugar syrup is thick. Add orange juice at this point. Keep stirring intermittently with a wooden spoon. Be careful while stirring, the sugar syrup splutters a lot. Once it starts coating the wooden spoon the marmalade is ready to be removed from heat. It will set as it cools.

    Once it is cool enough to handle, can the marmalade in glass jars. Keep a pretty jar on your table for your breakfast cravings of Orange Marmalade on toast or a methi paratha at dinner time.

    Thursday, May 24, 2012

    Bhoplyache Dhapate


    Most of the pumpkin was made into a huge pot of Bakar bhaaji when friends and cousins visited. I  had kept a wedge of pumpkin for raita but then on one Sunday morning hungry stomachs demanded a scrumptious breakfast. There was pumpkin and wheat flour and I thought a thalipith would sound music to the hungry ears. Then my Dad said but with just wheat flour you can't call it Thalipith, the purist that he is! He said make Dhapate.

    Now Dhapate are nothing but thick rotis made with veggies grated into it, mostly gourds like pumpkins, cucumbers and others. They are not Thalipith because they are made only with wheat flour instead of the toasted and coarse ground multi grain-multi lentil flour. Some people do mix flours of untoasted grains for some body.

    They get their name from the method of spreading them out. On a counter dusted with flour, the mix of veggies and flour is patted down into a thick roti. This sound and action of patting into shape is called Dhap-dhap and so these Marathi breads are called Dhapate - made with the Dhap dhap sound. For a neat non messy Dhapate do like I did below.

    Dhapate are always served with dry chutney powders like lasun chutney or peanut chutney and at times pickles are yummy accompaniments too.

    Pumpkin or Bhopla makes these Dhapate delicious. They can be made plain too for a quick one with just the masalas and no veggies at all. But take my word, the veggies make all the difference.

    Ingredients

    1 cup pumpkin
    1.5 cups Wheat flour
    1 teaspoon red chili powder
    1/2 teaspoon turmeric
    2 teaspoons sesame seeds
    1 teaspoon goda masala
    1 handful chopped cilantro
    1 green chili chopped.
    salt to taste
    Oil to shallow fry

    Mix all the ingredients in a bowl. Knead the dough. Never mind if it is sticky. Pinch off a small ball from the dough. Take a plastic sheet and spread it on it with your fingers. Now pick up the plastic sheet and turn it over into the non-stick fry pan, peel of the plastic sheet while you do that. From the sides add very little oil and roast.

    This is a pancake style recipe which should be crisp on the outside and soft on the inside. Serve piping hot with your favorite chutney or pickle with or without curd on the side.

    A steaming cup of tea to wash down is superb.

    Sunday, May 20, 2012

    Growing Pudina


    We have this beautiful pot of Mint or Pudina in Indian languages in one of our balconies. This one receives decent sunlight. Here is how my bro Sumeet planted it. He had got a big bunch of mint from the APMC market. Now note that the veggies and herbs that are sold in the APMC market travel atleast 100 kms before they reach the consumer, inspite  of that we got lucky and it grew beautifully.

    Here is the 1, 2 3...

    1. Take a pot, we used a 4 litre one. 
    2. Ensure there is a small hole in the bottom of the pot for draining excess water.
    3. Fill with planting soil upto 1 inch below the brim.
    4. Create holes in the soil at the top.
    5. Take cuttings of Pudina/ Mint, we used about just 4 or 5 cuttings which will stand on its own when stuck into the soil. Keep 3-4 leaves at the top for it to survive while it grows new roots on planting.
    6. Sprinkle water to moisten the soil. Do this every day.
    7. Ensure enough sunlight, but not direct. You can keep it under a larger plant for some shade.
    8. End of the month you will find more sprigs have come up and your pot is lush green.

    Tip: 
    Mint propagates with the help of rhizomes, it is a sterile plant so bears no seeds though you will see flowers. So to grow more Mint best is to provide it more space to grow.  

    Harvest : 
    Pluck sprigs when you require for garnishing. When you have a lot of mint snip off just the big leaves with a small scissor. Leave the stems in the pot. They will grow roots and leaves at the nodes.

    Some uses:

    • Use for garnishing
    • Make a chutney when you have a enough harvest.
    • Brew Mint tea.
    • Chew a few Mint leaves as medicine for getting rid of indigestion.
    • Make MaTha.

    Saturday, May 12, 2012

    Composting The Daily Dump Way

    What is that in my balcony?

    Guess what? my balcony is A Green Balcony, and that is a new label on this blog. My bro S loves growing stuff. He has nurtured a few plants, we have a Brahma kamal, Peace Lilies, Hibiscus and Tulsi in the decorative category and for the kitchen he grows Lemon Grass and Mint. I am helping him expand the green  in our home but I will focus on growing something for the kitchen. In the upcoming posts I will share both my bro's and my experience on growing our greens in our balcony in this Metro.

    This post inaugurates the new category on this blog. As our little balconies become green, we need to sustain them with compost and other care. We are also committing ourselves to Upcycling the waste generated by our busy Kitchen.

    What you see in the picture above is called a Khamba, I purchased it from the Daily Dump clone in Sion, Mumbai just today. I am so happy to have this composting unit in my home. It consists of 3 large Terracotta pots of about 15 liters capacity each. The pot that sits on the floor is the one with a bottom. The other 2 pots are bottomless. They just have a rope grid in the bottom, as you see in the pics below. The middle and top pots are used for dumping the daily waste from the kitchen.

    It's set up in my balcony at the further most end leaning against the wall for good support. Here is how I started it up. 


    Step 1: Filled half of the bottom pot with dried leaves.

    Step 2: Put the empty middle pot above it. Notice the rope grid on the inside.

    Step 3: Placed the 3rd pot on the top. It has the same rope grid, as the second on the inside. Covered it with a sheet of news paper.

    Step 4: Added some dry leaves, to form a bed for the wet waste from the kitchen.


    Step 5: Then added the wet waste from the kitchen, peels, used tea leaves, wasted food etc. Plastic should not be added, not even in traces. In my home we have separate bins for wet waste and dry waste (papers, plastic, glass etc.)

    Step 6: Sprinkled 2 tablespoons of the Compost Accelerator. Sprinkled some water.


    Step 7: Sprinkled 2 handfuls of sawdust on the pile. Covering the waste with saw dust avoids growth of maggots.

    Step 8: Need to sprinkle 3 tablespoons of Neem after 3 days, to keep the pile fit and free from harmful microbes and fungi.

    Step 9: Covered the pot with a lid.

    Now every day till the pot is full, we will repeat the step 5 and 7. 


    I will share with you the happenings in our Khamba as we go along on this journey of composting at home the Daily Dump way.


    These are the other accessories we got with the Khamba unit, a compost sieve (the pink basket), a short rake and a pair of gloves.

    Tuesday, May 08, 2012

    Dulce de leche and Remembering Jagan Baba


    My Ajoba that's my grand dad was a tyrant and that too with the entire village. Any woman passing our house and found not wearing kunku/ tikka would be stopped and questioned, did you eat? If the answer was in the affirmative he would ask, when you remember to eat why did you not remember to put a bindi? The era has gone by...

    There was yet another pet question he would ask young women just engaged for marriage, do you know how to boil a coconut? If the woman exposed her ignorance by saying never heard of such a thing, he would  smash the women with the most vicious words but if it was a smart woman and mocked him for asking that question then he would pat the woman's back and bless her.

    I remembered my grandpa today as I made this Dulce de leche. It is a dummy's recipe. As easy as boiling a coconut! 

    How to make 

    Just dump a sealed can of condensed milk in a pressure cooker with water up to 3/4 level of the can, close the lid and put the weight. Simmer. Time is what you watch here, ignore the whistles. I boiled it for 30 mins and got what you see, an almost toffee consistency. 

    Next time for a more pourable consistency and lighter shade will boil for just 15 mins.

    I used Amul Mithai Mate because it is easy to open by just tugging at the opener ring on the lid unlike Nestle's Milkmaid can which needs a can opener and if you don't have one then you will struggle to cut open the seal. Plus I prefer local products any day.

    Now I am looking for suggestion as to what I can make with it. Tarts are playing on my mind.


    Ajoba, narol ukadtan kinai mahit nai, pun condensed milk cha dabba mana ukadita yete :)
    Jagan baba where ever you are hope you found peace. (Death: 17th Dec 1985)

    (It's a message for my grand dad, "Not sure if coconuts can be boiled but I can boil a can of condensed milk)

    On Trail