Friday, May 09, 2014

Real Kala Khatta is Pink!


The pink is the final diluted drink, in the middle syrup plus ice, the last glass is the color of Jamun concentrate or Kala Khatta.

Want some Jamun?

This week Dad brought home Jamuns along with his regular fruit haul from the Nerul market. My first question was how much did they cost? Must be expensive? 

Yes in Mumbai they are expensive at Rs. 45 per 250 gms. So the day was about Jamuns eating them, staining the tongue with them. Posing with them for 365project and feeling impish about clicking the stained purple tongue for the day's submission. But better sense prevaled.

It was a day filled with memories of walking under the Coconut and Bettlenut shaded paths in Thal and going Jamun and Karvanda hunting with friends. They would be ripe and fallen below the tree, we did not even have to take the effort at throwing stones at the fruit to fell them. We would pick the fallen fruit carefully. Ensuring no insect had bitten it, a little smash is ok, infact it is desirable for a squishy fruit gauranteed sweet juiciness.

Then there were days of walking down with MJ Kaka to VT from home in Fort. Next to Canon Pav bhaaji there used to be a sarbat stall that did roaring business. (I think both  still are Mumbai landmarks!). They sold the best Kala khatta! The location was prime oppositive VT station along the Azad maidan. It mostly would be a reward for studying well and accompanying uncle to J B Petit library for a afternoon read. You guessed it right this 4 - 5 o'clock drink was Amrit for me.

Now the Kala khatta that I remember from childhood was from that cold drink shop or the one made from Rasna or that Rajput Kaki made with some magical potions at home and bottles of dark almost wine black concentrate would be stashed away in the fridge door. Here is a post that voices eloquently the past that we cherish about "I love you Rasna" and the girl with the Fountain ponytail. 

Cut now I dread anything artificial. So I decided to make the real Kala Khatta. I had Jamuns in hand and I was not going to let go this opportunity. Before summer ends you want to give it a try with me?

Ingredients

100gms Jamuns
400 gms sugar
2 limes
3 teaspoons pink salt
500 ml water

First wash the Jamun fruit. Put it in a deep sauce pan or cauldron. Add 500ml water to it. Boil till done on medium heat. The Jamuns will start disintegrating and the water will get a purple color from it.


Next add the sugar and boil till you get a sticky thick syrup and a darker shade of purple.

At this point add juice of two limes into the syrup, it will clarify. Add the pink salt and put off the heat, you do not want to loose the sulphorous smell and taste of the salt.

Let the syrup cool and then strain it thru a juice sieve or a coarse mesh. This should trap the seeds and skins from the jamun and seeds of lime too.

Fill in a clean jar and store in the fridge. Stays well upto 3-4 months. This is your concentrated Jamun syrup or Kala Khatta concentrate.

To serve

Fill glass with 1-2 tablespoons of concentrated Jamun syrup. Add as many ice cubes as you like and top up with water to fill the glass to a little below the brim.

(Note : pl. use the concentrate in the proportion you like to get the sweetness and saltiness of your choice. )

Stir n shake.  Lo! there you are, making your own real Kala Khatta. Suprise surprise it's pink!

Real fruit juice makes a big difference and it's not a big deal to make your own concentrates for this summer. Hope you will dump all those artificial packets and the convenience of 1-2-3 for your health's sake.

Tuesday, May 06, 2014

Onion Mushroom Masala and a Focaccia


The recipe is of Onion Mushroom Masala actually. I made a Focaccia with it that's just natural.

This lipsmacking bhaaji is purely addictive. I make this for the non veg loving members of my extended family when they visit. Invariable they have named it as stir fried Kalava che gole or Oysters in onion masala. Taut yet biteable and the koli masala makes it sublime. Whether it is Kalava or Mushroom eitherways its a hit.

Ingredients

1 pack fresh button mushrooms
2 large onions chopped lengthwise.
1 teaspoon Kolimasala.
1/4 teaspoon turmeric powder
salt to taste.
2 tablespoons oil

Heat a wok with oil in it. Add the onions and the mushrooms. Stir and fry till onions are transluscent. Add the Koli masala, turmeric and salt cover and cook for 5 mins. 

At this point stop cooking to use as topping for Focaccia. 

However if making it as a bhaaji, cook till onions are caramelized and you see the oil leaving the sides of the wok. 

This is a ideal side dish with a rice roti, steamed rice and dal or even to mop up with a soft Mumbai pav.

You can garnish it with chopped cilantro if you wish to add color.


To assemble the Focaccia:


Remove the second  tray of dough from the fridge and leave it come to normal temperature while you preheat the oven at 180 deg celcius.


While the oven gets ready, spread the Onion Mushroom Masala  evenly over the puffy cushion like dough. Press down lightly just to embedded the toppings a bit.

Thrust the tray in the hot oven and bake for 30 mins. Ensure there is no charring of the onions due to hot spots in the oven. Change dirrection if your oven has hotspots.

Remove from oven and serve once cooled enough to slice up about an hour.


This Focaccia tastes awesome both warm or cold. It does not really require a soup to go with it. It is super tasty on its own.

Make it for your guests and win a thumbs up from them between smiling mouthfuls.


Monday, May 05, 2014

Olive, Garlic, Chili and Thyme Focaccia


My nephew called up to tell me he was coming over to my place with his cousins and friends at night. Young adults are best to practice your art of cooking and feeding on. They clean up everythings that you make and you feel so nice to see no leftovers.

On this day I chose a simple menu of soup and 2 kinds of focaccia. Then just as a back up I also made Valachi Khichadi. You never want to run short of food with entusiatic youngsters around.

This is a lovely focaccia perfect with soup. It had a nice crunch and was full of flavors of garlic, thyme, chilli and olives.

It also meant a great chance to try the new powerful instant yeast that Apolina sent me with this friendship package. There is more that is coming up with the rest of the ingredients. Thank you!


Recipe reference: The Pioneer Woman

Ingredients

4 cups all purpose flour
1 teaspoons heaped instant yeast (Bruggenman)
1 teaspoon sugar
1.5 cups warm water
0.5 teaspoon salt
1/3 cup Olive oil
1/4 cup sliced olives

Toppings

1/2 teaspoon salt
2-3 tablespoons Olive oil
1/4 cup sliced olives
2 tablespoons dried thyme
2 tablespoons red chilli flakes
15 cloved garlic chopped


In a medium bowl measure out the warm water and add sugar to it. Sprinkle the yeast on top and leave it to bubble up for 10 mins.

On the counter measure out the flour. Make a well in it. Add the bubbly yeast liquid in the center. Mix well and knead to form a smooth dough. Add the olive oil and knead well to make a shiny smooth dough. Oil a large bowl and keep the dough to proof for atleast an hour or till it doubles. 

Meanwhile, drain 1/2 cup of sliced olives and blot them on a kitchen towel. 

This Bruggeman yeast is fantastic! The first proofing was thready airy and I'm surely loving it. 

Once the dough is doubled, turn it out on a lightly floured counter. Incorporate half of the sliced olives and knead with a light hand.

Divide the dough into 2 balls. 


Prepare two 9X11 baking trays. Put one ball in each and spread the dough on it. I let it rise the second time in the fridge so its Ok even if it looks really thinned out dough on the tray. It rose to a beautiful cushion by morning and ready to be baked.

After spreading the dough, for one tray top with Olives. Sprinkle the red chili flakes and the dried thyme, fresh would be really wonderful. Spread the chopped garlic evenly.

Now dimple the dough to create pockets for the oilve oil.

Drizzle the oilve oil. 

Sprinkle the salt.

Cover with cling film and keep it in the fridge overnight.

Save the other tray for another type of focaccia. Cover the flattened and dimpled dough with cling film and put it away in the fridge for proofing over night. Following in the second post...

I do this often to get a fresh baked bread on the next day. It gives me extra time to do other things when I am entertaining.

Next morning remove the trays and let them come to normal temperature for 10 mins till the oven preheats at 180 deg celcius. 

Bake for 30-35 mins.

This turned out a nice crunchy focaccia not to mention it looked pretty too.

Thursday, May 01, 2014

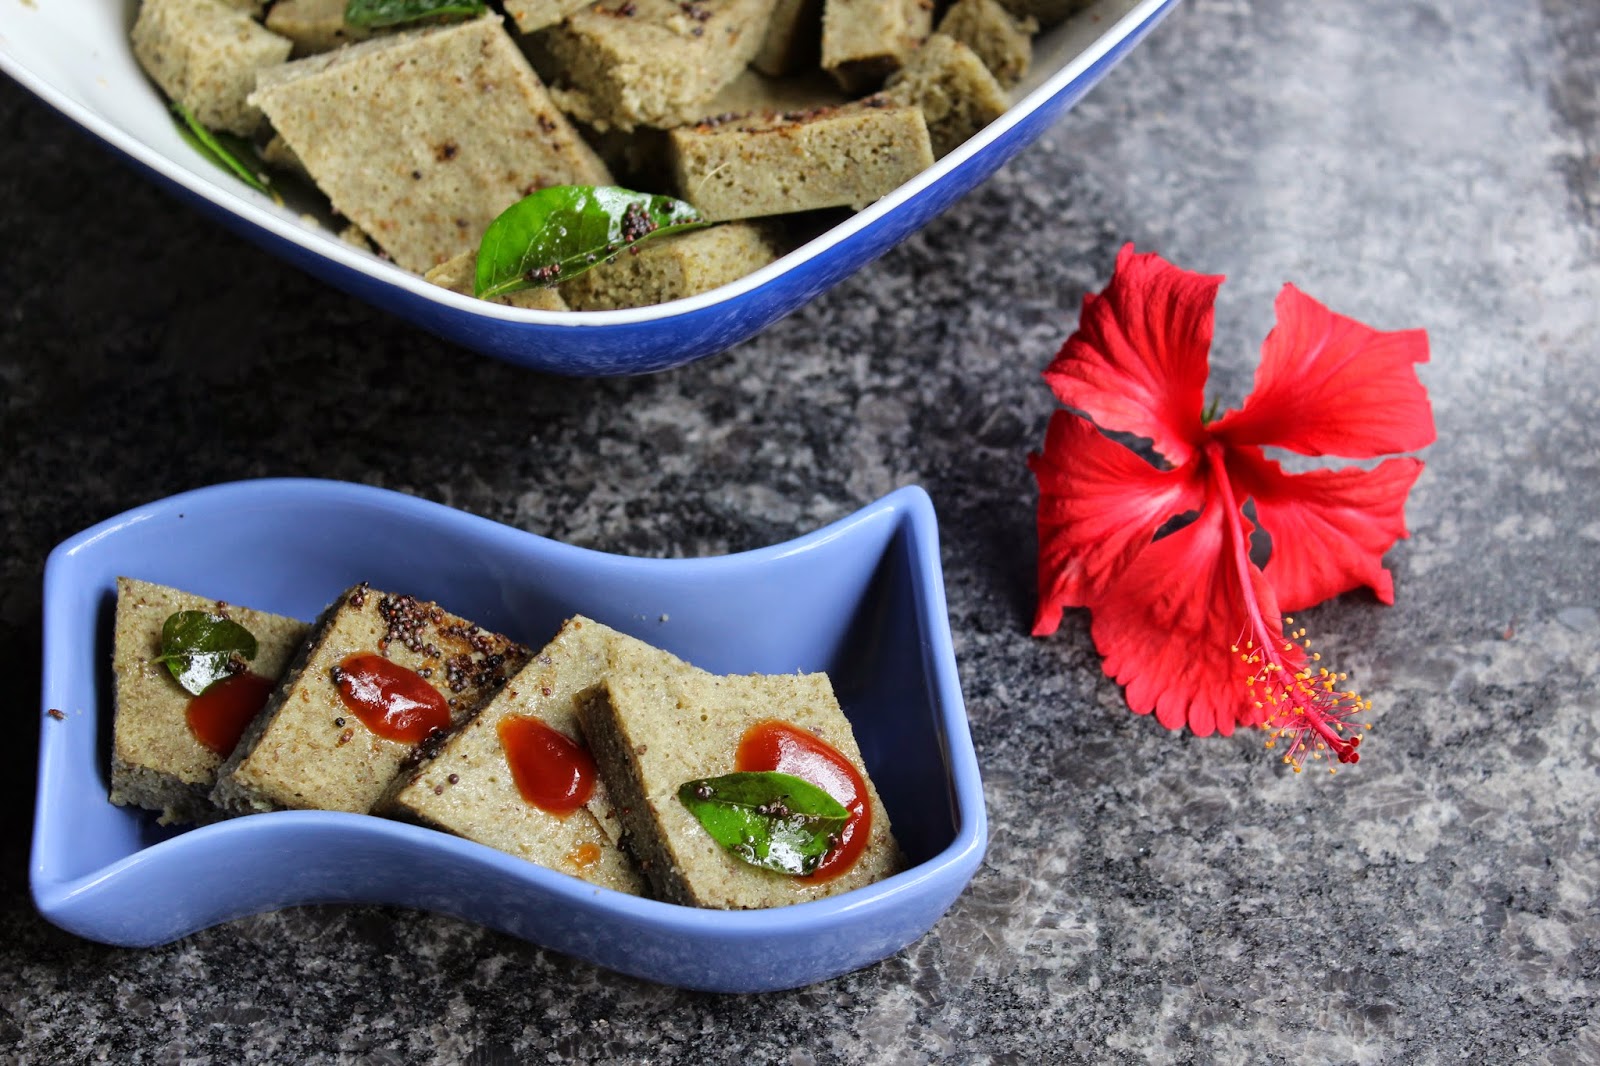
Green Moong Dal Dhokla


The green skinned moong dal is something I love unconditionally. I love pesarattu and I love moogache ladoo. At times I make this dhokla. It has a good amount of fibre and is nutritious. It takes a little bit of planning to make it as the dal needs to be soaked, just a few hours.

I think you must have it on your healthy food list. 

Ingredients

1 cup green skinned split moong dal
1 large pinch soda bicarb
salt to taste.
0.5 teaspoon ginger 
0.5 teaspoon green chili paste

For the seasoning

1 tablespoon oil 
1 teaspoon mustard seeds
few curry leaves
2-3 green chilies
1/2 teaspoon asafoetida

Preparation

Wash and soak the green skinned split moong dal in water. The water level should be more than the dal. Soak atleast for 3-4 hours.

Once soaked, drain the dal and grind to fine paste using minimum water. The green skins may loosen but that is fine, do not discard. Grind along with the skins.

Next add salt and green chili and ginger paste. Add a large pinch of soda bicarb. Mix well. 

Prepare the steaming plates, grease them with oil. Pour the batter about 1/2 inch thickness in a single plate.

Steam in pressure cooker for 20 mins.

Cool completely. Cut up into diamond shapes. 

Prepare the seasoning. Heat oil in a tempering spoon. Add mustard and splutter it. Follow in with asafoetida and curry leaves. Put off the heat. Sprinkle a table spoon of water on the seasoning. With a spoon sprinkle the seasoning over the steamed dhokla.

Toss the dhokla to give a nice coat of the seasoning.

Serve while still warm with ketchup or dry peanut chutney.


Thursday, April 24, 2014

Gor Papdi


Flash back to the days in Fort, there is a Jalaram Bappa and Ambe Mata temple in the building opposite my home. The bhajan is in full swing, me standing at the window and sticking out my head as a kid and there is a promise of Gor papdi prasad. Dad warns not go down at night. So I tell Ji, my grand old neighbor that if she goes down to the temple to get prasad for me. I tell Bharat to keep prasad for me. Ensure I get atleast one pudi of prasad (wrapped in newspaper).

Next morning we go to the temple and the potbellied pujari hands me a packet. Thrilled to bits I rush up and nibble the small piece. Then Ji asks if I want the prasad and I happily nod a yes. Bharat too ensures he drops in prasad at my home along with the milk bottle he drops everyday.

At another time Mom is discussing what to make as travel snacks for us to take on our yearly trip to Ganagapur-Akalkot-Gondavale and Kaki, Rajput suggests that we make khari puri and Gor papdi. So the two of them decide it would be made in the afternoon. Kaki would teach my Mom.

I would be pottering around and listening to Kaki's stories of travel. This image of gor papdi tied up in a cloth potli has stayed in my mind. Of the travelers eating it under the tree and drinking water from a kamandalu.


Flash forward to now. For our family trip to Gondavale besides many other things I made Gor papdi. This traditional sweet is made from pantry staples and gets done in less than 30 mins.

Ingredients

1 cup whole wheat flour
1/2 cup ghee
1/2 jaggery
1/8 cup water
5-6 cardamoms 
2-3 tablespoons poppy seeds

(This recipe can be doubled or tripled in all proportions very easily. I used 3 cups of wheat flour for the tray of gor papdi you see in the pics.)

First grease a plate and keep it ready.

In a kadhai heat ghee, once molten add the wheat flour slowly to it. Keep mixing and stirring till the wheat flour is browned and smells nutty. 

Meanwhile separately in a saucepan add the water and jaggery and heat till it dissolves completely. 

Pour the jaggery liquid into the ghee roasted wheat flour. At this point use the seeds of cardamom after crushing them. Stir till it starts leaving the sides of the kadhai and forms a mass at the center. About 5-6 mins.

Now transfer the mass onto the greased plate. Even it out with a katori. Sprinkle poppy seeds. Level it well. Let it set a bit and then cut up into pieces. Let it cool completely.

Once cooled pack it into a box. It stays fresh for 15 days. 

That's a healthy and nutritious snack for you better when you travel excellent for hikking trekking trips.


Sunday, April 20, 2014

Kancheepuram Idli


Like a reader commented on FB, I am here with another 'divine recipe'.

I have recieved the Kacheepuram idli as prasad on couple of occassion. This variation in idli I have eaten was the Rava idli with a tadka, called as Kancheepuram idli. Only after tasting the real temple prasad did I know the difference. However recieving it as prasad meant I got the idli after 1-2 days in transit so not as a fresh one. I wasn't really impressed but then when you have a whole lot of Tamil friends saying praises of the Lord Varadarajaperumal and the idli offered as prasad then your curiosity peaks. 

The Sitemeter on this blog brings in loads of info and insights. One such was this link to an old article in The Hindu that explored Tamil Nadu and finally attempted to decode the Kancheepuram idli.

Of the recipes on that link I refered to the original temple recipe and since it did not mention the amount of Urad Dal I used my own experience from the memory of the taste to arrive at the quantity. This temple recipe is for a very large quantity in kilos so I have adapted it for cooking at home. I have gone for 2:1 ratio for Rice and Urad dal.

SRI VARADARAJAPERUMAL TEMPLE RECIPE
(To make 10 idlis)
IngredientsRaw rice 2kg, Urad dhal kg, Methi 25gm, Pepper 100gm, Jeera 100gm, Dry ginger 100gm,Asafoetida, Curry leaves, Ghee 800gm, Salt
Method: Soak the rice, urad dhal and methi for an hour. Grind to a rough consistency. Add salt and leave overnight. In the morning, add pepper, jeera, dry ginger, asafoetida (all without tempering), sautéd curry leaves and ghee. Mix well and cook. It takes about an hour to cook.
At home, in a cooker it may take only 15 minutes. Place pieces of mandharai leaves on the idli tray and then pour the batter.
I don't know what are Mandharai leaves. Hope you readers can enlighten me.


My Recipe 

2 cups Raw rice 
1 cup Urad dhal 
1/ 4 teaspoon Methi 
1 tablespoon Peppercorns
1 tablespoon cumin seeds
1 tablespoon Dry ginger powder
1/ 2 teaspoon Asafoetida
1/2 cup Curry leaves
1 tablespoon Ghee
Salt to taste


Soak the rice and dal together along with methi for 1 hour. Grind to coarseness with enough water. Add salt and let it frement overnight.

The next morning. Crush the peppercorns and add to fermented batter. Add the raw cumin seeds, dry ginger powder, asafoetida into the batter.  Now temper the curryleaves in ghee and add the batter. Mix well. 

Oil plates and pour the spiced batter into the plates. Steam for 15-20 mins in the cooker. 

Demold. Cut up into quarters and serve with an array of chutneys. I made two, coconut cilantro and a tomato chutney to serve on my plate.

Sunday, April 13, 2014

' The Aamti ' from Gondavale


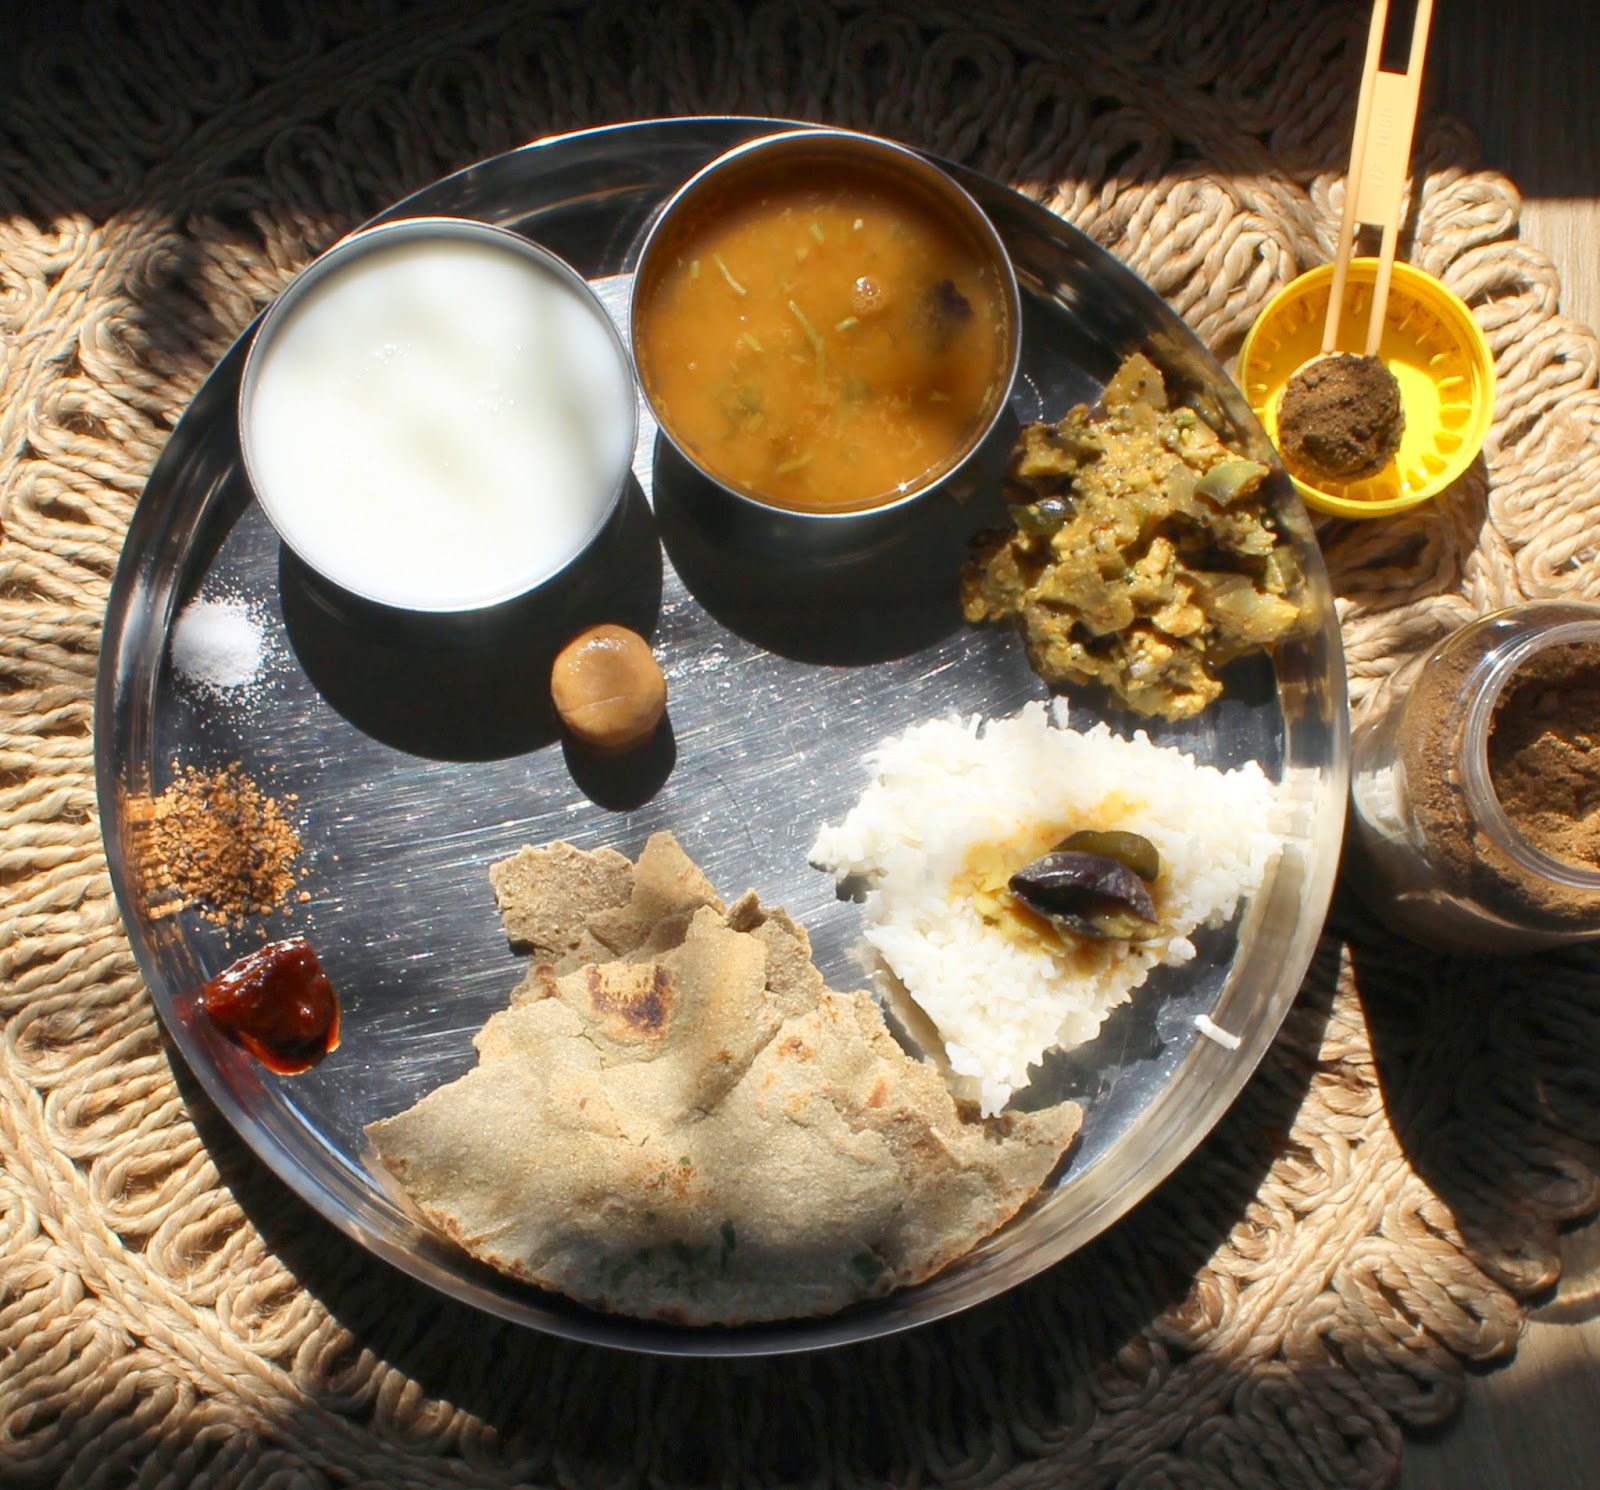
A typical meal at Gondavale temple would be Bajarichi Bhakari, Bhaat, Brinjals with crushed peanuts, Aamti, buttermilk, salt on the side, Khuraasnichi chutney, Spicy lime pickle. The Kandi peda in the middle is a Satara special that is offered at the temple.


Gondavale is where my family's faith lies. It is a small sleepy village that comes to life only when there are certain festive days like Ram Navami, Gurupournima, Shree Gondavalekar Maharaj's punyatithi etc.

Shree Gondavalekar Maharaj is the saint who was born there and in his life time he helped people find the love of God through chanting the divine name. He propogated the "Shree Ram Jai Ram Jai Jai Ram" mantra. Today there is a Samadhi Mandir and a trust that manages it. Read more about it on my travel blog, Swachchanda.


Shree's family was the Kulkarni of Gondavale. In his times whenever there was drought he would start some project in the village and provide food to the villagers. Most times it would be a Bajarichi Bhakari with spicy aamti. This aamti continues to be made in the Kitchens of Gondavale Sansthan and is served to 1000s of pilgrims every day along with the meal. There are many stories of miracles that people narrate on consuming the aamti. That is people's strong faith. We love the aamti so much that when we were kids we would drink dron-ful / Leaf cups full of it, guzzle it up when the volunteers came towards us to serve.

It is much later that we started making this aamti at home when we decoded the ingredients and were able to source the special blend of Goda masala from Gondavale itself.

This Gondavale Masala as we like to call is available on my E-shop. It is a fragrant masala and has a satvic taste that it imparts to the food. It can be used for curries and Masale bhaat but the best use is in this aamti. The sweet, tangy spicy aamti can liven up a simple meal. 


Not only the devotees and pilgrims who have tasted it but also many who have heard about it would like to have it decoded. While temple recipes never taste the same at home for two reasons, one the mass proportions in which it is made and above all the blessings of the Lord!

Yet I am trying to put down a recipe that I feel is very close to the original and that I make often in my own kitchen. 

Ingredients

1 cup cooked dal
4-5 kokum or 1/8 cup tamarind pulp
2 teapsoon oil
1/2 teaspoon mustard
1 tablespoon Gondavale Goda Masala
1/2 teaspoon red chili powder
1/2 teaspoon turmeric powder
1/2 teaspoon asafoetida
2 green chilies slit
1 sprig of curry leaves
2- 3 tablespoons crushed jaggery
salt to taste
handful of cilantro for garnish

Heat a deep pan add oil and splutter mustard seeds in it. Add the asafoetida, follow in with the curry leaves and slit green chilies. Shake the pan around to avoid charring of the phodni / seasonings.

Now add the cooked dal to it. Add the spices red chilli powder, turmeric powder and don't forget the Gondavale Goda Masala. Top up with water, the aamti at Gondavale is very thin and watery. You may want it slightly thick so adjust the water to your liking. 

Churn the dal with a Ravi/ beater. This helps thicken it and liquidize the dal. 

Once the dal looks well blended and is boiling rapidly, reduce the heat. At this stage add the kokum or tamarind pulp and jaggery. Let it simmer for 5 mins after adding salt. Dress up the aamti with fine chopped  fresh cilantro.

Serve steaming hot. Drink it up. Mix with rice and toop/ ghee or crumble a stale bhakri and slurp it up!


Wednesday, April 09, 2014

Mango Chilly


Ever since I sourced Mango pulp for my E-shop I have not missed Mango through the year. It is available for me to use when I want and in whatever I want without much thought. That does not mean I do not enjoy the fresh fruit. The fruit will be enjoyed soon now is time it will start flooding the market. Until then I have my mango pulp.

Today I am sharing this lovely cooler that I made. Did you note the pun in the name, its Mango with chilli and served chilled!

A sip and you feel the sweet taste at the tip of your tongue, as the swig progresses on to the middle of your palate you taste the hints of salt and the lime. Then the chili hits the back of the throat and you hold the glass at eye level to say...hummmm...good stuff!

That's the kind of a drink it is, and ready in just 10 mins.

Ingredients

For a single drink

3 tablespoons Mango pulp
1 tablespoon sugar
1 small pinch red chilli powder
1 large pinch pink salt/ rock salt
1/4 teaspoon red chili flakes
1/2 a lime
150 ml water
6-7 ice cubes

for decoration
1 red dried chili 
a sprig of mint 
wood skewer


In a drink shaker or a jar with a tight lid add the sugar, red chilli powder, pink or rock salt, chili flakes and water. Squeeze half lime into it. Shake shake shake till the sugar and salt dissolve completely. Add the mango pulp to it and shake well again. 

Pour out into a serving glass, I used a large tumbler. Top with ice cubes. 

Dress up the drink: On a wood skewer fix a chili and poke in the sprig of mint into it. Insert the decoration into the drink filled glass.

Enjoy sipping on it as you relax in your chair and look far away into to the  hot summer afternoon.

This Mango Chilly is excellent to entertain. Serve it up with Gol gappas. Let people dip the puffed up puris into their tumblers and enjoy the pani puri shots!


P.S: Will update the pani puri shots pic when I have a beautiful model for it. Yesterday I made it the 5th time again for family after we returned home from a 3 day trip into the country. It was an ideal hot summer treat after the entire day on the heated express way.

Sunday, April 06, 2014

Gulkand Kulfi


Kulfi, Kulfi-yo~~ 

That was the call of the Kulfiwala. Every summer night he would roam the backstreets of the Fort, Mumbai that went silent after all the commercial activities closed and the locals would find their peace and go down for a walk and the boys and men gathered to chat at the street corners.

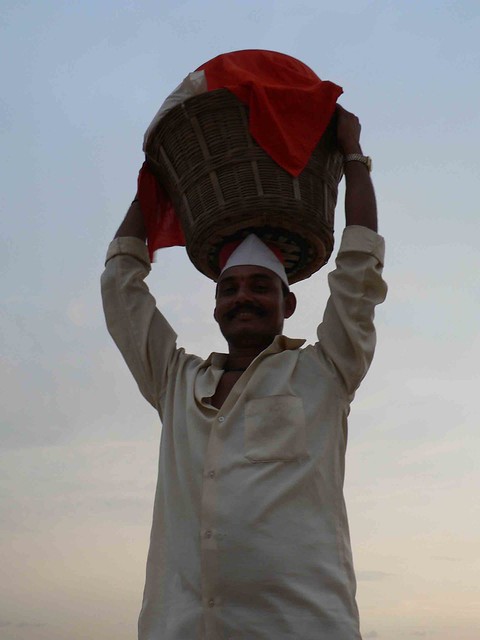
We as kids would go running to window and call out to the Kulfiwala, "Bhaiya upar aana" calling him up to our third floor home. There would be much excitement as he would climb the stairs and we would keep the change ready. He would put down the huge basket which nestled the large urn or matka on to the floor. The urn would be filled with salt and ice to keep the kulfi frozen. It would then be covered with a red cloth which he ensure was always wet to retain the chill. Barely would he have settled the basket down and each one of us would demand our own flavours, Malai, Kesar pista, Pista. These were the basic 3 flavors he carried. The Malai kulfi tasted the best. Simple with no artificialness. Then he'd pick out one kulfi mould cone and rub it between his palms to loosen the set kulfi inside and pop it out on a leaf, cutting it up into bite sized pieces. There was never a time when we did not lick up the last bits of kulfi from the leaf!

The Gulkand kulfi is a more sophisticated version that I had never tasted on the streets but in a fancy restaraunt. Any kulfi is pure joy but Gulkand kulfi is romance of the flavors of boiled down milk and rose petals. It transports you into the era of the Mughals. They who brought to India the Persian influences, the use of rose in cooking and what better way than in a Indian cool treat.

You will find many recipes of Kulfi across the internet and in books that include corn flour as a thickner or other modern adaptation of a quick fix recipe using condensed milk from a can. However I choose to go the traditional way. Making Kulfi is a love affair you cannot rush thru it. It is just not the same, it has to be done slowly and over time. I prefer to do it over two days savoring every stage of the making as much as letting the sublime flavors melt in the mouth with every morsel.

A great Gulkand kulfi need two things, full fat milk and good quality rose petal jam that gives the name "Gulkand".


First let me explain to you what is Gulkand after all. When the roses are blooming, the best are picked, cleaned and petals are separated. Then in a glass jar the petals are layered with sugar and suncooked. The suncooking pales the bright red color of rose petals but the sweet smell is encapsulated by the sugar and you get a lovely jam. You can make your own jam at home with this method if you have access to organically grown roses. Gulkand boasts of wonderful ayurvedic properties and it's best know for its cooling effect on the human body. It is either consumed as is in spoonfuls or had mixed in the daily glass of milk in the summer months. 

Stay away from anything that is bright red on dark pink colored and labeled as Gulkand. It would without doubt have artificial food color. A good Gulkand in kulfi lends a creamy shade to the kulfi. I succumbed to the pressure of making it colored to give it a rosy look as the name suggest the use of roses so I used a little bit rose syrup, yes the pink colored liquid from a good brand but I could have avoided it easily.

Are you ready to enjoy the wonderous art of making Kulfi with me?

Lets begin...

Ingredients

3 litres Full fat Milk
100 gms Gulkand
25 ml Kalverts rose syrup (skip this if you do not want the rose tinge)
100 gms sugar
10 cardamom pods

Day 1:

Pour milk in a large thick bottom vessel. Boil it and reduce the quantity to about half the amount. It takes about 1 hour on the smallest burner and on simmer. Ensure you are stirring intermittenly and the milk is not charring at the bottom. If it does there is nothing that can be fixed as it will smell burnt and affect the taste too. So stay close. 

Once the milk is reduced add the sugar. Now remove some milk into a different pot and mix the gulkand and Kalvert syrup into it. The pic below shows the steps and the difference in colors at every stage. Pour back the Gulkand mix into the reduced milk pot. Let it simmer for 10 mins. Peel the cardamom pods and separate the seeds. Add the seeds to the thickened milk and give a stir to distribute evenly.

Put off the gas and allow it to cool completely. I generally do this at night after I finish cooking and in a clean work area so there is no chance of any other flavors or smells affecting the purity of milk. Never do it parallely with other activity else its easy to spoil milk.


Day 2. 

In clean kulfi moulds fill to 3/4 capacity the cooled thickened milk, sugar and gulkand mix. I filled 6 kulfi moulds and the rest I put in 2 plastic containers. Chill for a 24hrs in the deep freezer. You can check in 2hrs if set completely and you are in a hurry to serve it. 

Serving

Each kulfi mould can be rubbed between the palm to warm up and then demoulded into a serving dish. It can be cut up into bitsized pieces or left whole.

To demould the kulfi from the pastic contains just dip them in warm water and invert on to a plate. Them slice up into roundels. Serve a slice on a nice plate.

So you see Kulfi making takes time but it has just 4-5 ingredients that make this cool treat a lasting memory.

Note: For a plain malai kulfi you need to skip the gulkand and instead increase the amount of sugar to your taste. Once you have the basic kulfi play around with flavors, colors textures using saffron, fruits and nuts.

Wednesday, April 02, 2014

ANZAC Biscuits


I started out on daily photo sharing on 365project.org though I haven't been very regular and am yet to try something exceptional with the camera. I am learning and will get there. What's nice is I have new friends with common interests. Rosie posted a pic of Anzac biscuits while she was baking and they looked so lovely that I almost complusively requested her for the recipe. She mentioned they are an Aussie favorite and has something to do with WWI.

(This teaset is my Aai's I used it more than she did. There are just two cups and saucers left now while the teapot, sugar pot and the milk pot are all in perfect condition)

I got curious and reading...

It's interesting that large no. of the innovations almost always have their beginnings in the military or atleast related in some way. The ANZAC or Australian and New Zealand Army Corps lends its name to these biscuits, because these were sent by the military wives to soldiers during the World War I. These biscuits transported well thru the Navy and had a good shelf life. They became commercially popular too later on. Even today these are made as a fundraiser item. 

The Anzac biscuit caught my fancy even more when I got to know that it is an eggless recipe right from the original times. When it was common to use eggs in biscuits and cookies the eggs found no use in these. That gave these biscuits their extra shelf life. It is said there was a shortage of eggs during the world war so skipping the eggs made it economical too. Mind you and you cannot call these cookies. The Australian and New Zealand law protect both the recipe and the name. You cannot change both. They are therefore the ANZAC Biscuits!

Ingredients

1 1/4 cups plain flour, sifted
1 cup rolled oats
1/2 cup caster sugar
3/4 cup desiccated coconut
2 tablespoons golden syrup or treacle (I used honey)
150g unsalted butter, chopped
1/2 teaspoon soda bicarb

Preheated the oven to 180°C. Measured out the flour, oats, sugar and coconut in a large bowl and gave it a stir to mix. I used desicated coconut powder this time, another time will try flakes for more texture.

In a cup microwaved the butter for 30secs and slowly blended in the honey and zapped it up for another 30 secs. I used honey this time next time I might use Jaggery syrup or molasses.

Mixed the soda bicarb with 1 1/2 tablespoons water and added to the liquid mixture while still hot. While it bubbled up kept stirring together. Poured it into the dry ingredients and mixed together until fully combined. Rolled tablespoonfuls of mixture into balls, flattened slightly and placed on baking trays lined with Al foil. Baked for 15 minutes till golden brown.

These biscuits are nice and chewy on the edges and deliciously crumbly in the centre.

You get about 24 biscuits of 2 inches size with the above proportions.


Inviting my 365project friends Rosie n Chris over for a virtual tea with this post and lots of conversation about our worlds.

Thank you Rosie for the recipe! I've already made them twice one small batch with your proportions and this one was 4X.

Monday, March 31, 2014

Sev Barfi or Singhar Ji Mithai


गुढी पाडव्याच्या हार्दिक शुभेच्या !

Does it matter if I post a Sindhi sweet recipe on a Marathi New year? Would it taste different if I tell you I made it in Diwali and am posting it now? 


No, naa. Then here is the recipe. You have one more sweet recipe to try at home.

Since I spent the first few years of my life in Colaba where besides the Kolis the Sindhis have their base, I grew up feasting on a lot of sweets from the famed Sindhi Mithaiwalas, whether it was Kailash Parbat or Chandu halwai. Then 20 years later Jhama's had us swearing with the hot samosas, juicy jelabis and a lot lot more. The sev barfi was brought home as an odd time treat, never for the religious rituals or naivedya. For the naivedya it has to be pure milk based sweets and this sev barfi had chana atta in the form of sev so was meant only for human consumption.

I don't know what made me think I cannot make it at home. Then I chanced on Alka Keswani's Sindhi Rasoi it sounded so easy so how could I not give it a try. During Diwali I was visiting friends when I made it as gifts for them and packed it into pretty boxes. It definitely is an uncommon sweet and people love the little surprise of a sweet made from sev. 

The key to making it successfully is laying your hands on Feeka sev! That's salt free Sev. The sev is usually savoury snack or topping that goes on the chaats but for this sweet the regular sev will not work.

Again I got lucky to  get Feeka Sev at Jhama's itself and I bought it on stealth lest my Dad who was with me asked me to dump it and buy the ready made Singhar Ji Mithai instead. That would have been easier but a blogger never takes it easy when it comes to food gifts, what say?

So there I was loaded with a kg of Sev and I mean that's a lot. I was home and in the kitchen boiling sugar syrup to make my own Sev barfi. I doubled the quantities as I need a large batch to be given to 3 families. I used vanilla and dropped the food color. My barfi was richer with more mawa.

Ingredients

500 gms Feeka Sev
750 gms mawa
500gms sugar
3 cups water
1 teaspoon vanilla extract
Cashews and almonds for decoration
5-6 cardamoms peeled, seeds separated

In a saucepan measure out the water and add sugar to it. Boil it till sugar dissolves. Add the vanilla extract.

Keep a greased tray ready.

Add the sev to it and stir to mix. Break the mawa into chunks but don't crumble it. Add it into the sev and sugar mix. Stir to even out. 


Transfer the mix into the tray. Level it out. Score the barfi. 

Chop the almonds and split the cashews, decorate as shown or just the way you like. Sprinkle the separated cardamom seeds over the top.

I do not use Varakh or silver foil. Its a choice I make, here is why?

Friday, March 28, 2014

Shahi Makhana


Hi!

It's been a month since the last post so it calls for a special one. Here I am with a recipe of a restaraunt style dish.

We move on to this celebration worthy recipe of Shahi Makhana that you are eagerly waiting for. The gravy is familiar but the Makhana in it is unusual you think, just give it a try and you will tell me you love it.

Ingredients

1 cup Makhana
2 large onions chopped lenghtwise
3-4 medium tomatoes
1/4 cup cashew nuts
2 tablespoon oil
1 teaspoon garam masala
1/2 teaspoon Kashmiri chili powder
1/4 teaspoon turmeric powder
1 teaspoon coriander powder
salt to taste
handful of chopped cilantro

In a kadhai heat the oil, fry the onions to transluscent. Chop the tomatoes and add to the onions. Cook till tomatoes are mushy. Let it cool.

Remove the fried onions and tomatoes into a wet grinder. Add the cashew nuts in along with the spices. Blend to get a paste. Use a little bit of water to grind. Keep aside.


Now toast the Makhana on heat till crisp. Pour in the ground masala paste. Adjust water to a consistency you like. A thick gravy is the best. Finally add salt and cilantro and bring it to a boil. 
This Shahi Makhana pairs well with a crisp Naan/ Kulcha or Punjabi Roti and its lipsmacking with jeera rice or a veg pulao.

There that's my balti of Shahi Makhana, what are you waiting for pick up the ladle and take a dig.


Saturday, March 01, 2014

Fig and Ricotta Pizza and Tomato Black Olive Mozarella Pizza


I was looking at my label for Pizza and realized I do not post too many pizza recipes and I do not eat too many pizzas anymore. Yes like everyone else my generation I was hooked to all those Pizza brands but one that I most loved was Sicillian. It was a small outlet in our cafeteria at work and they knew how to really bake the pizza base and the topping perfectly this while others used readymade pizza bases.

Recently I was browsing thru two recipe books actually I was just enjoying the pictures when I spotted a recipe for a thin crust dough. I just need to try it and it was so good I though I'd share it with you here.

We, that's Dad and me insist on crisp pizzas, limp will not do for us. So this recipe looked promising. Also I decided to try new toppings along with a standard veggie pizza of Tomato and black olives, dependable as it is.

Ingredients

For the dough (Reference: The Taj Magazine)

100 gms flour
1.5 tablespoons olive oil
salt to taste
1/4 teaspoon yeast
40 ml water

In the magazine all it says is knead the pizza dough and roll it out into a round base. Put on pizza tray.

However here is what I do from my experience of making pizza doughs.

Warm the water for 15 secs in the microwave. Add yeast and sprinkle some flour over it. Let it bloom for 10 mins. Now in a bowl measure out the flour. Slowly add the bubbled yeast liquid into the flour and bring it together in a ball. On a counter place 1/4 teaspoon salt and pour the 1.5 tablespoons olive oil over it. Now remove the dough on the counter and knead together with salt and olive oil for 5 mins. Make a smooth ball and divide into 2 portions.

Roll out the dough into two bases. I made one 8 inch base and another rectangular base.  Line the baking trays with foil if needed and place the base in it. Some trays do not have textured surface and it is tough to clean so I always line with foil.


Toppings for Pizza I

2 Sweet fresh figs sliced
1 cup Ricotta cheese, mine is homemade
2 pinches dried Thyme
2 pinches dried chili flakes
1/8 cup Balsamic vinegar

Bake the pizza base at 300 deg celcius for 15 mins. Remove from oven and sprinkle ricotta cheese. Place the fig slices over the ricotta. Drizzle the balsamic vinegar over. Sprinkle the thyme and follow in with chilli flakes. You can either put it into the oven for another 10 mins, till the ricotta bubbles or eat it straight once topped. 

The flavours of this pizza are amazing. Its not your everyday pizza and we loved it with the standard tomato black olive pizza. One was a main the other a wonderful dessert pizza!


Toppings for Pizza II

1/4 cup tomato sauce
1/2 cup grated mozarella and processed cheese mix
2 tomatoes sliced
a handful of olives sliced
2 teaspoons Itallian herbs
1 teaspoon dried chili flakes

On the second pizza base spread the tomato sauce, top it with cheese. Lay the tomato slices and spread evenly the olive slices. Dust with mixed Itallian herbs and chili flakes. 

Bake the pizza at 300 deg celsius for 20 mins or till desired crispness.

Enjoy the two pizzas!


On Trail